IOC控制反转与DI依赖注入
# 1、第一个案例:HelloSpring
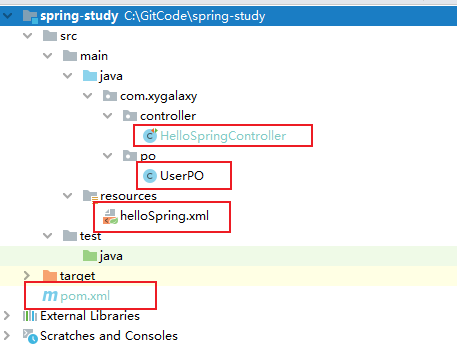
项目结构
# 1.1、新建maven项目
创建项目 
配置项目信息 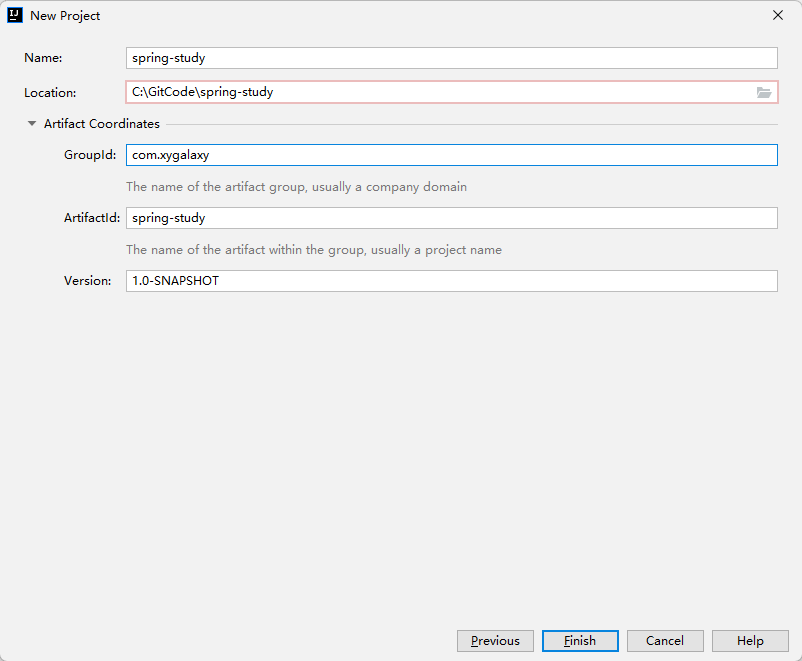
# 1.2、pom配置文件增加依赖
版本有问题可以到Maven官网找:Maven官网 (opens new window)
<dependencies>
    <!--  spring Context 上下文模块  -->
    <dependency>
        <groupId>org.springframework</groupId>
        <artifactId>spring-context</artifactId>
        <version>5.3.9</version>
    </dependency>
    <dependency>
        <groupId>org.projectlombok</groupId>
        <artifactId>lombok</artifactId>
        <version>1.18.24</version>
        <scope>provided</scope>
    </dependency>
    <!--   测试   -->
    <dependency>
        <groupId>junit</groupId>
        <artifactId>junit</artifactId>
        <version>4.12</version>
    </dependency>
</dependencies>
2
3
4
5
6
7
8
9
10
11
12
13
14
15
16
17
18
19
20
# 1.3、创建UserPO类
package com.xygalaxy.po;

import lombok.Data;


/**
 * @ClassName UserPO
 * @Description 用户实体
 */
@Data
public class UserPO {

    /**
     * id
     */
    private String id;

    /**
     * 姓名
     */
    private String name;

    /**
     * 年龄
     */
    private String age;

    /**
     * 性别
     */
    private String sex;

}
2
3
4
5
6
7
8
9
10
11
12
13
14
15
16
17
18
19
20
21
22
23
24
25
26
27
28
29
30
31
32
33
# 1.4、增加helloSpring.xml
<?xml version="1.0" encoding="UTF-8"?>
<beans xmlns="http://www.springframework.org/schema/beans"
       xmlns:xsi="http://www.w3.org/2001/XMLSchema-instance"
       xsi:schemaLocation="http://www.springframework.org/schema/beans
    http://www.springframework.org/schema/beans/spring-beans.xsd">
    <!--告诉spring创建对象
        声明bean,告诉spring要创建哪个类的对象
        id:对象的自定义名称,自己给对象起个名
        class:类的全限定名称(不能是接口)
    -->
    <!-- 一个Bean 声明一个对象 -->
    <bean id="userPo" class="com.xygalaxy.po.UserPO">
        <property name="id" value="02"/>
        <property name="name" value="xygalaxy"/>
        <property name="age" value="18"/>
        <property name="sex" value="男"/>
    </bean>
</beans>
2
3
4
5
6
7
8
9
10
11
12
13
14
15
16
17
18
# 1.5、创建测试类
import com.xygalaxy.po.UserPO;
import org.junit.Test;
import org.springframework.context.support.ClassPathXmlApplicationContext;

/**
 * @ClassName HelloSpring
 * @Description 测试
 */
public class HelloSpringController {

    @Test
    public void testHelloSpring1(){
        /**
         * 以往通过new创建对象并set方式赋值过程
         */
        UserPO userPo = new UserPO();
        userPo.setId("01");
        userPo.setName("星云系");
        userPo.setAge("2");
        userPo.setSex("男");

        System.out.println(userPo);
        // UserPO(id=01, name=星云系, age=2, sex=男)
    }


    @Test
    public void testHelloSpring2(){
        ApplicationContext ac = new ClassPathXmlApplicationContext("helloSpring.xml");

        UserPO userPo = (UserPO) ac.getBean("userPo");

        System.out.println(userPo);
        // UserPO(id=02, name=xygalaxy, age=18, sex=男)
    }
}
2
3
4
5
6
7
8
9
10
11
12
13
14
15
16
17
18
19
20
21
22
23
24
25
26
27
28
29
30
31
32
33
34
35
36
# 1.6、案例总结
- 这是一个非常简单的案例,就是简单的创建User对象,并且赋值。
- 第一种方式:我们通过
new创建对象,并set赋值的方式,然后打印结果正常显示。 - 第二种方式:我们获取Spring的
ApplicationContext(Context上下文),然后从IOC容器中获取Bean的方式创建User对象,然后打印结果正常显示。 - 第二种方式我们配置了Bean配置文件
helloSpring.xml,并加入了userPo的Bean,给userPo配置赋值了,这一步就是将userPo这个Bean给Spring的IOC容器管理。 - 使用的时候,我们就直接在Spring的容器中获取就可以了。
# 2、IOC理解
# 2.1、IOC是什么?
IOC(Inversion of Control)即:控制反转,不是一种技术,是一种设计思想。
控制反转的理解
- 把对象的创建,赋值,管理工作都交给代码之外的容器实现,也就是对象的创建是有其他的外部资源来完成的。
- 控制是指控制对象的创建、对象的属性赋值、对象之间的依赖关系管理。
- 反转是指把控制权交给容器,也就是把对象交给容器来管理。用容器代替开发人员的管理、创建、赋值等。
- 正转是指开发人员使用new创建对象,用set方法设置属性,通过手动实现依赖关系管理。
- 控制反转理解起来就是:容器代替了开发人员对于对象的创建、赋值、依赖关系管理。
Spring中IOC的理解
- Spring把管理的对象叫做Bean,即由开发人员管理Bean转变为Spring管理Bean,这就是Spring的控制反转(IOC)。
- Spring把这些管理的Bean放到容器中,这容器即:IOC容器(IOC Container)。
- Spring管理Bean是通过配置的方式来实现的,Spring提供了三种Bean配置方式:基于XML的配置方式、基于Java的配置方式、基于注解的配置方式。
- Spring管理了Bean,就必然要管理Bean的整个生命周期。
- 程序从IOC容器中获取Bean,并注入到程序中使用,这个过程就是依赖注入(DI)。所以说控制反转是通过依赖注入实现的。即:IOC是设计思想,DI是实现方式。
- 依赖注入的方式也有三种:setter方式、构造器注入、注解注入。
# 2.2、Spring Bean是什么?
Spring Bean是一个由Spring框架管理的Java对象。在Spring应用程序中,Bean是一个由IOC容器创建、组装和管理的对象。
# 2.3、DI是什么?
DI(Dependency Injection)即:依赖注入,是IOC思想实现的一种方式。
# 2.4、IOC和DI的关系
IOC是设计思想,DI是实现方式。
# 2.5、为什么使用IOC?
- 对象的管理更加松散
- 解耦合
- 减少对代码的改动,也能实现不同的功能
# 3、Bean的三种装配方式
Bean的自动装配
- 自动装配是spring满足bean依赖一种方式。
- Spring会在上下文中自动寻找,并自动给bean装配属性。
Bean的装配的方式有三种
- 基于XML的配置方式
- 基于Java的配置方式
- 基于注解的配置方式
Bean自动装配策略
- ByName自动装配
- ByType自动装配
# 3.1、Bean装配策略
Bean装配策略是指在Spring在上下文中自动寻找到Bean的方式。
- Bean自动装配策略分类
- ByName自动装配
- ByType自动装配
- ByName自动装配
ByName的时候,需要保证所有bean的id唯一 ,并且这个bean需要和自动注入的属性的set方法的值一致。
<?xml version="1.0" encoding="UTF-8"?>
<beans xmlns="http://www.springframework.org/schema/beans"
       xmlns:xsi="http://www.w3.org/2001/XMLSchema-instance"
       xsi:schemaLocation="http://www.springframework.org/schema/beans
    http://www.springframework.org/schema/beans/spring-beans.xsd">
    <!-- autowire="byName" 可以省略 -->
    <bean id="userPo" class="com.xygalaxy.po.UserPO" autowire="byName">

    </bean>
</beans>
2
3
4
5
6
7
8
9
10
- ByType自动装配
ByType的时候,需要保证所有bean的class唯一 ,并且这个bean需要和自动注入的属性的类型一致;全局唯一,id属性可以省略。这里class就是该bean的属性类型
<?xml version="1.0" encoding="UTF-8"?>
<beans xmlns="http://www.springframework.org/schema/beans"
       xmlns:xsi="http://www.w3.org/2001/XMLSchema-instance"
       xsi:schemaLocation="http://www.springframework.org/schema/beans
    http://www.springframework.org/schema/beans/spring-beans.xsd">
    <!-- id="userPo" 可以省略 -->
    <bean id="userPo" class="com.xygalaxy.po.UserPO" autowire="byType">

    </bean>
</beans>
2
3
4
5
6
7
8
9
10
# 3.2、基于XML的配置方式
顾名思义,就是将bean的信息配置.xml文件里,通过Spring加载文件为我们创建bean。
我们在第一个案例
HelloSpring中就是通过这种配置XML的方式,配置了一个Bean告诉Spring的IOC容器。
- 优点:可以使用于任何场景,结构清晰,通俗易懂。
- 缺点:配置繁琐,不易维护,枯燥无味,扩展性差。
案例
- 创建一个xxx.xml文件
- 声明beans空间,并配置bean
<?xml version="1.0" encoding="UTF-8"?>
<beans xmlns="http://www.springframework.org/schema/beans"
       xmlns:xsi="http://www.w3.org/2001/XMLSchema-instance"
       xsi:schemaLocation="http://www.springframework.org/schema/beans
    http://www.springframework.org/schema/beans/spring-beans.xsd">
    <!--告诉spring创建对象
        声明bean,告诉spring要创建哪个类的对象
        id:对象的自定义名称,自己给对象起个名
        class:类的全限定名称(不能是接口)
    -->
    <!-- 一个Bean 声明一个对象 -->
    <bean id="userPo" class="com.xygalaxy.po.UserPO">
        <property name="id" value="02"/>
        <property name="name" value="xygalaxy"/>
        <property name="age" value="18"/>
        <property name="sex" value="男"/>
    </bean>
</beans>
2
3
4
5
6
7
8
9
10
11
12
13
14
15
16
17
18
# 3.3、基于Java的配置方式
采用纯Java方式,将类的创建和配置交给我们配置的JavcConfig类来完成。Spring框架则负责管理和维护这些类。这种方式的本质是将之前在XML配置文件中声明的配置转移到Java配置类中。
- 优点:适用于任何场景,配置方便,因为是纯Java代码,扩展性高,十分灵活。
- 缺点:由于是采用Java类的方式,声明不明显,如果大量配置,可读性比较差。
案例
- 创建一个配置类,加上注解@Configuration,声明该类为配置类(告诉Spring这是配置类)。
- 创建一个方法返回创建的对象,并在该方法加上@Bean注解,声明这是一个Bean。
- 通过
AnnotationConfigApplicationContext读取配置类,获取Bean。
import com.xygalaxy.po.UserPO;
import org.springframework.context.annotation.Bean;
import org.springframework.context.annotation.Configuration;

/**
 * @ClassName HelloSpringConfig
 * @Description spring配置类
 */
@Configuration
public class HelloSpringConfig {

    @Bean("helloUserPo")
    public UserPO getUserPO(){
        UserPO userPO = new UserPO();
        userPO.setId("1");
        userPO.setName("张三");
        userPO.setAge("20");
        userPO.setSex("男");
        return userPO;
    }

}

// 测试
@Test
public void testHelloSpring3(){
    ApplicationContext ac = new AnnotationConfigApplicationContext(HelloSpringConfig.class);

    UserPO userPo = (UserPO) ac.getBean("helloUserPo");

    System.out.println(userPo);
    // UserPO(id=1, name=张三, age=20, sex=男)
}
2
3
4
5
6
7
8
9
10
11
12
13
14
15
16
17
18
19
20
21
22
23
24
25
26
27
28
29
30
31
32
33
# 3.4、基于注解的配置方式
通过在类中添加注解,我们可以声明一个类由Spring进行管理。Spring会自自动搜索带有@Component,@Controller,@Service,@Repository四个注解的类,然后为我们创造并管理它们。前提是我们需要先配置Spring的注解扫描器,通过@ComponentScan配置注解扫描。
- 优点:开发便捷,通俗易懂,方便维护。
- 缺点:具有局限性,对于一些第三方资源,无法添加注解。只能采用XML或JavaConfig的方式配置
案例
- 首先我们增加一个配置类,用于配置扫描器,让Spring扫描po这个包下的所有注解
- 给UserPO类添加@Component注解,声明这个类直接给Spring管理。
- 测试获取UserPo的Bean对象。
增加一个配置类,用于配置扫描器,让Spring扫描po这个包下的所有注解
import org.springframework.context.annotation.ComponentScan;
import org.springframework.context.annotation.Configuration;

/**
 * @ClassName HelloSpringScanConfig
 * @Description 声明配置类,并扫描指定包
 */
@Configuration
@ComponentScan("com.xygalaxy.po")
public class HelloSpringScanConfig {

}
2
3
4
5
6
7
8
9
10
11
12
UserPO类添加@Component注解,声明这个类直接给Spring管理。
import lombok.Data;
import org.springframework.stereotype.Component;

/**
 * @ClassName UserPO
 * @Description 用户实体
 */
@Data
@Component
public class UserPO {

    /**
     * id
     */
    private String id;

    /**
     * 姓名
     */
    private String name;

    /**
     * 年龄
     */
    private String age;

    /**
     * 性别
     */
    private String sex;

}
2
3
4
5
6
7
8
9
10
11
12
13
14
15
16
17
18
19
20
21
22
23
24
25
26
27
28
29
30
31
32
测试获取UserPo的Bean对象。
@Test
public void testHelloSpring4(){
    ApplicationContext ac = new AnnotationConfigApplicationContext(HelloSpringScanConfig.class);

    UserPO userPo = (UserPO) ac.getBean("userPO");

    System.out.println(userPo);
    // UserPO(id=null, name=null, age=null, sex=null)
}
2
3
4
5
6
7
8
9
因为我们只是在UserPO实体类上加了@Component注解,只是声明这个类为Bean,给IOC管理,并未赋值操作,所以这里的值都是null。
@Component,@Controller,@Service,@Repository这几个注解的区别和用法
- @Component:
- @Component是一个通用的注解,表示该类被标注为一个Spring管理的Bean,并且可以作为一个通用的组件被注入和使用。
- 在使用@Component注解标注类时,默认的Bean名称是类名的首字母小写,可以使用@Bean注解的name属性来自定义Bean名称。
- @Controller:
- @Controller注解用于标注控制层的Bean,即MVC模式中的控制器。
- 通常用于处理HTTP请求、响应和路由控制等功能。
- @Controller注解通常与@RequestMapping注解一起使用,用于指定请求的URL映射。
- @Service:
- @Service注解用于标注服务层的Bean,即用于标识业务逻辑的组件。
- 主要用于标识业务逻辑的处理,如事务管理、数据处理等。
- @Service注解通常与@Autowired注解一起使用,用于自动注入依赖的其他Bean。
- @Repository:
- @Repository注解用于标注数据访问层(DAO)的Bean。
- 主要用于标识数据访问相关的类,如数据存取、数据库操作等。
- 与@Service注解一样,@Repository注解通常与@Autowired注解一起使用,用于自动注入依赖的其他Bean。
# 4、依赖注入的三种方式
DI(依赖注入)是创建对象,并给属性赋值,注入就是赋值的意思。
我们前面有个注解方式配置bean,打印的结果都是null,是因为只创建了对象,并没有给属性赋值,DI会在创建的对象后并赋值。
能够注入的数据
- 基本类型和String
- 其他bean类型(在配置文件中或者注解配置过的bean)
- 复杂类型/集合类型
注入的方式
- 使用setter方式注入
- 使用构造器注入
- 使用注解注入
# 4.1、setter方式
顾名思义,就是在类中提供需要注入成员的 set 方法。
在XML配置方式中,property都是setter方式注入。通过property标签给指定属性赋值。
<bean id="userPo" class="com.xygalaxy.po.UserPO">
    <property name="id" value="02"/>
    <property name="name" value="xygalaxy"/>
    <property name="age" value="18"/>
    <property name="sex" value="男"/>
</bean>
2
3
4
5
6
property标签中的属性
- name:用于指定注入时所调用的set方法名称
- value:用于提供基本类型和String类型的数据
- ref:用于指定其他的bean类型数据。它指的就是在spring的Ioc核心容器中出现过的bean对象。
# 4.2、构造器注入
顾名思义,就是使用类中的构造函数,给成员变量赋值。
通过构造方法进行自动注入,spring会匹配与构造方法参数类型一致的bean进行注入,如果有一个多参数的构造方法,一个只有一个参数的构造方法,在容器中查找到多个匹配多参数构造方法的bean,那么spring会优先将bean注入到多参数的构造方法中。
在XML配置方式中,<constructor-arg>是通过构造函数参数注入
<!--默认构造器方式-->
<bean id="user" class="com.xygalaxy.po.UserPO">
  <property name="name" value="张三"/>
</bean>

<!--通过有参构造创建对象。方式一:下标赋值-->
<bean id="user" class="com.xygalaxy.po.UserPO">
  <constructor-arg index="0" value="jerry"/>
</bean>

<!--通过有参构造创建对象。方式二:类型创建,不建议使用-->
<bean id="user" class="com.xygalaxy.po.UserPO">
  <constructor-arg type="java.lang.String" value="jarry"/>
</bean>

<!--通过有参构造创建对象。方式三:通过参数名,推荐使用-->
<bean id="user" class="com.xygalaxy.po.UserPO">
  <constructor-arg name="name" value="jarry"/>
  <constructor-arg name="birthday" ref="now"/>
</bean>
<!-- 配置一个日期对象 -->
<bean id="now" class="java.util.Date"></bean>
2
3
4
5
6
7
8
9
10
11
12
13
14
15
16
17
18
19
20
21
22
constructor-arg标签中的属性
- type:用于指定要注入的数据的数据类型,该数据类型也是构造函数中某个或某些参数的类型。
- index:用于指定要注入的数据给构造函数中指定索引位置的参数赋值。索引的位置是从0开始。
- name:用于指定给构造函数中指定名称的参数赋值。
- value:用于提供基本类型和String类型的数据
- ref:用于指定其他的bean类型数据。它指的就是在spring的Ioc核心容器中出现过的bean对象
# 4.3、注解注入
就是通过注解的方式进行赋值。
以@Autowired(自动注入)注解注入为例,修饰符有三个属性:Constructor,byType,byName。默认按照byType注入。
注入Service
// 将Service交给Spring容器管理
@Service
public class HelloSpringServiceImpl implements HelloSpringService {
}

// 通过@Autowired自动注入到helloSpringService中,就可以直接使用了
@Autowired
private HelloSpringServiceImpl helloSpringService;
2
3
4
5
6
7
8
# 4.4、其他一些属性注入
复杂类型的注入
<?xml version="1.0" encoding="UTF-8"?>
<beans xmlns="http://www.springframework.org/schema/beans"
       xmlns:xsi="http://www.w3.org/2001/XMLSchema-instance"
       xsi:schemaLocation="http://www.springframework.org/schema/beans
        https://www.springframework.org/schema/beans/spring-beans.xsd">

    <bean id="person" class="com.xygalaxy.UserPo">
        <property name="name" value="zhangsan"/>
        <property name="age" value="12"/>
    </bean>

    <bean id="student" class="com.kang.pojo.Student">
        <!--普通值注入,value:具体属性值-->
        <property name="name" value="jerry"/>

        <!--Bean注入,ref:对象-->
        <property name="person" ref="person"/>

        <!--数组注入-->
        <property name="arr">
            <array>
                <value>AAA</value>
                <value>BBB</value>
                <value>CCC</value>
            </array>
        </property>

        <!--List注入-->
        <property name="myList">
            <list>
                <value>111</value>
                <value>222</value>
                <value>333</value>
            </list>
        </property>

        <!--Map注入-->
        <property name="myMap">
            <map>
                <entry key="aaa" value="aaaa"></entry>
                <entry key="bbb" value="bbbb"></entry>
                <entry key="ccc" value="cccc"></entry>
            </map>
        </property>

        <!--Set注入-->
        <property name="mySet">
            <set>
                <value>111</value>
                <value>222</value>
                <value>333</value>
            </set>
        </property>

        <!--null注入-->
        <property name="wife">
            <null/>
        </property>

        <!--Properties注入-->
        <property name="myPro">
            <props>
                <prop key="aaa">aaaa</prop>
                <prop key="bbb">bbbb</prop>
                <prop key="ccc">cccc</prop>
            </props>
        </property>
    </bean>
</beans>
2
3
4
5
6
7
8
9
10
11
12
13
14
15
16
17
18
19
20
21
22
23
24
25
26
27
28
29
30
31
32
33
34
35
36
37
38
39
40
41
42
43
44
45
46
47
48
49
50
51
52
53
54
55
56
57
58
59
60
61
62
63
64
65
66
67
68
69
p、c命名空间注入
<?xml version="1.0" encoding="UTF-8"?>
<beans xmlns="http://www.springframework.org/schema/beans"
       xmlns:xsi="http://www.w3.org/2001/XMLSchema-instance"
       xmlns:p="http://www.springframework.org/schema/p"
       xmlns:c="http://www.springframework.org/schema/c"
       xsi:schemaLocation="http://www.springframework.org/schema/beans
        https://www.springframework.org/schema/beans/spring-beans.xsd">

    <!--p命名空间注入,可以直接注入属性的值:properties-->
    <bean id="user" class="com.xygalaxy.UserPo" p:name="jarry" p:age="15"/>

    <!--c命名空间注入,通过构造器注入:construct-args-->
    <bean id="user2" class="com.xygalaxy.UserPo" c:name="张三" c:age="18"/>
</beans>
2
3
4
5
6
7
8
9
10
11
12
13
14
Bean作用域(scope属性)
<!-- 单例模式(Spring默认的机制) -->
<bean id="helloSpringService" class="com.xygalaxy.service.HelloSpringService" scope="singleton"/>
<!-- 原型模式(多例模式) -->
<bean id="helloSpringService" class="com.xygalaxy.service.HelloSpringService" scope="prototype"/>
2
3
4
注解方式开启
@Scope("prototype")
还有一些其他Bean作用域方式可以了解下。
# 5、使用注解开发
# 5.1、组件定义注解
- @Component:组件,表示一个受Spring管理的组件,会被Spring容器扫描并注册到容器中。
- @Controller:控制器组件,用于标识一个Controller类,主要用于接收用户请求和返回结果。
- @Service:服务组件,用于标识一个Service类,主要用于编写业务逻辑。
- @Repository:数据仓库组件,用于标识一个DAO类,主要用于操作数据库。
# 5.2、依赖注入注解
- @Autowired:根据类型注入bean,如果同一类型存在多个bean,则会根据变量名来注入。
- @Qualifier:合格者的意思,和@Autowired配合使用,当同一类型存在多个bean时,根据名称选择注入哪个bean。
- @Resource:和@Autowired类似,也是用于自动注入,首先根据名称注入,如果名称没有匹配的,再根据类型注入。
- @Value:用于从配置文件、环境变量或其他地方获取值,并将其注入到对应的属性中。可以使用SpEL表达式或基本类型进行注入。示例:@Value("${my.property}")
- @Inject:使用方式与@Autowired类似,可以用于构造函数、Setter方法、成员变量等位置。
@Autowired、@Resource、@Inject的区别?
- @Autowired
// @Autowired注解源码
@Target({ElementType.CONSTRUCTOR, ElementType.METHOD, ElementType.PARAMETER, ElementType.FIELD, ElementType.ANNOTATION_TYPE})
@Retention(RetentionPolicy.RUNTIME)
@Documented
public @interface Autowired {
  boolean required() default true;
}

// 可见作用区域为如下:
@Target(ElementType.CONSTRUCTOR) #构造函数
@Target(ElementType.METHOD) #方法
@Target(ElementType.PARAMETER) #方法参数
@Target(ElementType.FIELD) #字段、枚举的常量
@Target(ElementType.ANNOTATION_TYPE) #注解
2
3
4
5
6
7
8
9
10
11
12
13
14
- @Autowired是Spring自带的注解,通过AutowiredAnnotationBeanPostProcessor 类实现的依赖注入
- @Autowired可以作用在CONSTRUCTOR、METHOD、PARAMETER、FIELD、ANNOTATION_TYPE
- @Autowired默认是根据类型(byType )进行自动装配的
- 如果有多个类型一样的Bean候选者,需要指定按照名称(byName )进行装配,则需要配合@Qualifier。
- 指定名称后,如果Spring IOC容器中没有对应的组件bean抛出NoSuchBeanDefinitionException。也可以将@Autowired中required配置为false,如果配置为false之后,当没有找到相应bean的时候,系统不会抛异常
首先根据类型获取,发现多个HelloDao,然后根据helloDao进行获取,如果要获取限定的其中一个候选者,结合@Qualifier进行注入。
@Autowired
@Qualifier("helloWorldDao")
private HelloDao helloDao;

// 使用@Qualifier 时候,如何设置的指定名称的Bean不存在,则会抛出异常,如果防止抛出异常,则可以
@Qualifier("xxxxyyyy")
@Autowired(required = false)
private HelloDao helloDao;
2
3
4
5
6
7
8
- @Resource
@Target({TYPE, FIELD, METHOD})
@Retention(RUNTIME)
public @interface Resource {
    String name() default "";
}

// 作用区域
@Target(ElementType.TYPE) #接口、类、枚举、注解
@Target(ElementType.FIELD) #字段、枚举的常量
@Target(ElementType.METHOD) #方法
2
3
4
5
6
7
8
9
10
- @Resource是JSR250规范的实现,在javax.annotation包下
- @Resource可以作用TYPE、FIELD、METHOD上
- @Resource是默认根据属性名称进行自动装配的,如果有多个类型一样的Bean候选者,则可以通过name进行指定进行注入
- name 的作用类似 @Qualifier
@Component
public class SuperMan {
    @Resource
    private Car car;
}
// 或者
@Component
public class SuperMan {
    @Resource(name = "BMW")
    private Car car;
}
2
3
4
5
6
7
8
9
10
11
- @Inject
@Target({ METHOD, CONSTRUCTOR, FIELD })
@Retention(RUNTIME)
@Documented
public @interface Inject {}

// 作用区域
@Target(ElementType.CONSTRUCTOR) #构造函数
@Target(ElementType.METHOD) #方法
@Target(ElementType.FIELD) #字段、枚举的常量
2
3
4
5
6
7
8
9
- @Inject是JSR330 (Dependency Injection for Java)中的规范,需要导入javax.inject.Inject jar包 ,才能实现注入
- @Inject可以作用CONSTRUCTOR、METHOD、FIELD上
- @Inject是根据类型进行自动装配的,如果需要按名称进行装配,则需要配合@Named
- @Named 的作用类似 @Qualifier
@Inject
private Car car;

@Inject
@Named("BMW")
private Car car;
2
3
4
5
6
@Autowired、@Resource、@Inject的区别小结
- @Autowired是Spring自带的,@Resource是JSR250规范实现的,@Inject是JSR330规范实现的
- @Autowired、@Inject用法基本一样,不同的是@Inject没有required属性
- @Autowired、@Inject是默认按照类型匹配的,@Resource是按照名称匹配的
- @Autowired如果需要按照名称匹配需要和@Qualifier一起使用,@Inject和@Named一起使用,@Resource则通过name进行指定
# 5.3、请求处理注解
- @RequestMapping:请求映射,用于将一个特定的请求映射到一个Handler(处理器)方法。
- @ResponseBody:表示方法返回值将直接写入HTTP response body中,而不是作为模板解析的一部分。
- @PathVariable:从URI模板中获取变量。
- @RequestParam:从请求参数中获取变量。
@PathVariable、@RequestParam的用法区别?
@RequestMapping("/example")
public String example(@RequestParam(value = "name", required = false) String name){...}

@RequestMapping("/example/{id}")
public String example(@PathVariable("id") int id){...}
2
3
4
5
# 5.4、配置与管理注解
- @Configuration:配置类,用于Java配置方式的Spring配置。
- @Bean:用在@Configuration类中的方法,表示创建一个bean。
- @Scope:用来设置bean的作用域,如prototype(原型),singleton(单例)等。
- @Profiles:表示当指定的profiles激活时,才会注册对应的bean。
- @ComponentScan:组件扫描,扫描指定的路径,把标记为@Component、@Controller、@Service、@Repository的类注册为bean。
- @Enablexxx:一类特殊的注解,用于开启某些特定的Spring功能。如@EnableTransactionManagement开启事务管理功能。
@Profiles作用
@Profile 在 Spring 中用于解决为特定的环境使用特定的配置的问题。例如,在开发环境、测试环境、生产环境中可能使用不同的数据库配置等。
@Configuration
public class DataSourceConfig {

  @Bean(name = "dataSource")
  @Profile("dev")
  public DataSource devDataSource() {
    // 创建并返回适用于开发环境的数据源
  }

  @Bean(name = "dataSource")
  @Profile("prod")
  public DataSource prodDataSource() {
    // 创建并返回适用于生产环境的数据源
  }
}
2
3
4
5
6
7
8
9
10
11
12
13
14
15
然后通过配置spring.profiles.active属性激活"dev"或"prod"配置。
# 5.5、其他注解
- @PostConstruct:用于标记一个方法,在Bean实例化后,依赖注入完成后,以及在将其放入服务之前调用。
- @PreDestroy:用于标记一个方法,在Bean被销毁之前调用。
# 6、IOC和DI的总结理解
控制反转就是将对象的控制权给Spring来管理的思想。依赖注入就是给对象或属性赋值。
- IOC(Inversion of Control)即:控制反转,不是一种技术,是一种设计思想。
- DI(Dependency Injection)即:依赖注入,是IOC思想实现的一种方式。
- Bean的三种自动装配方式:XML配置方式、Java配置方式、注解配置方式。
- 依赖注入的三种方式:setter方式、构造器注入、注解注入
- 使用注解的开发,对Spring注解基本熟悉。
Spring的基本流程
- 声明Bean给Spring容器,并自动装配好Bean。
- 给Bean依赖注入赋值。
- 从容器中获取Bean进行使用。