MyBatisPlus入门案例
半塘 2024/1/14 MyBatisPlus框架
- MyBatis-Plus强大的功能,配合SpringBoot框架,能够极致的简化我们配置及代码量,提高开发效率。本章将用SpringBoot来演示MyBatis-Plus的基本使用。
- MyBatisPlus-Study项目地址 (opens new window)
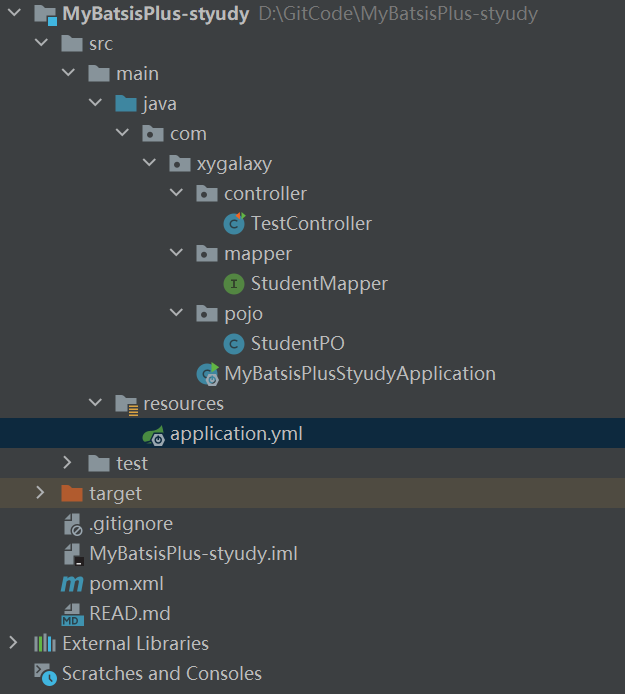
项目结构

# 1、数据库创建表
CREATE TABLE `student`
(
    id BIGINT NOT NULL COMMENT '主键ID',
    name VARCHAR(30) NULL DEFAULT NULL COMMENT '姓名',
    age INT NULL DEFAULT NULL COMMENT '年龄',
    email VARCHAR(50) NULL DEFAULT NULL COMMENT '邮箱',
    PRIMARY KEY (id)
);

INSERT INTO `student` (id, name, age, email) VALUES
(1, 'Jone', 18, 'test1@xygalaxy.com'),
(2, 'Jack', 20, 'test2@xygalaxy.com'),
(3, 'Tom', 28, 'test3@xygalaxy.com'),
(4, 'Sandy', 21, 'test4@xygalaxy.com'),
(5, 'Billie', 24, 'test5@xygalaxy.com');
1
2
3
4
5
6
7
8
9
10
11
12
13
14
15
2
3
4
5
6
7
8
9
10
11
12
13
14
15
# 2、创建SpringBoot项目
创建项目

# 3、新增依赖
注意MyBatisPlus有些版本和SpringBoot版本不兼容,本次演示版本如下:
- SpringBoot版本:3.1.7
- MyBatisPlus版本:3.5.5
- MySQL连接版本:5.1.34
- MySQL版本:5.7.44
<?xml version="1.0" encoding="UTF-8"?>
<project xmlns="http://maven.apache.org/POM/4.0.0" xmlns:xsi="http://www.w3.org/2001/XMLSchema-instance"
         xsi:schemaLocation="http://maven.apache.org/POM/4.0.0 https://maven.apache.org/xsd/maven-4.0.0.xsd">
    <modelVersion>4.0.0</modelVersion>
    <parent>
        <groupId>org.springframework.boot</groupId>
        <artifactId>spring-boot-starter-parent</artifactId>
        <version>3.1.7</version>
        <relativePath/> <!-- lookup parent from repository -->
    </parent>
    <groupId>com.xygalaxy</groupId>
    <artifactId>MyBatsisPlus-styudy</artifactId>
    <version>0.0.1-SNAPSHOT</version>
    <name>MyBatsisPlus-styudy</name>
    <description>MyBatsisPlus-styudy</description>
    <properties>
        <java.version>17</java.version>
    </properties>


    <dependencies>
        <!-- springboot依赖 -->
        <dependency>
            <groupId>org.springframework.boot</groupId>
            <artifactId>spring-boot-starter</artifactId>
        </dependency>
        <!-- springboot测试依赖 -->
        <dependency>
            <groupId>org.springframework.boot</groupId>
            <artifactId>spring-boot-starter-test</artifactId>
            <version>RELEASE</version>
            <scope>compile</scope>
        </dependency>

        <!-- MybatisPlus依赖 -->
        <dependency>
            <groupId>com.baomidou</groupId>
            <artifactId>mybatis-plus-boot-starter</artifactId>
            <version>3.5.5</version>
        </dependency>
        <!-- 连接数据库依赖 -->
        <dependency>
            <groupId>mysql</groupId>
            <artifactId>mysql-connector-java</artifactId>
            <version>5.1.34</version>
        </dependency>
        <!--  lombok简化实体  -->
        <dependency>
            <groupId>org.projectlombok</groupId>
            <artifactId>lombok</artifactId>
            <version>RELEASE</version>
            <scope>compile</scope>
        </dependency>
    </dependencies>

    <build>
        <plugins>
            <plugin>
                <groupId>org.springframework.boot</groupId>
                <artifactId>spring-boot-maven-plugin</artifactId>
            </plugin>
        </plugins>
    </build>

</project>
1
2
3
4
5
6
7
8
9
10
11
12
13
14
15
16
17
18
19
20
21
22
23
24
25
26
27
28
29
30
31
32
33
34
35
36
37
38
39
40
41
42
43
44
45
46
47
48
49
50
51
52
53
54
55
56
57
58
59
60
61
62
63
64
65
2
3
4
5
6
7
8
9
10
11
12
13
14
15
16
17
18
19
20
21
22
23
24
25
26
27
28
29
30
31
32
33
34
35
36
37
38
39
40
41
42
43
44
45
46
47
48
49
50
51
52
53
54
55
56
57
58
59
60
61
62
63
64
65
# 4、编码配置
# 4.1、新增StudentPO实体类
@Data
@TableName("student") // 指定表名
public class StudentPO {

    private Long id;

    private String name;

    private Integer age;

    private String email;
}
1
2
3
4
5
6
7
8
9
10
11
12
2
3
4
5
6
7
8
9
10
11
12
# 4.2、新增StudentMapper接口
@Mapper // 指定为Mapper接口,并继承BaseMapper,指定类型为StudentPO
public interface StudentMapper extends BaseMapper<StudentPO> {

}
1
2
3
4
2
3
4
# 4.3、Application启动类配置
@SpringBootApplication // 声明为SpringBoot应用启动类
@MapperScan("com.xygalaxy.mapper") // Mapper接口扫描包
public class MyBatsisPlusStyudyApplication {

    public static void main(String[] args) {
        SpringApplication.run(MyBatsisPlusStyudyApplication.class, args);
    }

}
1
2
3
4
5
6
7
8
9
2
3
4
5
6
7
8
9
# 4.4、配置application.yml
# 配置数据源
spring:
  datasource:
    driver-class-name: com.mysql.jdbc.Driver
    url: jdbc:mysql://localhost:3306/xygalaxy?useSSL=false&useUnicode=true&characterEncoding=utf8
    username: root
    password: 123456

# 开启日志
mybatis-plus:
  configuration:
    log-impl: org.apache.ibatis.logging.stdout.StdOutImpl
1
2
3
4
5
6
7
8
9
10
11
12
2
3
4
5
6
7
8
9
10
11
12
# 4.5、测试
这里测试就加Service业务层了,直接测试。
@SpringBootTest // 声明为SpringBoot测试类
@Slf4j // 打印日志
public class TestController {

    @Autowired
    private StudentMapper studentMapper;

    @Test
    public void testQueryStudentList(){
        List<StudentPO> studentList = studentMapper.selectList(null);
        log.info("studentList========>"+studentList);
    }

}
1
2
3
4
5
6
7
8
9
10
11
12
13
14
2
3
4
5
6
7
8
9
10
11
12
13
14
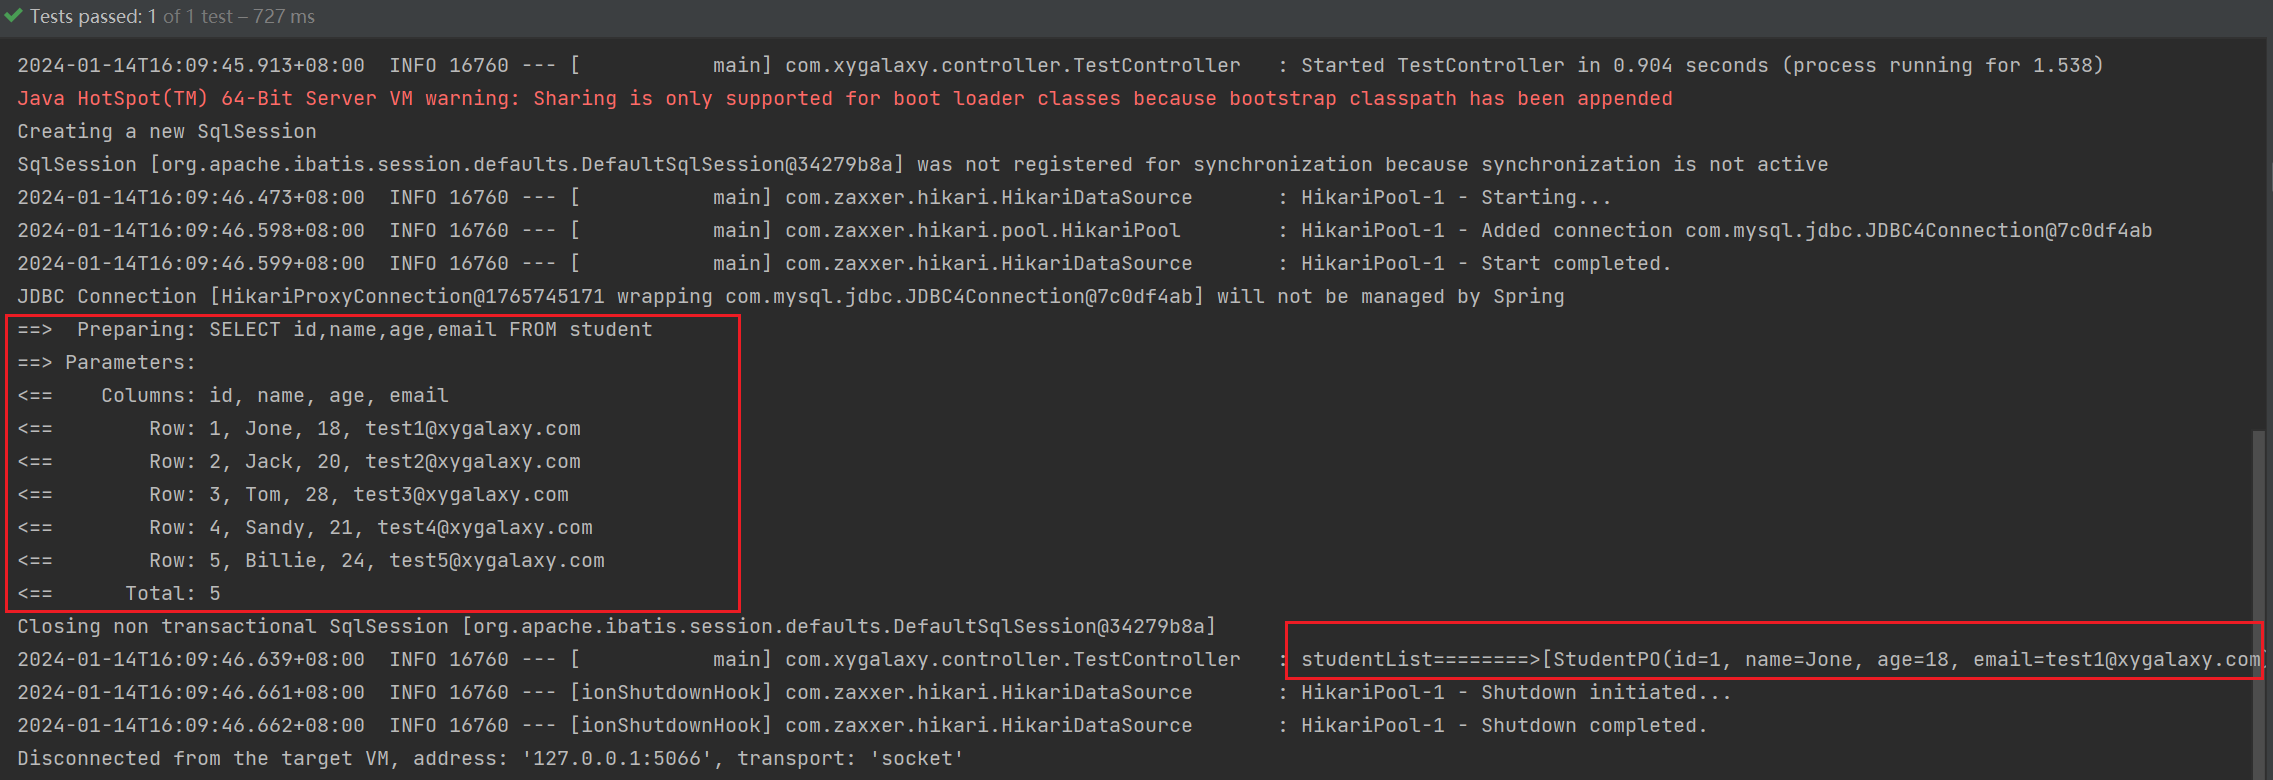
测试结果 
# 5、案例总结
- 比起MyBatis中的案例,MyBatis-Plus的案例更加简洁,更加方便。
- Mapper层中,我们只需要继承
BaseMapper<StudentPO>,然后使用泛型指定StudentPO的类型即可。 - StudentPO实体类中,通过
@TableName("student")绑定数据库表。 - 测试使用时,我们直接调用BaseMapper中提供的方法,就可以快速的实现CRUD了。
