SpringMVC详解
前提
- 对Spring有一定了解
- 对JavaWeb有一定了解
- 对Servlet有一定了解
# 1、MVC模式
MVC(全称:Model-View-Controller)是一种经典的软件架构模式。MVC模式将应用程序分为三个核心部件:Model(模型)、View(视图)、Controller(控制器)。分层主要用于应用程序的分层开发,目的是将数据、业务逻辑和软件用户界面分离以提高代码的可扩展性和可维护性。
MVC模式三个核心部件:
Model(模型)
模型持有所有的数据、状态和程序逻辑。它代表着业务数据和业务逻辑处理,主要包括业务逻辑模块(web项目中的dao类)和数据模块(model类)。一个Model可以为多个视图提供业务数据,因此Model也就提高应用程序的可重用性。
View(视图)
代表视图,也就是与用户交互的界面,可以给用户显示业务逻辑数据,同时也可以接收用户输入的数据。在视图中不对数据进行任何的业务逻辑处理。
Controller(控制器)
代表控制器,用来接收从视图输入的参数,同时调用对应的Model模型对数据进行业务逻辑处理,同时将处理好的数据传递到对应的视图来显示给用户。
MVC模式图示 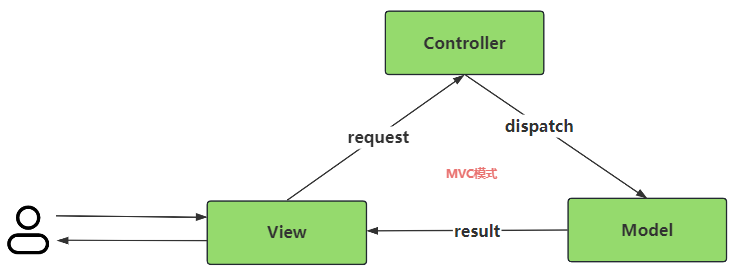
# 2、SpringMVC初识
- SpringMVC是Spring遵循MVC规范开发的一个轻量级Web框架。
- SpringMVC是基于Spring容器和AOP基础上开发的,所以 SpringMVC 能够通过容器控制对象。
- SpringMVC底层依然是Servlet,SpringMVC就是对Servlet进行深层次的封装。
- SpringMVC底层是Servlet,所以访问的依然是DispatcherServlet。
- SpringMVC采用了松散耦合可插拔组件结构,比其他 MVC 框架更具扩展性和灵活性。
在SpringMVC发布之前,大多数都是使用Servlet在做Web开发。Servlet开发web应用存在以下问题:
- 请求参数、数据共享、页面跳转操作复杂
- 大量重复的代码
- 代码臃肿
- 开发效率低
- 代码复用性差
- 代码可维护性差
可以去看一下Servlet开发的Web项目。
# 3、SpringMVC请求流程
SpringMVC请求流程图 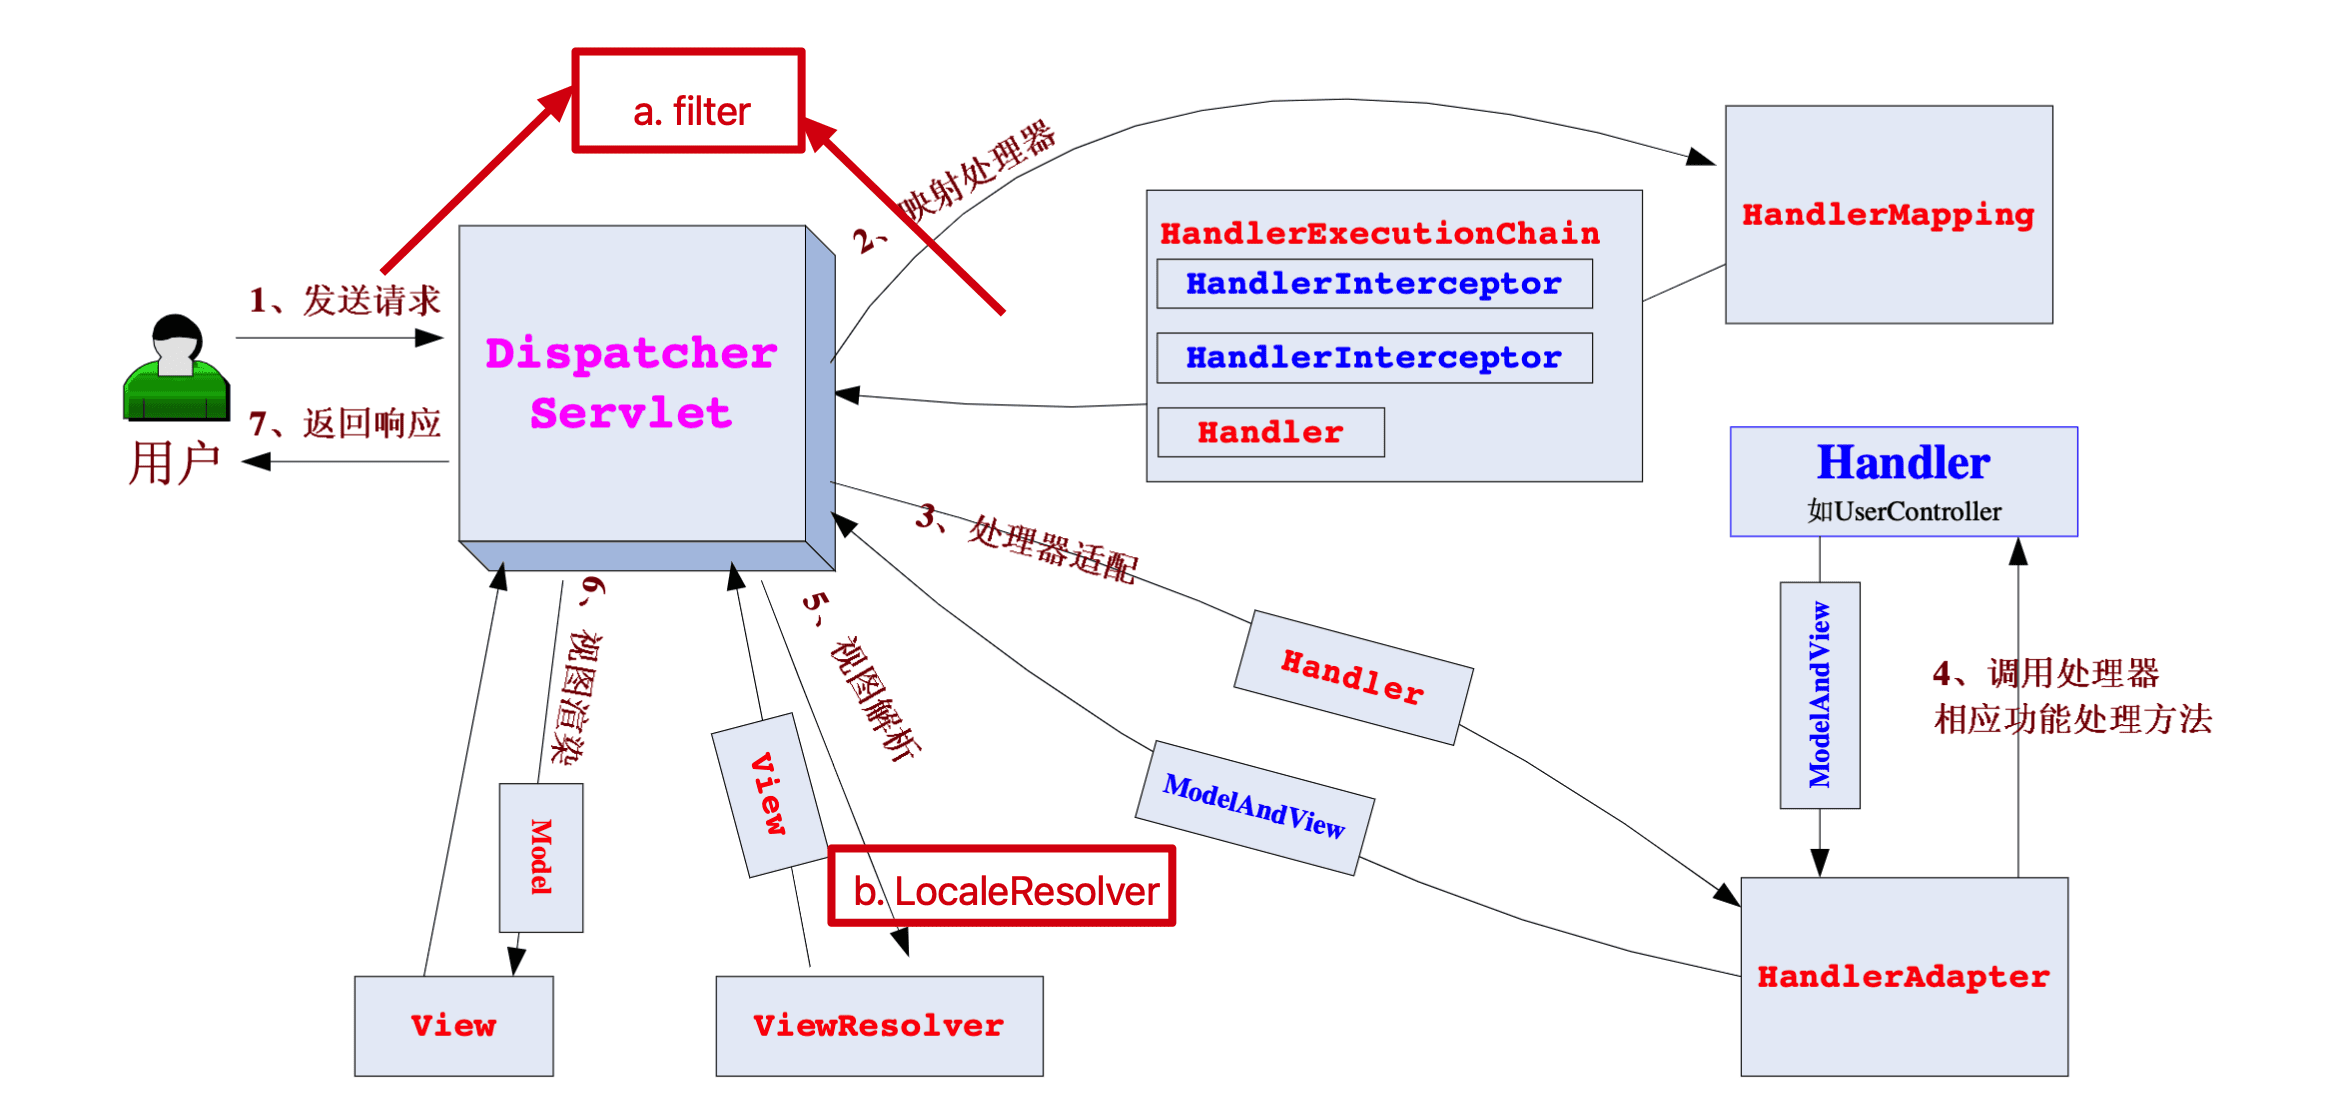
SpringMVC请求流程解析
① 首先用户发送请求 -> DispatcherServlet
前端控制器收到请求后自己不进行处理,而是委托给其他的解析器进行处理,作为统一访问点,进行全局的流程控制。
② DispatcherServlet -> HandlerMapping
HandlerMapping 将会把请求映射为 HandlerExecutionChain 对象(包含一 个Handler 处理器(页面控制器)对象、多个HandlerInterceptor 拦截器)对象,通过这种策略模式,很容易添加新的映射策略。
③ DispatcherServlet -> HandlerAdapter
HandlerAdapter 将会把处理器包装为适配器,从而支持多种类型的处理器, 即适配器设计模式的应用,从而很容易支持很多类型的处理器。
④ HandlerAdapter -> 处理器功能处理方法的调用
HandlerAdapter 将会根据适配的结果调用真正的处理器的功能处理方法,完成功能处理;并返回一个ModelAndView 对象(包含模型数据、逻辑视图名)。
⑤ ModelAndView 的逻辑视图名 -> ViewResolver
ViewResolver 将把逻辑视图名解析为具体的View,通过这种策略模式,很容易更换其他视图技术。
⑥ View -> 渲染
View 会根据传进来的Model 模型数据进行渲染,此处的Model 实际是一个Map数据结构,因此 很容易支持其他视图技术。
⑦ 返回DispatcherServlet
由DispatcherServlet 返回响应给用户,到此一个流程结束。
# 4、SpringMVC案例
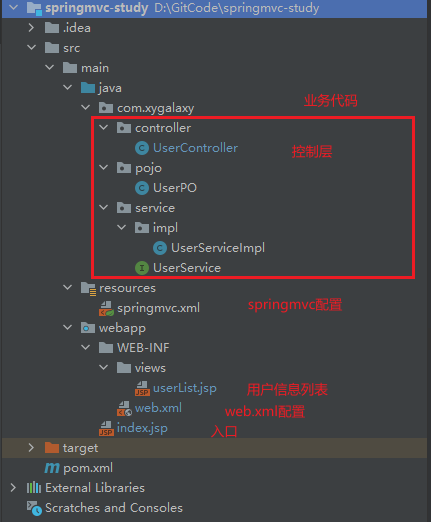
# 4.1、项目结构
案例项目结构
# 4.2、创建web项目
创建Maven项目,注意选择webapp,不然后面可能会有些环境问题 (坑) 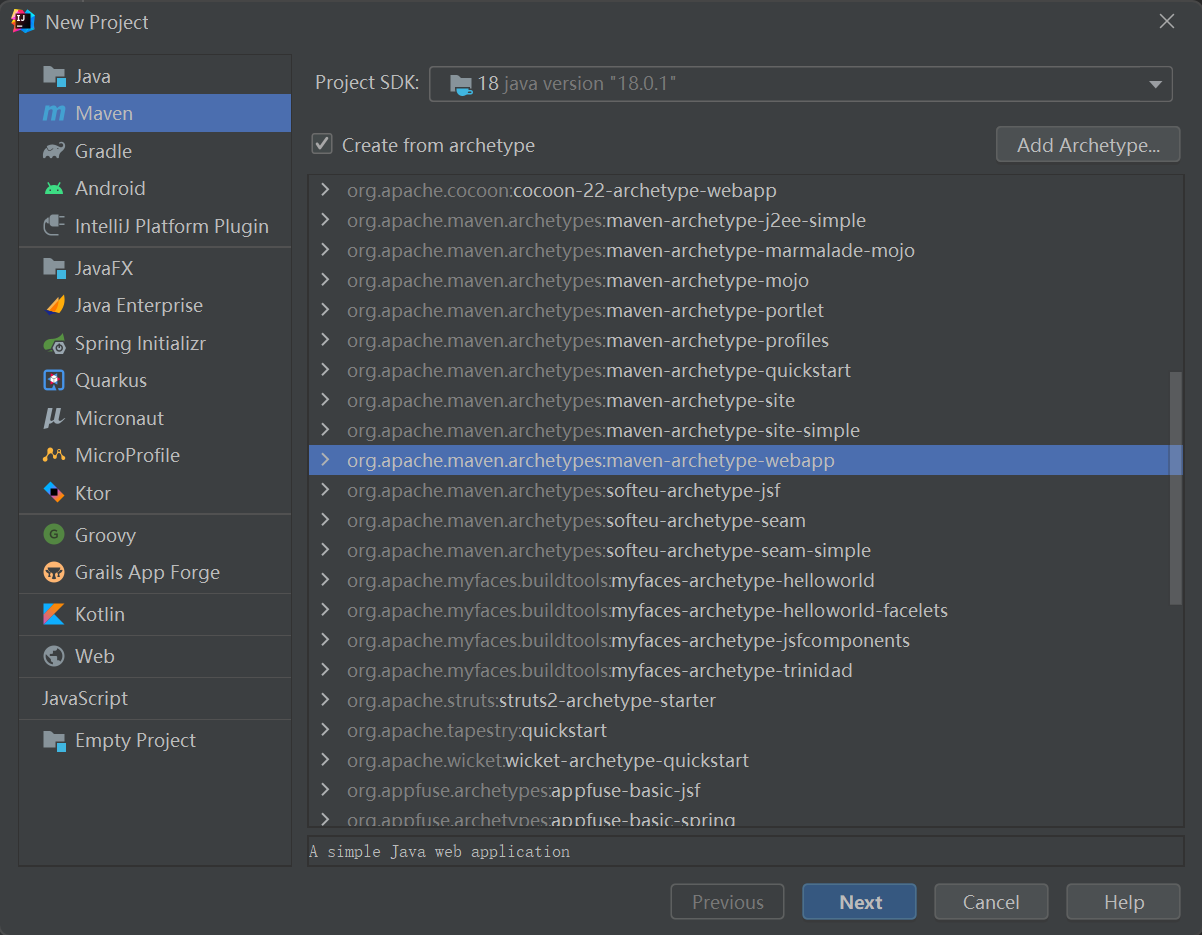
# 4.3、pom.xml依赖
<?xml version="1.0" encoding="UTF-8"?>
<project xmlns="http://maven.apache.org/POM/4.0.0"
         xmlns:xsi="http://www.w3.org/2001/XMLSchema-instance"
         xsi:schemaLocation="http://maven.apache.org/POM/4.0.0 http://maven.apache.org/xsd/maven-4.0.0.xsd">

    <name>springmvc-study</name>
    <groupId>com.xygalaxy</groupId>
    <artifactId>springmvc-study</artifactId>
    <version>1.0-SNAPSHOT</version>
    <packaging>war</packaging>

    <modelVersion>4.0.0</modelVersion>

    <properties>
        <maven.compiler.source>18</maven.compiler.source>
        <maven.compiler.target>18</maven.compiler.target>
        <project.build.sourceEncoding>UTF-8</project.build.sourceEncoding>
    </properties>

    <dependencies>
        <!--springMVC的依赖-->
        <dependency>
            <groupId>org.springframework</groupId>
            <artifactId>spring-webmvc</artifactId>
            <version>5.3.9</version>
        </dependency>
        <!-- servlet相关包   -->
        <dependency>
            <groupId>javax.servlet</groupId>
            <artifactId>javax.servlet-api</artifactId>
            <version>4.0.1</version>
        </dependency>
        <!--  JSP中使用jstl  -->
        <dependency>
            <groupId>javax.servlet</groupId>
            <artifactId>jstl</artifactId>
            <version>1.2</version>
        </dependency>
        <dependency>
            <groupId>org.projectlombok</groupId>
            <artifactId>lombok</artifactId>
            <version>1.18.24</version>
        </dependency>
    </dependencies>
</project>
2
3
4
5
6
7
8
9
10
11
12
13
14
15
16
17
18
19
20
21
22
23
24
25
26
27
28
29
30
31
32
33
34
35
36
37
38
39
40
41
42
43
44
45
# 4.4、业务代码
UserP实体类
@Data
@AllArgsConstructor
public class UserPO {

    /**
     * id
     */
    private String id;

    /**
     * 姓名
     */
    private String name;

    /**
     * 年龄
     */
    private int age;

    /**
     * 性别
     */
    private String sex;

}
2
3
4
5
6
7
8
9
10
11
12
13
14
15
16
17
18
19
20
21
22
23
24
25
UserService接口及实现
public interface UserService {

    /**
     * 查询用户列表
     * @return
     */
    List<UserPO> queryUserList();

}


@Service
public class UserServiceImpl implements UserService {
    /**
     * 查询用户列表
     * @return
     */
    public List<UserPO> queryUserList(){
        // 模拟数据库查询用户信息返回
        List<UserPO> resultList = new ArrayList<>();

        // 增加10个用户信息
        for (int i = 0; i < 10; i++) {
            String id = String.valueOf(i+1);
            String name = "用户"+(i+1);
            int age = i+20;
            String sex = i%2==1?"男":"女";
            resultList.add(new UserPO(id,name,age,sex));
        }

        return resultList;
    }
}
2
3
4
5
6
7
8
9
10
11
12
13
14
15
16
17
18
19
20
21
22
23
24
25
26
27
28
29
30
31
32
33
UserController控制层
@Controller
public class UserController {

    @Autowired
    private UserServiceImpl userService;

    @RequestMapping("/allUser")
    public ModelAndView list(HttpServletRequest request, HttpServletResponse response) {
        ModelAndView modelAndView = new ModelAndView();
        modelAndView.addObject("dateTime", LocalDateTime.now());
        modelAndView.addObject("userList", userService.queryUserList());
        modelAndView.setViewName("userList"); // views目录下userList.jsp
        return modelAndView;
    }

}
2
3
4
5
6
7
8
9
10
11
12
13
14
15
16
# 4.5、springmvc.xml配置
<?xml version="1.0" encoding="UTF-8"?>
<beans xmlns="http://www.springframework.org/schema/beans"
       xmlns:xsi="http://www.w3.org/2001/XMLSchema-instance"
       xmlns:context="http://www.springframework.org/schema/context"
       xmlns:mvc="http://www.springframework.org/schema/mvc"
       xmlns:jpa="http://www.springframework.org/schema/data/jpa"
       xmlns:tx="http://www.springframework.org/schema/tx"
       xsi:schemaLocation="http://www.springframework.org/schema/beans http://www.springframework.org/schema/beans/spring-beans.xsd
       http://www.springframework.org/schema/context http://www.springframework.org/schema/context/spring-context.xsd
       http://www.springframework.org/schema/mvc http://www.springframework.org/schema/mvc/spring-mvc.xsd
       http://www.springframework.org/schema/data/jpa http://www.springframework.org/schema/data/jpa/spring-jpa.xsd
       http://www.springframework.org/schema/tx http://www.springframework.org/schema/tx/spring-tx.xsd">

    <!-- 扫描注解 -->
    <context:component-scan base-package="com.xygalaxy"/>

    <!-- 静态资源处理 -->
    <mvc:default-servlet-handler/>

    <!-- 开启注解 -->
    <mvc:annotation-driven/>

    <!-- 视图解析器 -->
    <bean id="jspViewResolver" class="org.springframework.web.servlet.view.InternalResourceViewResolver">
        <!--JstlView 用于支持使用JSP标准标签库的JSP页面 -->
        <property name="viewClass" value="org.springframework.web.servlet.view.JstlView"/>
        <!--前缀,视图文件的路径-->
        <property name="prefix" value="/WEB-INF/views/"/>
        <!--后缀,视图文件的拓展名-->
        <property name="suffix" value=".jsp"/>
    </bean>

</beans>
2
3
4
5
6
7
8
9
10
11
12
13
14
15
16
17
18
19
20
21
22
23
24
25
26
27
28
29
30
31
32
33
# 4.6、web.xml配置
<?xml version="1.0" encoding="UTF-8"?>
<web-app xmlns="http://xmlns.jcp.org/xml/ns/javaee"
         xmlns:xsi="http://www.w3.org/2001/XMLSchema-instance"
         xsi:schemaLocation="http://xmlns.jcp.org/xml/ns/javaee http://xmlns.jcp.org/xml/ns/javaee/web-app_3_1.xsd"
         version="3.1">

    <display-name>SpringMVC</display-name>

    <!--web.xml固定代码-->
    <servlet>
        <servlet-name>springmvc</servlet-name>
        <servlet-class>org.springframework.web.servlet.DispatcherServlet</servlet-class>
        <!--设置在服务器启动时,马上拆功能键DispatcherServlet对象-->
        <!--load-on-startup:在启动时进行加载,
        数字表示tomcat启动后创建的顺序,数制越小创建的对象时机越早>=0的整数-->
        <init-param>
            <!--指定SpringMVC的配置文件的属性,必须是contextConfigLocation-->
            <param-name>contextConfigLocation</param-name>
            <!--自定义文件的位置classpath(相当resources根目录)-->
            <param-value>classpath:springmvc.xml</param-value>
        </init-param>
        <load-on-startup>1</load-on-startup>
    </servlet>
    <!--设置servlet-mapping-->
    <servlet-mapping>
        <servlet-name>springmvc</servlet-name>
        <!--可以使用两种值,
        1.使用扩展名的方式,语法*.xxxxxx是自定义的拓展名常用的有*.do*.action*.mvc
            表示以.do结尾的请求,都会被该servlet-mapping处理(没有/)
                http://localhost:8080/myweb/some.do
                http://localhost:8080/myweb/other.do
        2.使用"/"的方式
        -->
        <url-pattern>/</url-pattern>
    </servlet-mapping>

    <!--注册过滤器,解决post请求中文乱码问题 web.xml文件配置-->
    <filter>
        <filter-name>characterEncodingFilter</filter-name>
        <!--CharacterEncodingFilter-->
        <filter-class>org.springframework.web.filter.CharacterEncodingFilter</filter-class>
        <!--设置项目中使用的字符编码-->
        <init-param>
            <param-name>encoding</param-name>
            <param-value>utf-8</param-value>
        </init-param>
        <!--强制请求对象,使用encoding编码的值-->
        <init-param>
            <param-name>forceRequestEncoding</param-name>
            <param-value>true</param-value>
        </init-param>
        <!--强制响应对象,使用encoding编码的值-->
        <init-param>
            <param-name>forceResponseEncoding</param-name>
            <param-value>true</param-value>
        </init-param>
    </filter>

    <filter-mapping>
        <filter-name>characterEncodingFilter</filter-name>
        <!--表示强制所有的请求先通过过滤器处理-->
        <url-pattern>/*</url-pattern>
    </filter-mapping>

</web-app>
2
3
4
5
6
7
8
9
10
11
12
13
14
15
16
17
18
19
20
21
22
23
24
25
26
27
28
29
30
31
32
33
34
35
36
37
38
39
40
41
42
43
44
45
46
47
48
49
50
51
52
53
54
55
56
57
58
59
60
61
62
63
64
65
# 4.7、JSP页面
index.jsp是首页,项目首次启动后访问的页面,位于webapp下
<%@ page contentType="text/html;charset=UTF-8" language="java" %>
<html>
<head>
    <title>Hello SpringMVC</title>
    <!-- Bootstrap -->
    <link rel="stylesheet" href="//cdn.bootcss.com/bootstrap/3.3.5/css/bootstrap.min.css">
</head>
<body>
<div class="container" style="margin-top:100px">
    <h2>Hello SpringMVC</h2>
    <a href="/allUser"><button>获取用户信息</button></a>
</div>
</body>
</html>
2
3
4
5
6
7
8
9
10
11
12
13
14
userList.jsp是用户列表页面,所有的展示页面都放在views下统一管理
<%@ page contentType="text/html;charset=UTF-8" language="java" %>
<%@ taglib prefix="c" uri="http://java.sun.com/jsp/jstl/core" %>
<!DOCTYPE html>
<html lang="zh-CN">
<head>
    <meta charset="utf-8">
    <meta http-equiv="X-UA-Compatible" content="IE=edge">
    <meta name="viewport" content="width=device-width, initial-scale=1">

    <title>用户信息</title>

    <!-- Bootstrap -->
    <link rel="stylesheet" href="//cdn.bootcss.com/bootstrap/3.3.5/css/bootstrap.min.css">

</head>
<body>
    <div class="container" style="margin-top:100px">
        <a href="/"><button>返回</button></a>
        <p style="float: right">${dateTime}</p>
        <c:if test="${!empty userList}">
            <table class="table table-bordered table-striped" style="margin-top: 10px">
                <tr>
                    <th>ID</th>
                    <th>姓名</th>
                    <th>年龄</th>
                    <th>性别</th>
                </tr>
                <c:forEach items="${userList}" var="user">
                    <tr>
                        <td>${user.id}</td>
                        <td>${user.name}</td>
                        <td>${user.age}</td>
                        <td>${user.sex}</td>
                    </tr>
                </c:forEach>
            </table>
        </c:if>
    </div>
</body>
</html>
2
3
4
5
6
7
8
9
10
11
12
13
14
15
16
17
18
19
20
21
22
23
24
25
26
27
28
29
30
31
32
33
34
35
36
37
38
39
40
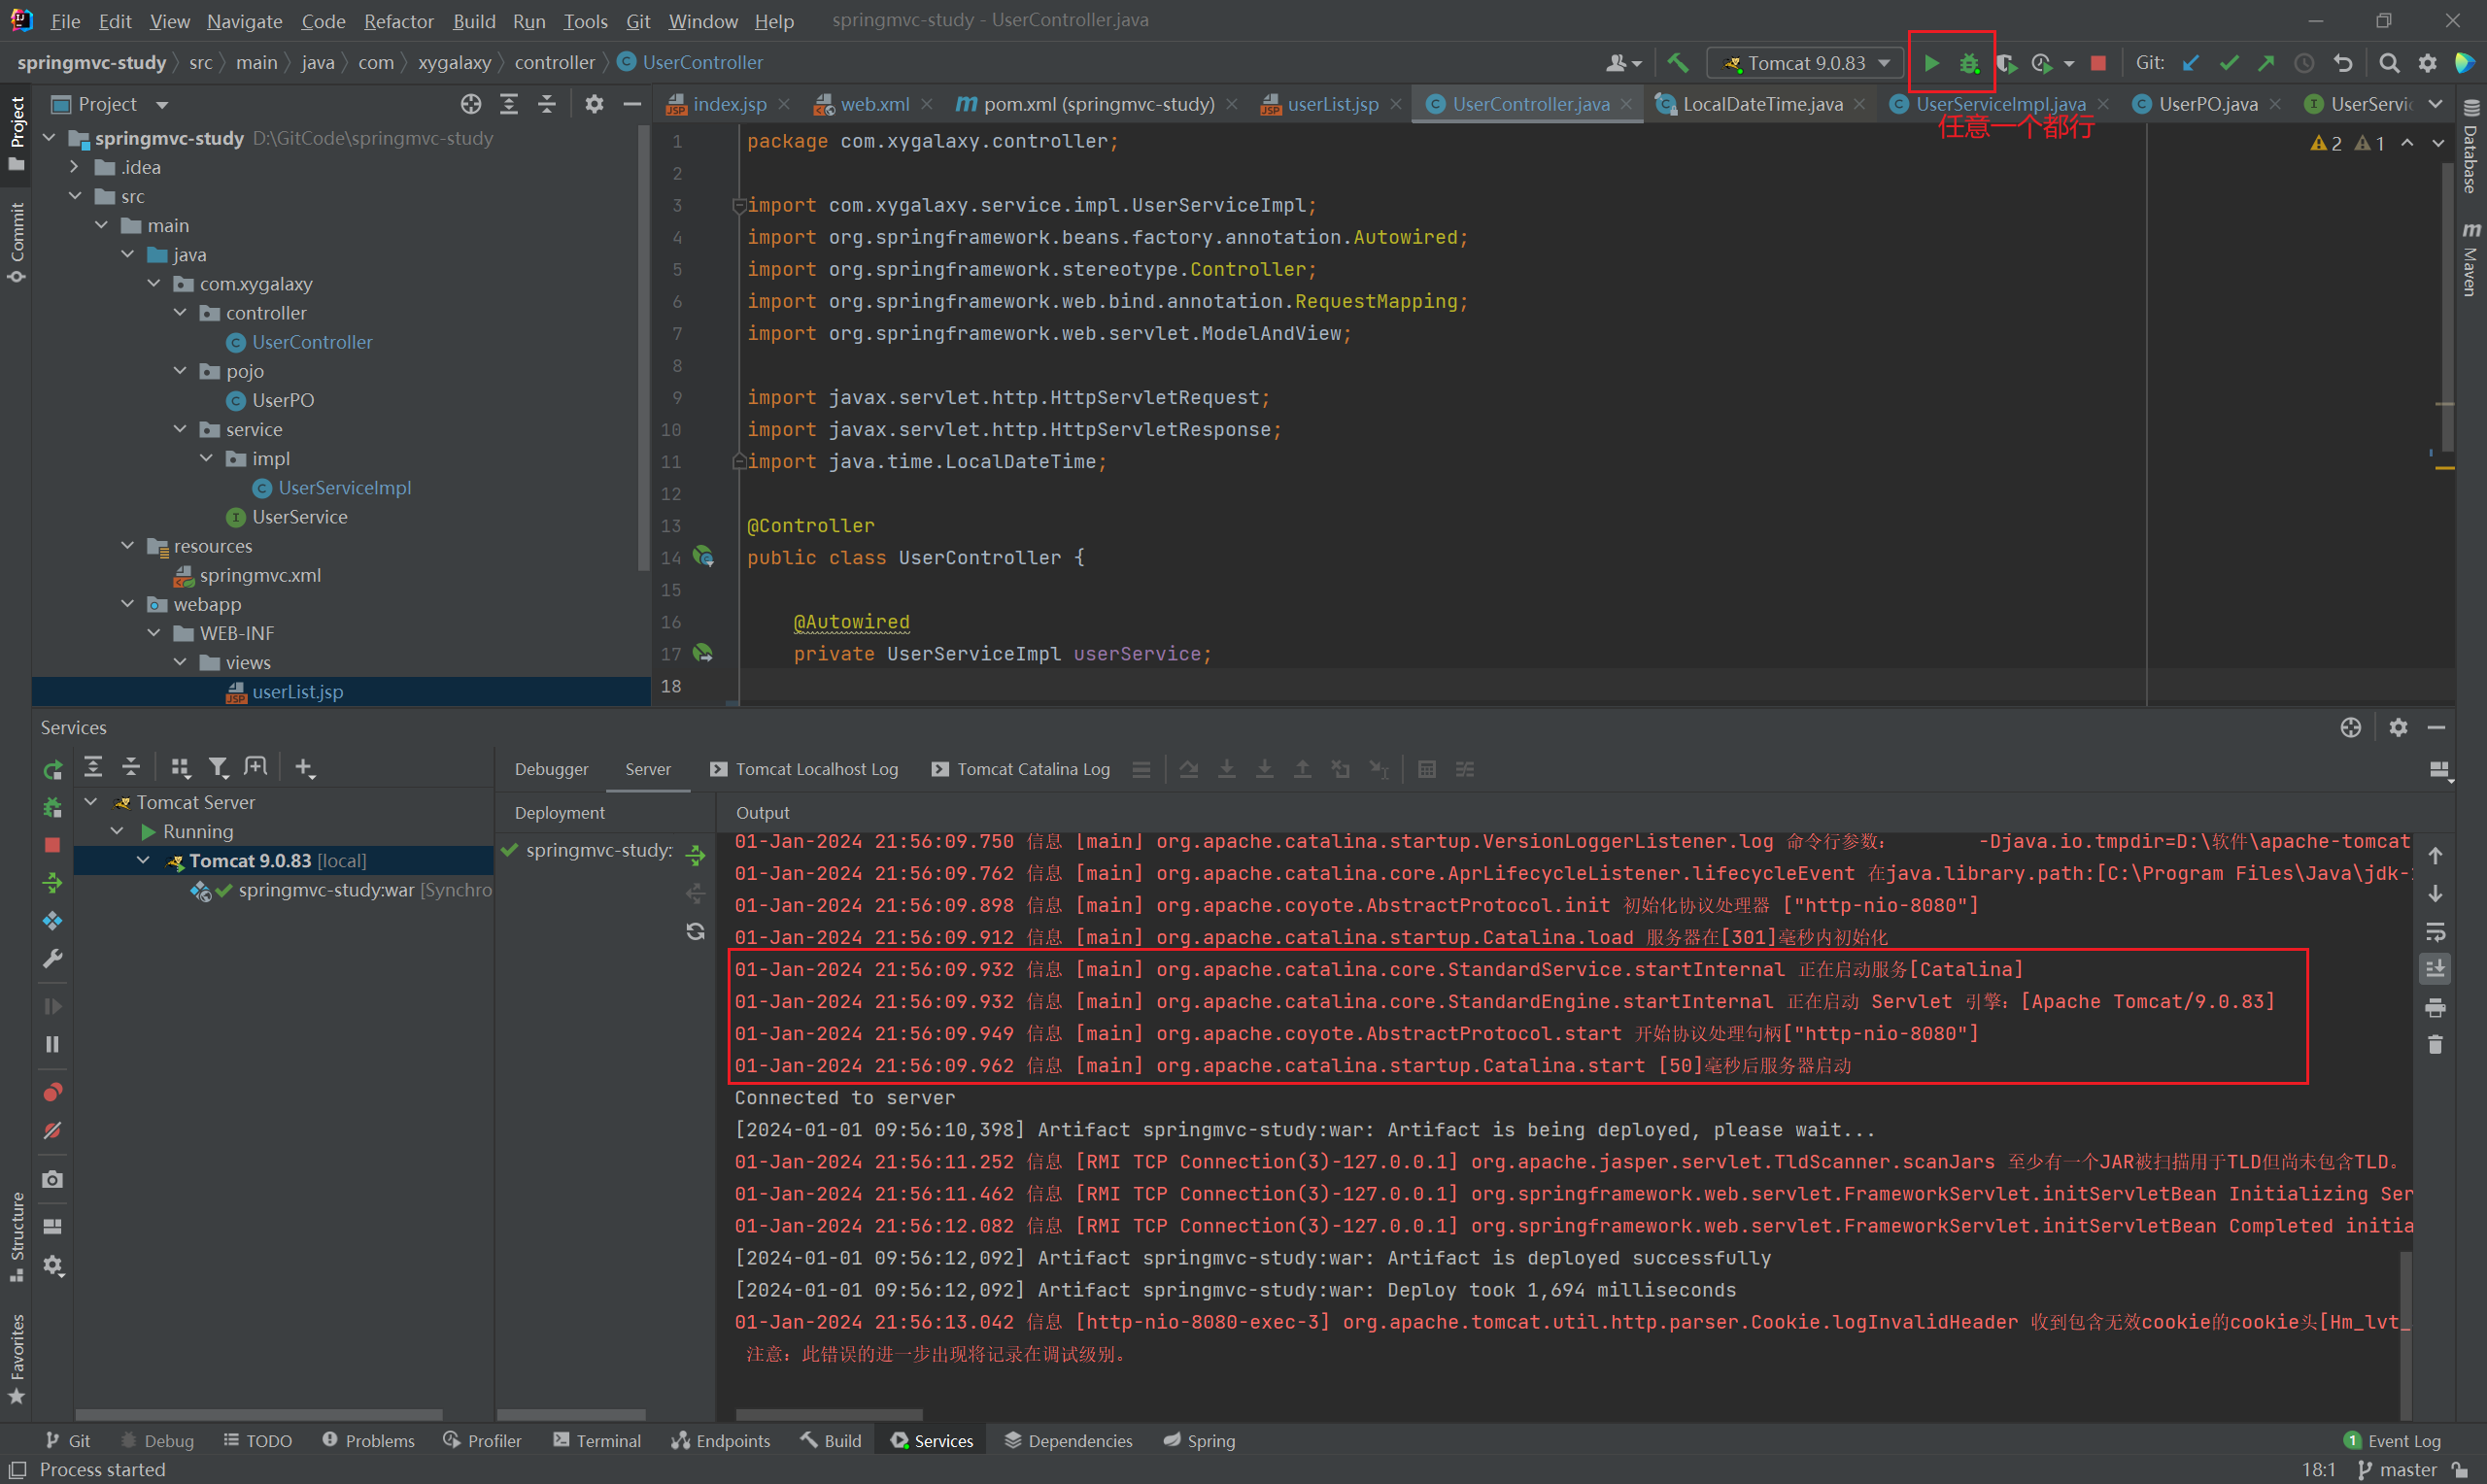
# 4.8、部署测试
我们看到其实整个Web项目并没有启动入口,因为以前的Web项目大多数都是基于JavaWeb和Servlet的,一般都部署在Tomcat服务器上。
Tomcat下载地址 (opens new window),这里用Tomcat9演示,下载
<!-- 地址: -->
https://downloads.apache.org/tomcat/tomcat-9/v9.0.83/bin/
<!-- 文件 -->
apache-tomcat-9.0.83.zip
2
3
4
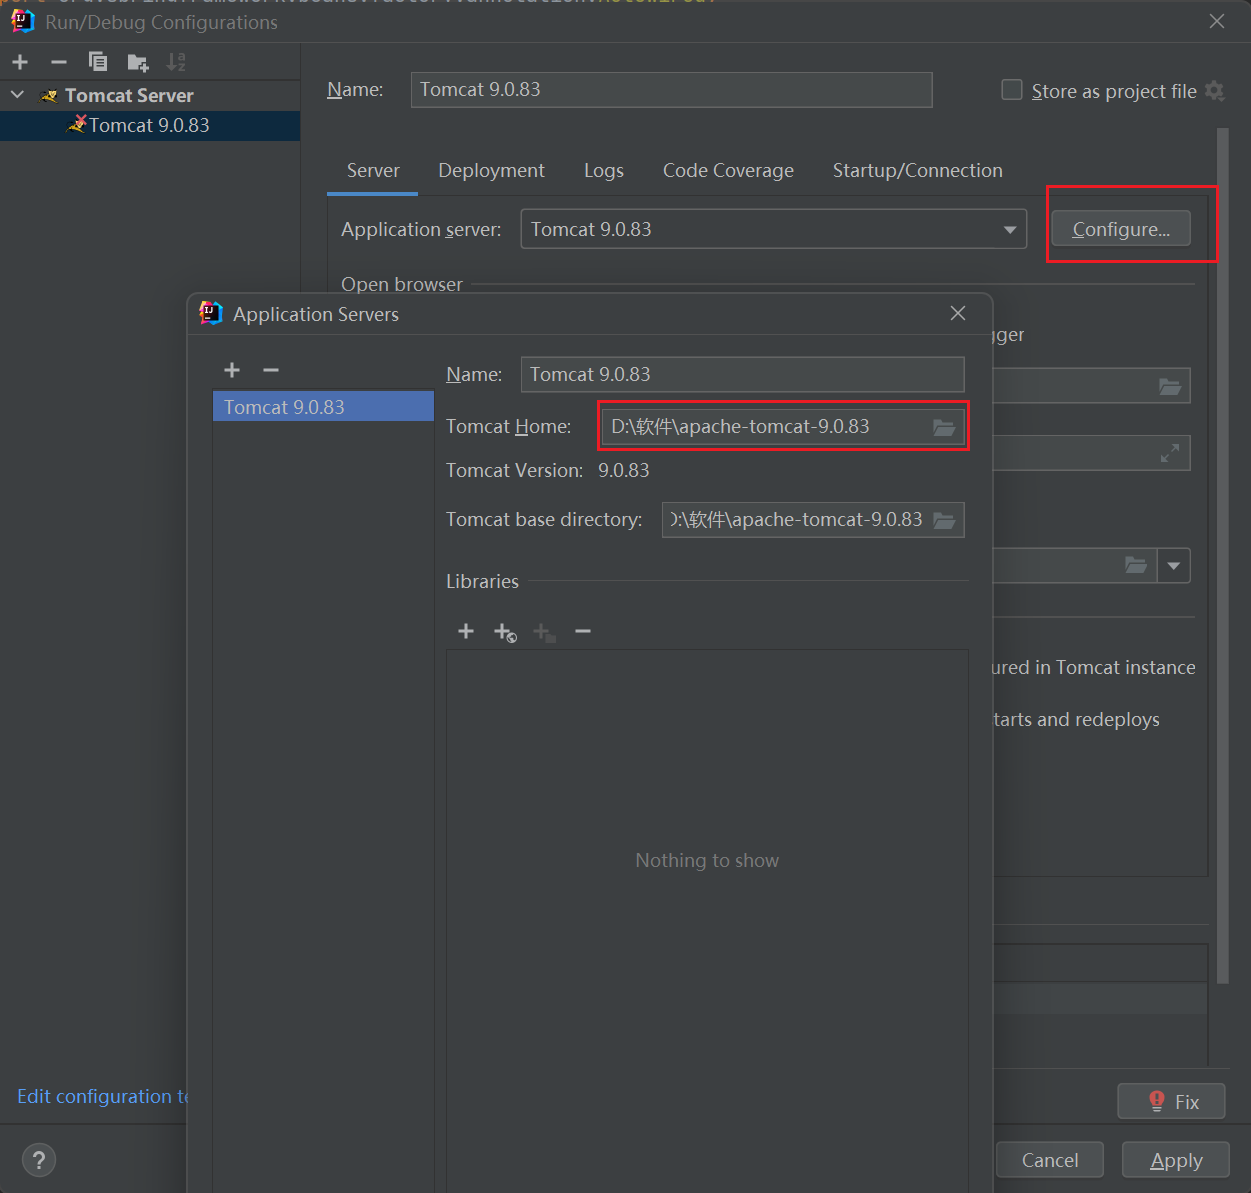
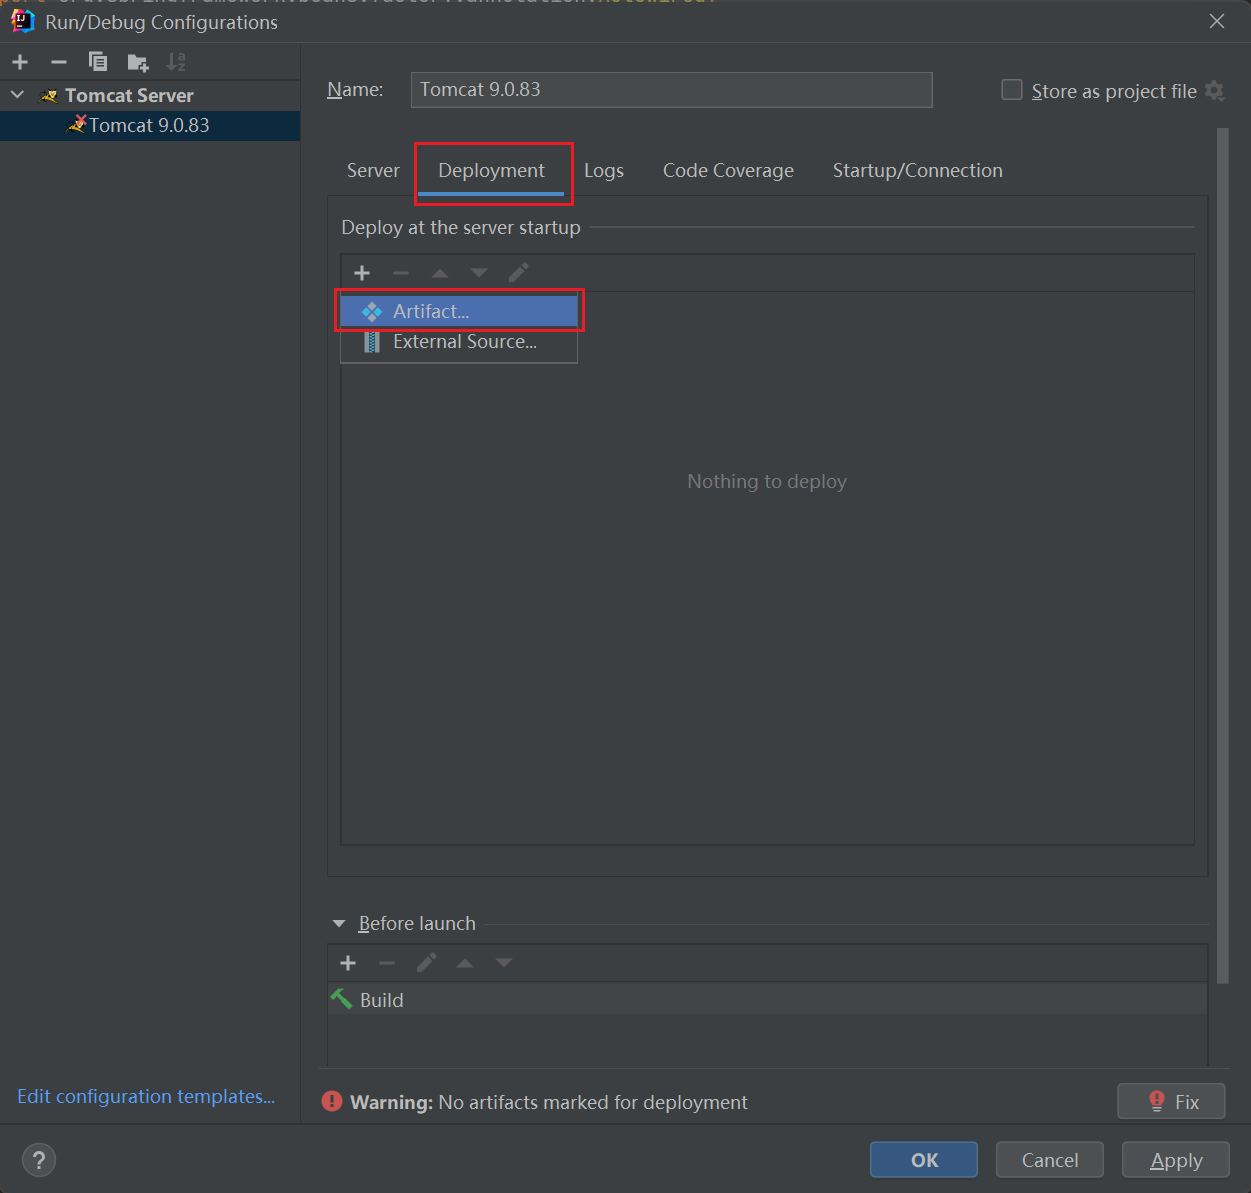
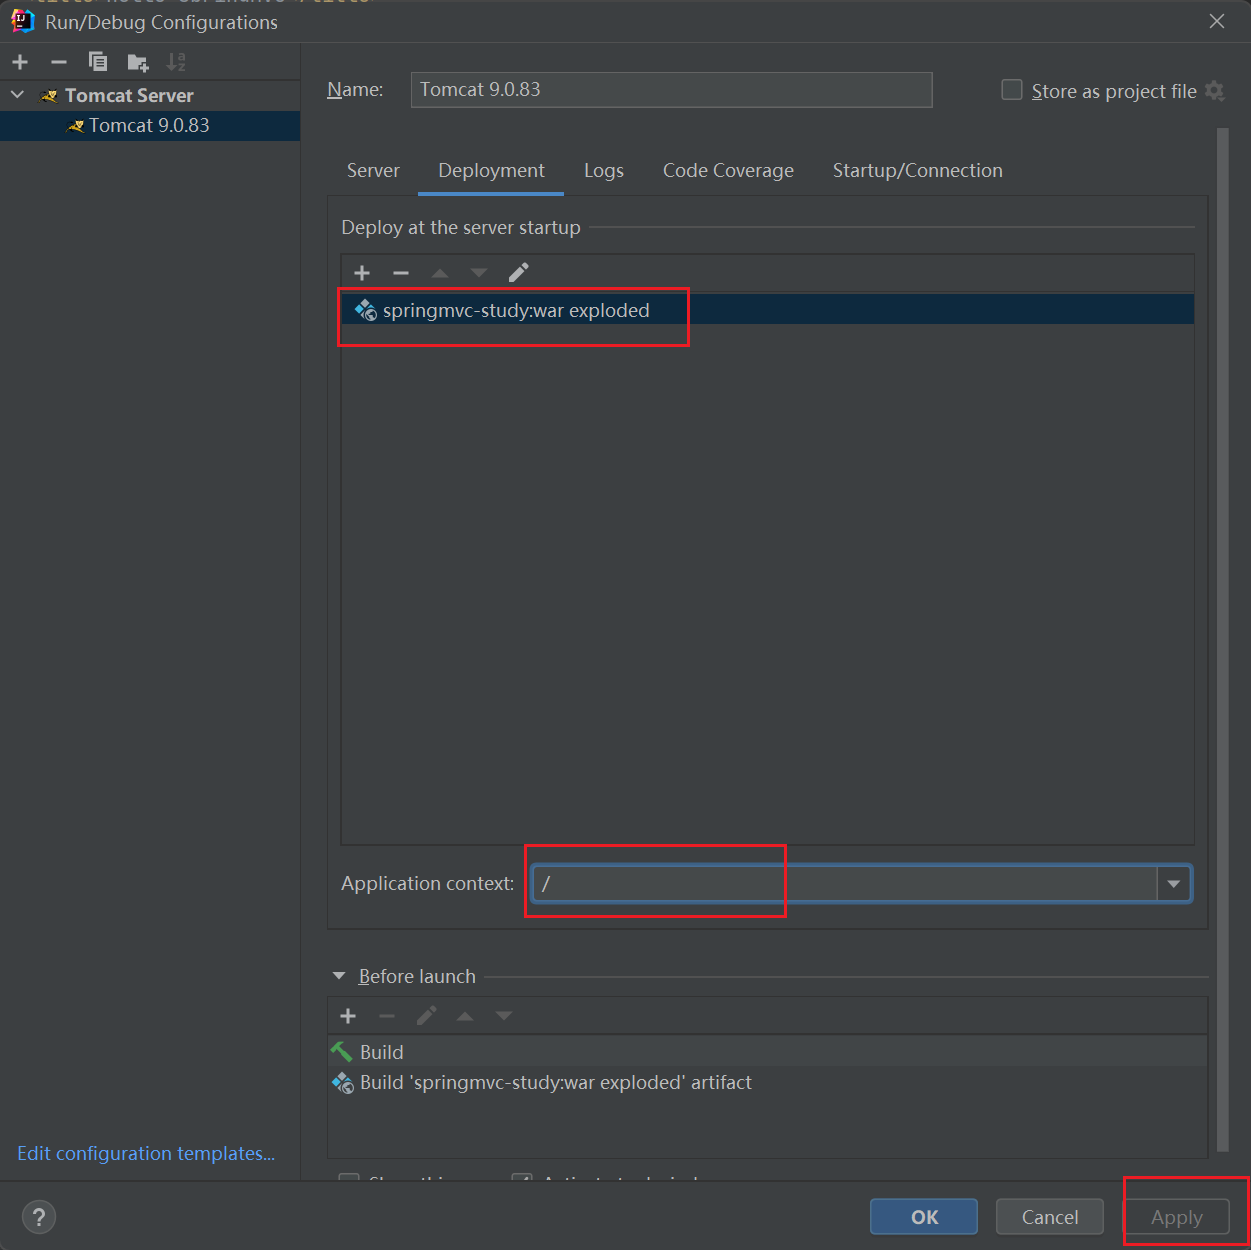
配置Tomcat,选择刚刚下载Tomcat解压文件夹 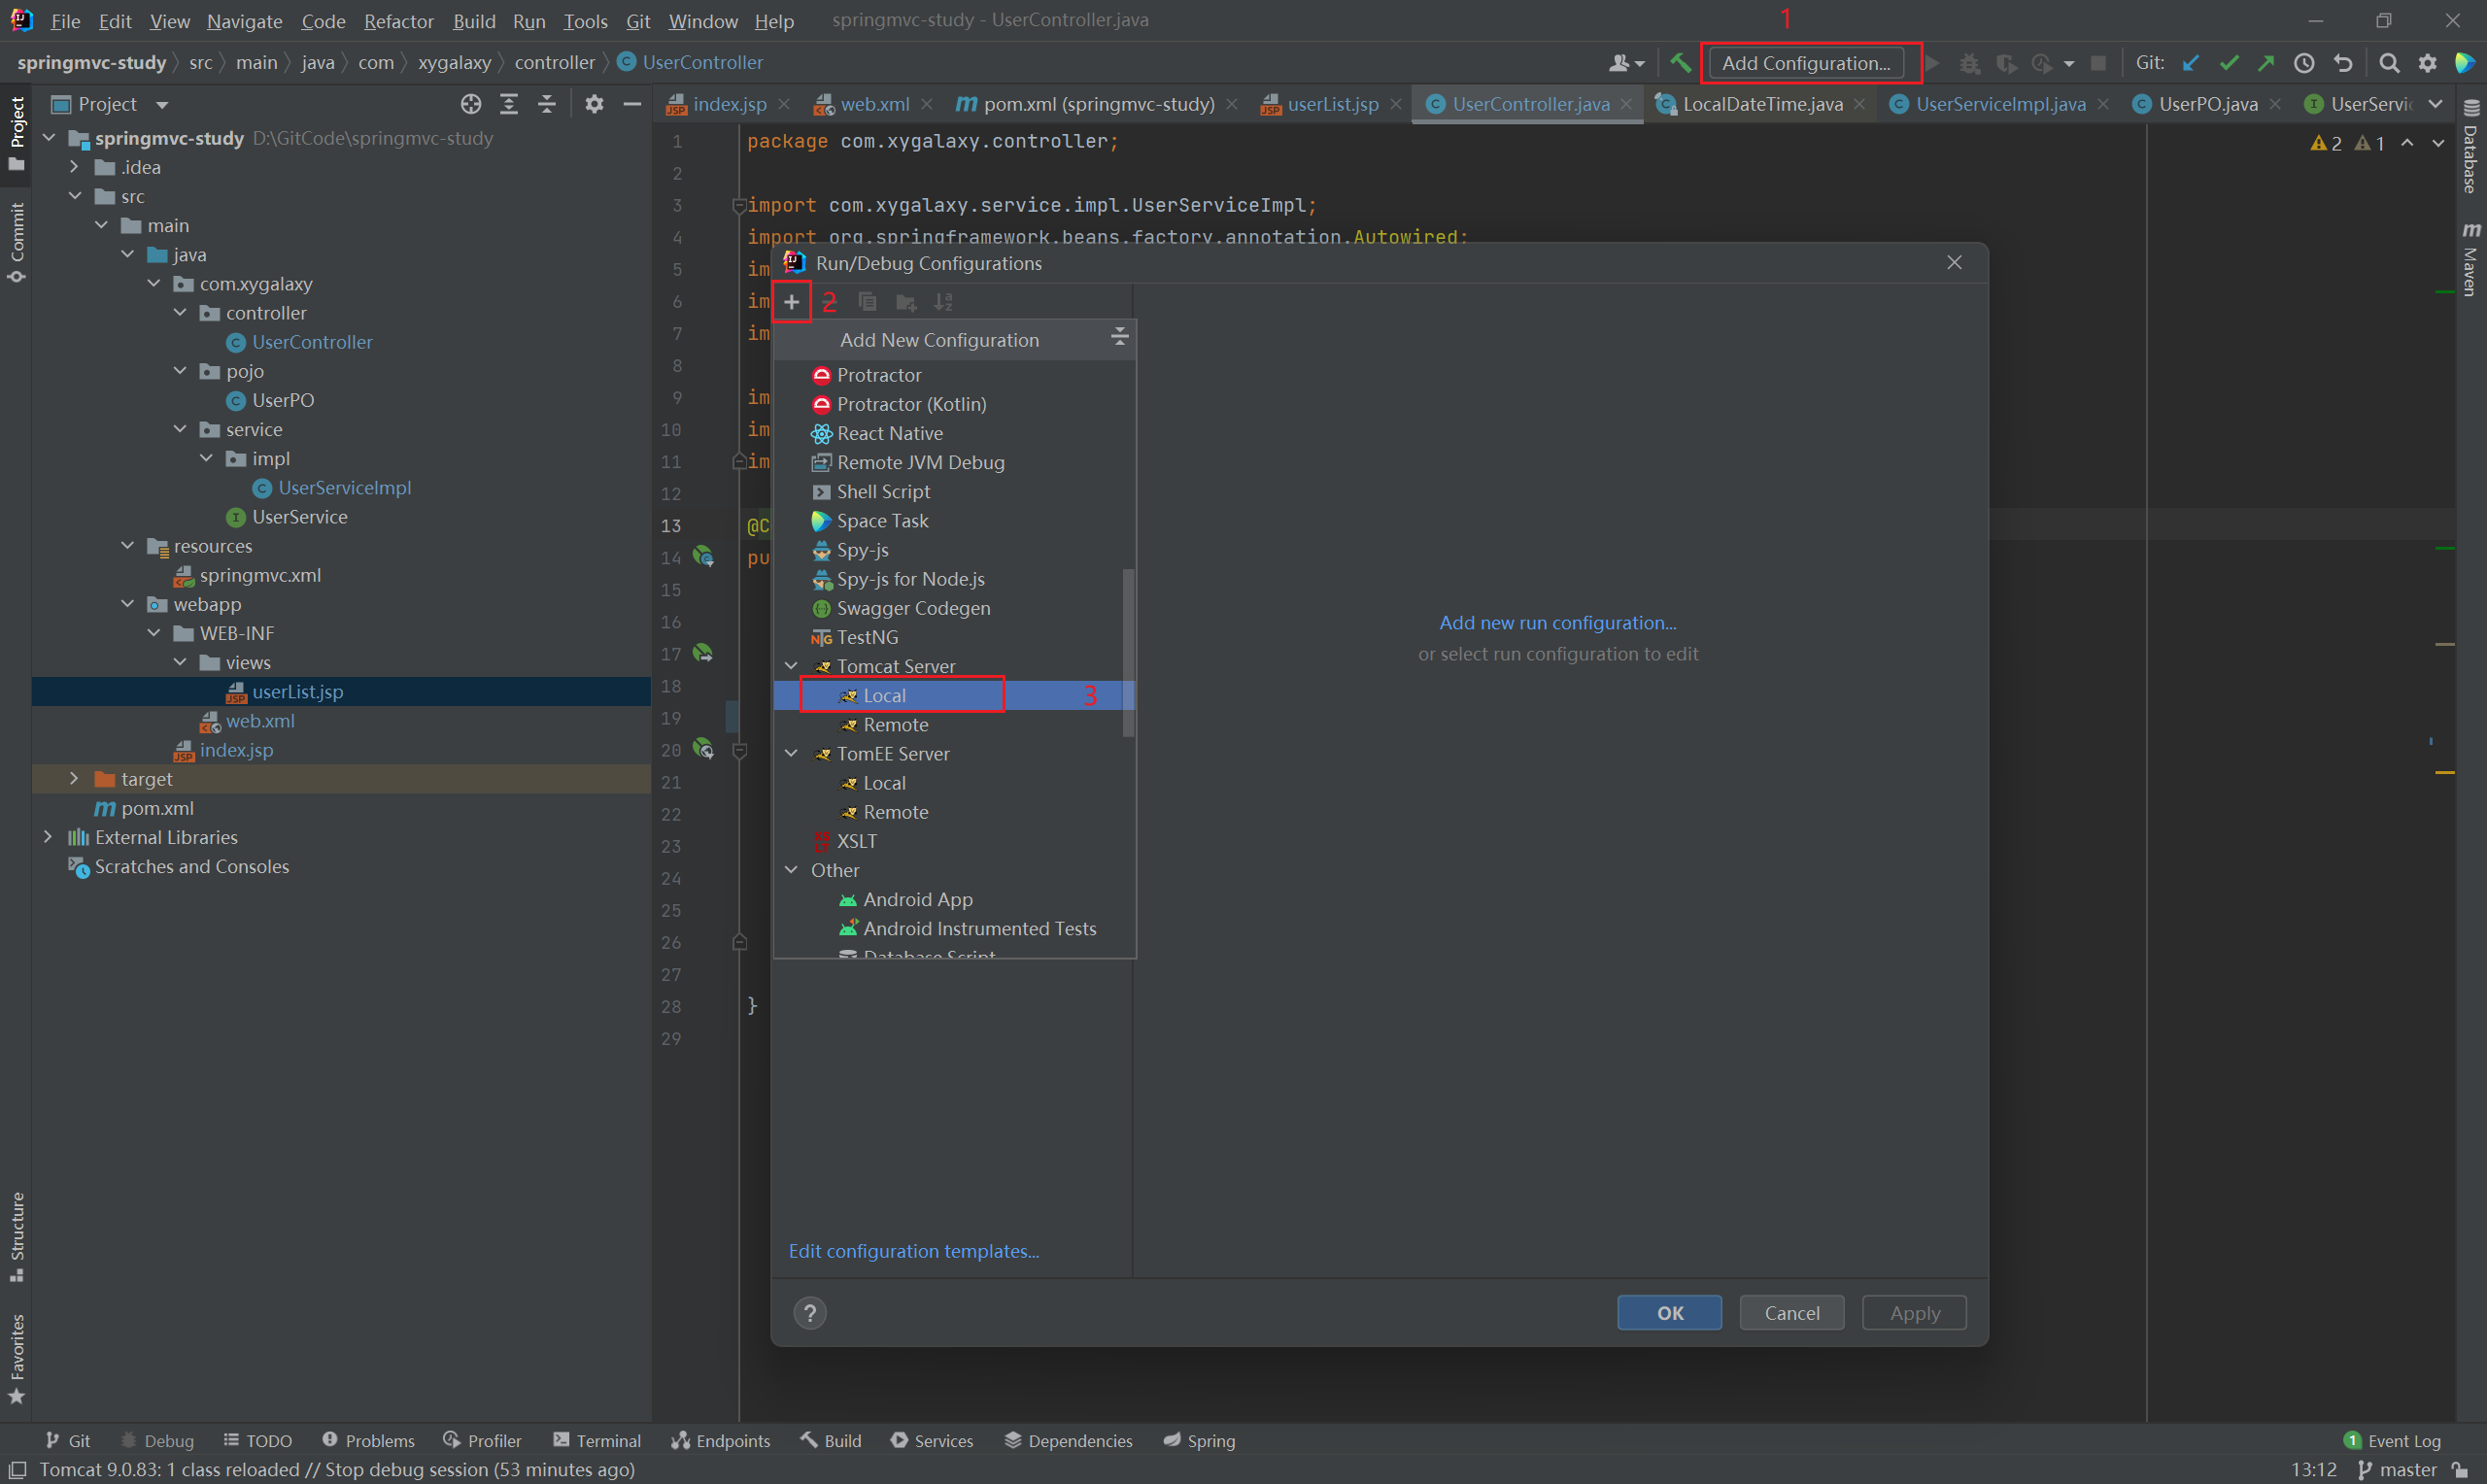
注意点
# 快捷键
Ctrl+Alt+Shift+S
2
配置Tomcat时,这里需要同上面一致,不然容易报错

访问测试
测试首页访问:http://localhost:8080/ 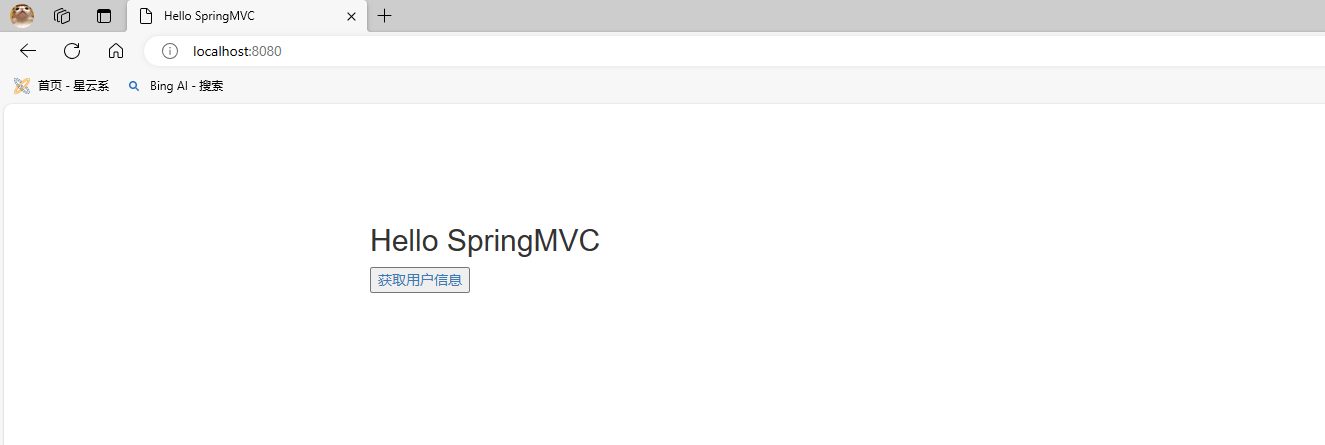
测试获取用户信息:http://localhost:8080/allUser 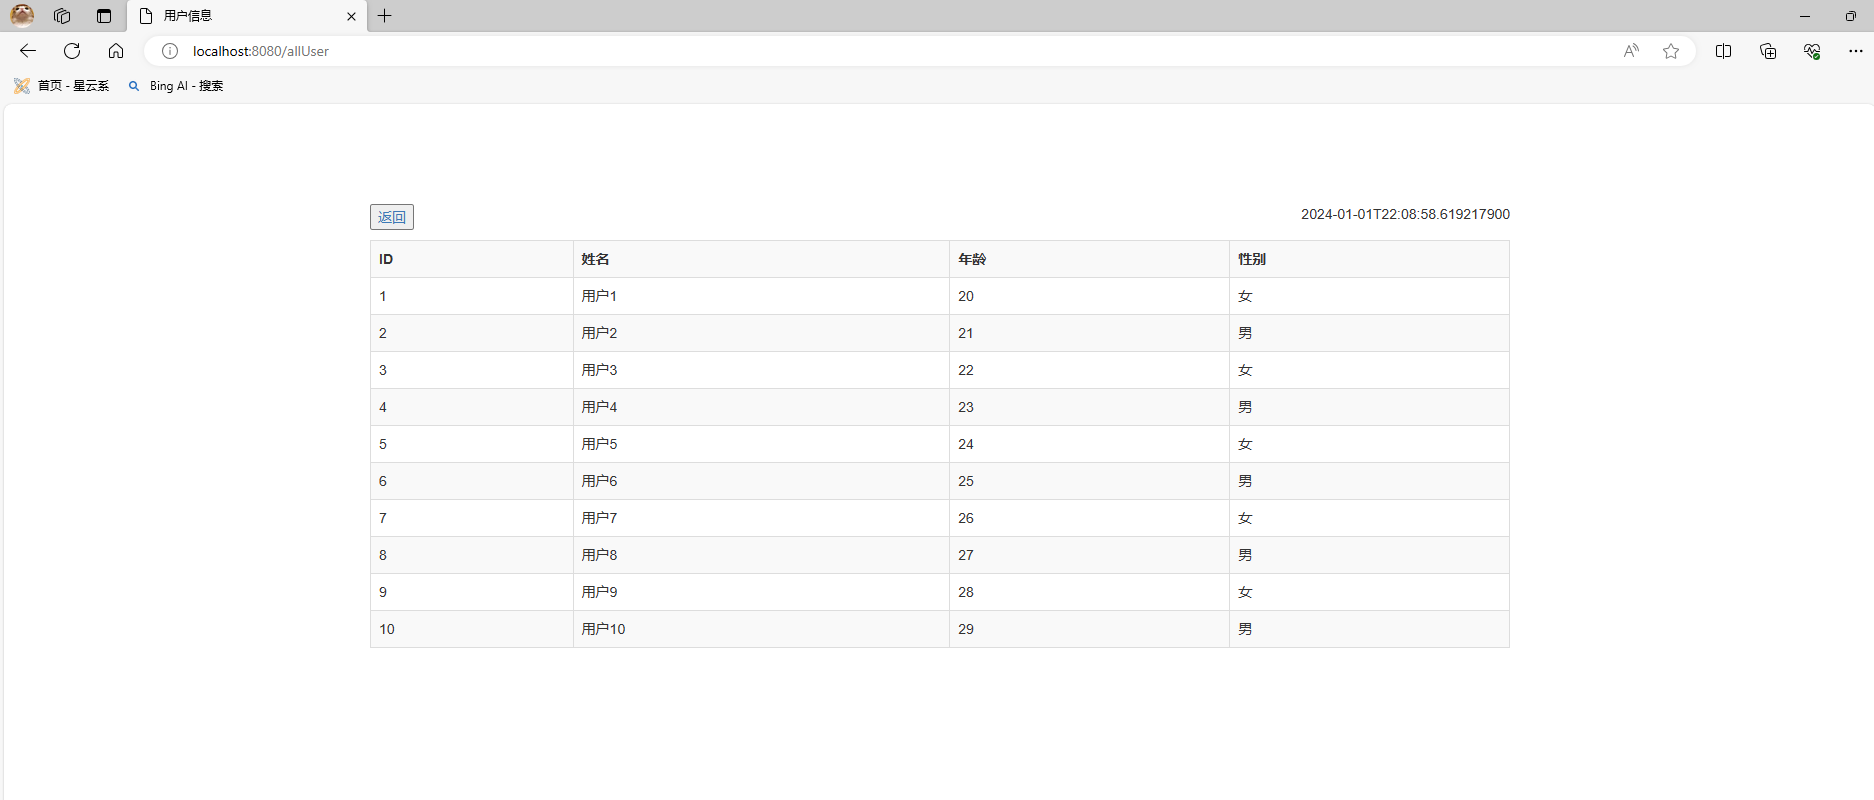
# 4.9、案例小结
可以结合SpringMVC请求流程图分析
- web.xml作为整个Web项目的配置中心,核心还是Servlet的DispatcherServlet(中央调度器)。
- 控制层封装数据到ModelAndView,并设置可读取数据的页面。
- JSP页面通过JSTL方式读取ModelAndView中的各项数据。
- 通过springmvc.xml配置Bean,配置包扫描、静态资源处理、注解开启、以及视图解析器配置。
访问allUser页面
- 过滤器拦截所有请求给到映射处理器。
- 映射处理器通过适配找到控制层
@RequestMapping("/allUser")方法来处理请求。 - 控制层封装数据到ModelAndView,并指定返回找到页面
userList,返回给处理器。 - 处理器返回ModelAndView给到DispatcherServlet,DispatcherServlet通过视图解析器拼接查找页面
(前缀+userList+后缀):/WEB-INF/views/userList.jsp。 - JSP页面通过JSTL方式读取ModelAndView中的数据。最后页面渲染展示给用户。
# 5、Model和ModelAndView
- Model是模型的意思,是MVC中的M,主要用来传输数据。
- ModelAndView是模型视图的意思,是MVC中的MV,主要功能:传输数据、设置跳转页面。
区别:Model只是用来传输数据的,并不会进行业务的寻址。ModelAndView 却是可以进行业务寻址的。
# 5.1、Model
Model是模型的意思,是MVC中的M,主要用来传输数据。
在案例中,我们控制层是通过ModelAndView返回数据,如果用Model如何返回数据呢?
@Controller
public class UserController {

    @Autowired
    private UserServiceImpl userService;

    @RequestMapping("/allUser")
    public String list(Model model) {
        model.addAttribute("dateTime", LocalDateTime.now());
        model.addAttribute("userList", userService.queryUserList());
        // 会被视图解析器处理
        return "userList"; // views目录下userList.jsp
    }

}
2
3
4
5
6
7
8
9
10
11
12
13
14
15
Model是每次请求中都存在的默认参数,利用其addAttribute()方法即可将服务器的值传递到jsp页面中,Model是每一次请求会自动创建。
可以看下Model的源码,Model提供了几个设置数据的方法。
Model源码
public interface Model {

	/**
	 * Add the supplied attribute under the supplied name.
	 * @param attributeName the name of the model attribute (never {@code null})
	 * @param attributeValue the model attribute value (can be {@code null})
	 */
	Model addAttribute(String attributeName, @Nullable Object attributeValue);

	/**
	 * Add the supplied attribute to this {@code Map} using a
	 * {@link org.springframework.core.Conventions#getVariableName generated name}.
	 * <p><i>Note: Empty {@link java.util.Collection Collections} are not added to
	 * the model when using this method because we cannot correctly determine
	 * the true convention name. View code should check for {@code null} rather
	 * than for empty collections as is already done by JSTL tags.</i>
	 * @param attributeValue the model attribute value (never {@code null})
	 */
	Model addAttribute(Object attributeValue);

	/**
	 * Copy all attributes in the supplied {@code Collection} into this
	 * {@code Map}, using attribute name generation for each element.
	 * @see #addAttribute(Object)
	 */
	Model addAllAttributes(Collection<?> attributeValues);

	/**
	 * Copy all attributes in the supplied {@code Map} into this {@code Map}.
	 * @see #addAttribute(String, Object)
	 */
	Model addAllAttributes(Map<String, ?> attributes);

	/**
	 * Copy all attributes in the supplied {@code Map} into this {@code Map},
	 * with existing objects of the same name taking precedence (i.e. not getting
	 * replaced).
	 */
	Model mergeAttributes(Map<String, ?> attributes);

	/**
	 * Does this model contain an attribute of the given name?
	 * @param attributeName the name of the model attribute (never {@code null})
	 * @return whether this model contains a corresponding attribute
	 */
	boolean containsAttribute(String attributeName);

	/**
	 * Return the attribute value for the given name, if any.
	 * @param attributeName the name of the model attribute (never {@code null})
	 * @return the corresponding attribute value, or {@code null} if none
	 * @since 5.2
	 */
	@Nullable
	Object getAttribute(String attributeName);

	/**
	 * Return the current set of model attributes as a Map.
	 */
	Map<String, Object> asMap();

}
2
3
4
5
6
7
8
9
10
11
12
13
14
15
16
17
18
19
20
21
22
23
24
25
26
27
28
29
30
31
32
33
34
35
36
37
38
39
40
41
42
43
44
45
46
47
48
49
50
51
52
53
54
55
56
57
58
59
60
61
62
Model方法说明
| 方法 | 说明 |
|---|---|
| addAttribute(String attributeName, Object attributeValue) | 添加单个属性到模型中,attributeName 是你希望在视图中访问该属性时使用的名称, attributeValue 是相应的值。 |
| addAttribute(Object attributeValue) | 自动根据属性值的类型推断属性名称并添加到模型中。它通常基于属性值的类名来推断属性名称。 |
| addAllAttributes(Collection<?> attributeValues) | 将一个集合内的所有对象添加到模型中,属性名称是自动推断的。 |
| addAllAttributes(Map<String, ?> attributes) | 将一个 Map 中的所有键值对添加到模型中,Map 中的键作为属性名称,值作为属性值。 |
| mergeAttributes(Map<String, ?> attributes) | 将一个 Map 中的所有键值对合并到现有模型属性中,如果存在相同的属性则不会覆盖原有属性值。 |
| containsAttribute(String attributeName) | 检查模型是否包含给定名称的属性。 |
| Map<String, Object> asMap() | 返回当前模型的视图,这是一个包含所有属性的 Map。 |
使用案例
// 添加用户
model.addAttribute("user", user);
// 添加用户
model.addAttribute(user);
// 添加所有用户,用于批量添加属性,其中每个属性值都将根据其类型自动分配属性名。
model.addAllAttributes(users);
// 添加一个map类型的数据,以键值对的形式一次性添加多个属性
model.addAllAttributes(mapAttributes);
// 与现有模型属性的合并,它保留了现有的属性并添加了新的属性,除非它们有相同的名称。
model.mergeAttributes(mapAttributes);
// 检查模型是否包含user
boolean exists = model.containsAttribute("user");
// 将model数据转为map
Map<String, Object> map = model.asMap();
2
3
4
5
6
7
8
9
10
11
12
13
14
# 5.2、ModelAndView
ModelAndView是模型视图的意思,是MVC中的MV,主要功能:传输数据、设置跳转页面。ModelAndView 可以进行业务寻址。
ModelAndView源码主要是包含了几个属性、构造方法、对象方法。
ModelAndView源码
public class ModelAndView {

	/** View instance or view name String. */
	@Nullable
	private Object view;

	/** Model Map. */
	@Nullable
	private ModelMap model;

	/** Optional HTTP status for the response. */
	@Nullable
	private HttpStatus status;

	/** Indicates whether or not this instance has been cleared with a call to {@link #clear()}. */
	private boolean cleared = false;


	/**
	 * Default constructor for bean-style usage: populating bean
	 * properties instead of passing in constructor arguments.
	 * @see #setView(View)
	 * @see #setViewName(String)
	 */
	public ModelAndView() {
	}

	/**
	 * Convenient constructor when there is no model data to expose.
	 * Can also be used in conjunction with {@code addObject}.
	 * @param viewName name of the View to render, to be resolved
	 * by the DispatcherServlet's ViewResolver
	 * @see #addObject
	 */
	public ModelAndView(String viewName) {
		this.view = viewName;
	}

	/**
	 * Convenient constructor when there is no model data to expose.
	 * Can also be used in conjunction with {@code addObject}.
	 * @param view the View object to render
	 * @see #addObject
	 */
	public ModelAndView(View view) {
		this.view = view;
	}

	/**
	 * Create a new ModelAndView given a view name and a model.
	 * @param viewName name of the View to render, to be resolved
	 * by the DispatcherServlet's ViewResolver
	 * @param model a Map of model names (Strings) to model objects
	 * (Objects). Model entries may not be {@code null}, but the
	 * model Map may be {@code null} if there is no model data.
	 */
	public ModelAndView(String viewName, @Nullable Map<String, ?> model) {
		this.view = viewName;
		if (model != null) {
			getModelMap().addAllAttributes(model);
		}
	}

	/**
	 * Create a new ModelAndView given a View object and a model.
	 * <em>Note: the supplied model data is copied into the internal
	 * storage of this class. You should not consider to modify the supplied
	 * Map after supplying it to this class</em>
	 * @param view the View object to render
	 * @param model a Map of model names (Strings) to model objects
	 * (Objects). Model entries may not be {@code null}, but the
	 * model Map may be {@code null} if there is no model data.
	 */
	public ModelAndView(View view, @Nullable Map<String, ?> model) {
		this.view = view;
		if (model != null) {
			getModelMap().addAllAttributes(model);
		}
	}

	/**
	 * Create a new ModelAndView given a view name and HTTP status.
	 * @param viewName name of the View to render, to be resolved
	 * by the DispatcherServlet's ViewResolver
	 * @param status an HTTP status code to use for the response
	 * (to be set just prior to View rendering)
	 * @since 4.3.8
	 */
	public ModelAndView(String viewName, HttpStatus status) {
		this.view = viewName;
		this.status = status;
	}

	/**
	 * Create a new ModelAndView given a view name, model, and HTTP status.
	 * @param viewName name of the View to render, to be resolved
	 * by the DispatcherServlet's ViewResolver
	 * @param model a Map of model names (Strings) to model objects
	 * (Objects). Model entries may not be {@code null}, but the
	 * model Map may be {@code null} if there is no model data.
	 * @param status an HTTP status code to use for the response
	 * (to be set just prior to View rendering)
	 * @since 4.3
	 */
	public ModelAndView(@Nullable String viewName, @Nullable Map<String, ?> model, @Nullable HttpStatus status) {
		this.view = viewName;
		if (model != null) {
			getModelMap().addAllAttributes(model);
		}
		this.status = status;
	}

	/**
	 * Convenient constructor to take a single model object.
	 * @param viewName name of the View to render, to be resolved
	 * by the DispatcherServlet's ViewResolver
	 * @param modelName name of the single entry in the model
	 * @param modelObject the single model object
	 */
	public ModelAndView(String viewName, String modelName, Object modelObject) {
		this.view = viewName;
		addObject(modelName, modelObject);
	}

	/**
	 * Convenient constructor to take a single model object.
	 * @param view the View object to render
	 * @param modelName name of the single entry in the model
	 * @param modelObject the single model object
	 */
	public ModelAndView(View view, String modelName, Object modelObject) {
		this.view = view;
		addObject(modelName, modelObject);
	}


	/**
	 * Set a view name for this ModelAndView, to be resolved by the
	 * DispatcherServlet via a ViewResolver. Will override any
	 * pre-existing view name or View.
	 */
	public void setViewName(@Nullable String viewName) {
		this.view = viewName;
	}

	/**
	 * Return the view name to be resolved by the DispatcherServlet
	 * via a ViewResolver, or {@code null} if we are using a View object.
	 */
	@Nullable
	public String getViewName() {
		return (this.view instanceof String ? (String) this.view : null);
	}

	/**
	 * Set a View object for this ModelAndView. Will override any
	 * pre-existing view name or View.
	 */
	public void setView(@Nullable View view) {
		this.view = view;
	}

	/**
	 * Return the View object, or {@code null} if we are using a view name
	 * to be resolved by the DispatcherServlet via a ViewResolver.
	 */
	@Nullable
	public View getView() {
		return (this.view instanceof View ? (View) this.view : null);
	}

	/**
	 * Indicate whether or not this {@code ModelAndView} has a view, either
	 * as a view name or as a direct {@link View} instance.
	 */
	public boolean hasView() {
		return (this.view != null);
	}

	/**
	 * Return whether we use a view reference, i.e. {@code true}
	 * if the view has been specified via a name to be resolved by the
	 * DispatcherServlet via a ViewResolver.
	 */
	public boolean isReference() {
		return (this.view instanceof String);
	}

	/**
	 * Return the model map. May return {@code null}.
	 * Called by DispatcherServlet for evaluation of the model.
	 */
	@Nullable
	protected Map<String, Object> getModelInternal() {
		return this.model;
	}

	/**
	 * Return the underlying {@code ModelMap} instance (never {@code null}).
	 */
	public ModelMap getModelMap() {
		if (this.model == null) {
			this.model = new ModelMap();
		}
		return this.model;
	}

	/**
	 * Return the model map. Never returns {@code null}.
	 * To be called by application code for modifying the model.
	 */
	public Map<String, Object> getModel() {
		return getModelMap();
	}

	/**
	 * Set the HTTP status to use for the response.
	 * <p>The response status is set just prior to View rendering.
	 * @since 4.3
	 */
	public void setStatus(@Nullable HttpStatus status) {
		this.status = status;
	}

	/**
	 * Return the configured HTTP status for the response, if any.
	 * @since 4.3
	 */
	@Nullable
	public HttpStatus getStatus() {
		return this.status;
	}


	/**
	 * Add an attribute to the model.
	 * @param attributeName name of the object to add to the model (never {@code null})
	 * @param attributeValue object to add to the model (can be {@code null})
	 * @see ModelMap#addAttribute(String, Object)
	 * @see #getModelMap()
	 */
	public ModelAndView addObject(String attributeName, @Nullable Object attributeValue) {
		getModelMap().addAttribute(attributeName, attributeValue);
		return this;
	}

	/**
	 * Add an attribute to the model using parameter name generation.
	 * @param attributeValue the object to add to the model (never {@code null})
	 * @see ModelMap#addAttribute(Object)
	 * @see #getModelMap()
	 */
	public ModelAndView addObject(Object attributeValue) {
		getModelMap().addAttribute(attributeValue);
		return this;
	}

	/**
	 * Add all attributes contained in the provided Map to the model.
	 * @param modelMap a Map of attributeName -> attributeValue pairs
	 * @see ModelMap#addAllAttributes(Map)
	 * @see #getModelMap()
	 */
	public ModelAndView addAllObjects(@Nullable Map<String, ?> modelMap) {
		getModelMap().addAllAttributes(modelMap);
		return this;
	}


	/**
	 * Clear the state of this ModelAndView object.
	 * The object will be empty afterwards.
	 * <p>Can be used to suppress rendering of a given ModelAndView object
	 * in the {@code postHandle} method of a HandlerInterceptor.
	 * @see #isEmpty()
	 * @see HandlerInterceptor#postHandle
	 */
	public void clear() {
		this.view = null;
		this.model = null;
		this.cleared = true;
	}

	/**
	 * Return whether this ModelAndView object is empty,
	 * i.e. whether it does not hold any view and does not contain a model.
	 */
	public boolean isEmpty() {
		return (this.view == null && CollectionUtils.isEmpty(this.model));
	}

	/**
	 * Return whether this ModelAndView object is empty as a result of a call to {@link #clear}
	 * i.e. whether it does not hold any view and does not contain a model.
	 * <p>Returns {@code false} if any additional state was added to the instance
	 * <strong>after</strong> the call to {@link #clear}.
	 * @see #clear()
	 */
	public boolean wasCleared() {
		return (this.cleared && isEmpty());
	}


	/**
	 * Return diagnostic information about this model and view.
	 */
	@Override
	public String toString() {
		return "ModelAndView [view=" + formatView() + "; model=" + this.model + "]";
	}

	private String formatView() {
		return isReference() ? "\"" + this.view + "\"" : "[" + this.view + "]";
	}

}
2
3
4
5
6
7
8
9
10
11
12
13
14
15
16
17
18
19
20
21
22
23
24
25
26
27
28
29
30
31
32
33
34
35
36
37
38
39
40
41
42
43
44
45
46
47
48
49
50
51
52
53
54
55
56
57
58
59
60
61
62
63
64
65
66
67
68
69
70
71
72
73
74
75
76
77
78
79
80
81
82
83
84
85
86
87
88
89
90
91
92
93
94
95
96
97
98
99
100
101
102
103
104
105
106
107
108
109
110
111
112
113
114
115
116
117
118
119
120
121
122
123
124
125
126
127
128
129
130
131
132
133
134
135
136
137
138
139
140
141
142
143
144
145
146
147
148
149
150
151
152
153
154
155
156
157
158
159
160
161
162
163
164
165
166
167
168
169
170
171
172
173
174
175
176
177
178
179
180
181
182
183
184
185
186
187
188
189
190
191
192
193
194
195
196
197
198
199
200
201
202
203
204
205
206
207
208
209
210
211
212
213
214
215
216
217
218
219
220
221
222
223
224
225
226
227
228
229
230
231
232
233
234
235
236
237
238
239
240
241
242
243
244
245
246
247
248
249
250
251
252
253
254
255
256
257
258
259
260
261
262
263
264
265
266
267
268
269
270
271
272
273
274
275
276
277
278
279
280
281
282
283
284
285
286
287
288
289
290
291
292
293
294
295
296
297
298
299
300
301
302
303
304
305
306
307
308
309
310
311
312
313
314
315
316
属性说明
- view:表示需要呈现的视图。用于告诉Spring MVC应该渲染哪个视图。
- model:用于向视图传递数据。ModelMap(模型数据的特殊实现类)对象的引用。
- status:可选的HTTP响应状态码。
- cleared:指ModelAndView实例是否已经通过调用clear()方法进行了清除。当调用clear()方法后,该属性为true。
构造方法
| 方法 | 说明 |
|---|---|
| ModelAndView() | 创建一个空的 ModelAndView 对象。 |
| ModelAndView(String viewName) | 创建一个 ModelAndView 对象,并设置视图的名称。 |
| ModelAndView(String viewName, Map model) | 创建一个 ModelAndView 对象,设置视图的名称和要传递给视图的模型数据。 |
| ModelAndView(String viewName, String modelName, Object modelObject) | 创建一个 ModelAndView 对象,设置视图的名称、模型数据的名称和模型数据的值。 |
| ModelAndView(View view) | 创建一个 ModelAndView 对象,并设置视图的实例。 |
| ModelAndView(View view, Map model) | 创建一个 ModelAndView 对象,设置视图的实例和要传递给视图的模型数据。 |
| ModelAndView(View view, String modelName, Object modelObject) | 创建一个 ModelAndView 对象,设置视图的实例、模型数据的名称和模型数据的值。 |
案例
@RequestMapping("/some-path")
public ModelAndView someMethod() {
    // ... do some processing ...
    Map<String, Object> model = new HashMap<>();
    model.put("key1", value1);
    model.put("key2", value2);
    return new ModelAndView("viewName", model);
}

@RequestMapping("/some-path")
public ModelAndView someMethod() {
    // ... do some processing ...
    return new ModelAndView("viewName", "key1", value1);
}
2
3
4
5
6
7
8
9
10
11
12
13
14
其他方法
| 方法 | 说明 |
|---|---|
| addAllObjects(Map modelMap) | 添加所有条目到模型中。 |
| addObject(Object modelObject) | 将模型对象添加到模型中。 |
| addObject(String modelName, Object modelObject) | 将模型对象添加到模型中,并指定一个名称。 |
| clear() | 清除模型中的所有数据。 |
| getModel() | 获取当前的模型数据。 |
| getModelInternal() | 获取内部的模型数据。 |
| getModelMap() | 获取底层ModelMap实例。 |
| getView() | 获取视图对象。 |
| getViewName() | 获取视图名称。 |
| hasView() | 检查是否有一个视图对象。 |
| isEmpty() | 检查是否没有模型数据。 |
| isReference() | 检查是否使用视图的引用。 |
| setView(View view) | 设置视图对象。 |
| setViewName(String viewName) | 设置视图名称。 |
| toString() | 返回模型的诊断信息。 |
| wasCleared() | 检查是否已清除模型数据。 |
# 5.3、两者对比
- Model只是用来传输数据的,并不会进行业务的寻址。而ModelAndView 可以进行业务寻址。
- ModelAndView更强大,而Model更简单。
- Model是每一次请求都自动创建,是每次请求中都存在的默认参数。而ModelAndView需要手动创建。
- JSP页面中读取数据都是通过EL表达式方式。
- 寻址跳转页面方式都是forward操作(请求转发操作)。
业务寻址:指的是返回的页面
// 使用Model时,直接返回String指向页面
@RequestMapping("/hello")
public String hello(Model model){
	return "hello";
}
// 使用ModelAndView时,返回ModelAndView,指定页面
@RequestMapping("/hello")
public ModelAndView hello(){
	ModelAndView modelAndView = new ModelAndView();
	// 指定返回页面
	modelAndView.setViewName("hello");
	return modelAndView;
}
2
3
4
5
6
7
8
9
10
11
12
13
# 6、web.xml配置
# 6.1、web.xml的作用
SpringMVC的Java Web项目,对于web.xml配置可以说是必不可少的。
- 配置欢迎页、错误页面
- 配置Servlet
- 配置Filter(过滤器)
- 配置Listener(监听器)
- Spring上下文配置
- 静态资源处理配置
- 异常处理配置
# 6.2、web.xml标签加载顺序
需要注意的是,以下仅是常见的标签加载顺序,实际情况可能因具体项目和需求而有所不同。在编写web.xml时,应根据项目需要和标签之间的依赖关系来确定加载顺序。
web-app:是web.xml文件的根标签,应该作为首个标签出现。display-name:用于设置Web应用程序的显示名称。context-param:用于设置上下文的参数。可以在此标签内定义各种配置参数,供整个Web应用程序使用。listener:用于配置监听器。可以在此标签内定义监听器类,监听器可以监听Web应用程序的生命周期事件。filter:用于配置过滤器。可以在此标签内定义过滤器名称、过滤器类、过滤器参数等。filter-mapping:用于定义过滤器的映射规则,即指定哪些URL请求需要经过该过滤器进行处理。servlet:用于配置Servlet。可以在此标签内定义servlet名称、servlet类、servlet初始化参数等。servlet-mapping:用于定义Servlet的映射规则,即指定哪些URL请求需要由该Servlet进行处理。error-page:用于定义错误页面,可以根据不同的HTTP状态码或异常类型,指定对应的错误页面。welcome-file-list:用于定义默认的欢迎文件。在没有指定具体URL时,Web容器会根据该标签中定义的顺序,依次尝试加载欢迎文件。session-config:用于配置会话(Session)的相关参数,例如会话的超时时间等。mime-mapping:用于定义MIME类型与文件后缀名的对应关系。
# 6.3、web.xml加载过程
当启动一个WEB项目时,容器包括(JBoss、Tomcat等),详细的加载过程步骤
- 容器启动并搜索Web应用程序。
- 容器通过类加载器找到WEB-INF目录下的web.xml文件。
- 容器加载并解析web.xml文件的XML结构,并验证其是否符合Servlet规范的XML Schema。如果解析错误,容器可能会停止应用启动并报错。
- 容器创建一个ServletContext对象,代表整个应用程序,并将其初始化。
- 容器通过解析web.xml文件中的元素,将的名字和值存储在ServletContext对象中,以供整个应用程序使用。示例如下:
<context-param>
  <param-name>contextConfigLocation</param-name>
  <param-value>/WEB-INF/applicationContext.xml</param-value>
</context-param>
2
3
4
在示例中,param-name为"contextConfigLocation",param-value为"/WEB-INF/applicationContext.xml",这样可以将"param-name"和对应的"param-value"存储在ServletContext对象中。
- 容器通过解析web.xml文件中的元素,根据配置的来创建Listener的实例。对于每个创建的Listener实例,容器会调用其contextInitialized()方法,以进行初始化操作。示例如下:
<listener>
  <listener-class>com.example.MyListener</listener-class>
</listener>
2
3
- 容器通过解析web.xml文件中的过滤器
<filter>
  <filter-name>myFilter</filter-name>
  <filter-class>com.example.MyFilter</filter-class>
</filter>
2
3
4
在示例中,filter-name为"myFilter",filter-class为"com.example.MyFilter",容器会创建一个MyFilter的实例,并调用其init()方法。
- 容器通过解析web.xml文件中的元素,根据配置的来创建Servlet的实例。对于每个创建的Servlet实例,容器会调用其init()方法,进行初始化操作。示例如下:
<servlet>
  <servlet-name>myServlet</servlet-name>
  <servlet-class>com.example.MyServlet</servlet-class>
</servlet>
2
3
4
在示例中,servlet-name为"myServlet",servlet-class为"com.example.MyServlet",容器会创建一个MyServlet的实例,并调用其init()方法。
- 容器通过解析web.xml文件中的元素和元素,将URL和对应的Filter或Servlet建立映射关系。示例如下:
<filter-mapping>
  <filter-name>myFilter</filter-name>
  <url-pattern>/myServlet</url-pattern>
</filter-mapping>
<servlet-mapping>
  <servlet-name>myServlet</servlet-name>
  <url-pattern>/myServlet</url-pattern>
</servlet-mapping>
2
3
4
5
6
7
8
- 容器标记应用程序已准备就绪,可以接受客户端请求。
- 容器拦截客户端请求,根据URL的映射关系,调用对应的Filter的doFilter()方法,然后将请求转发给对应的Servlet进行处理。
- 容器在应用程序关闭时,调用每个Listener的contextDestroyed()方法,进行资源释放等清理操作。
- 容器调用每个Filter的destroy()方法,进行资源释放等清理操作。
- 容器调用每个Servlet的destroy()方法,进行资源释放等清理操作。
- 容器关闭,Web应用程序停止运行。
Servlet定义DispatcherServlet时执行顺序 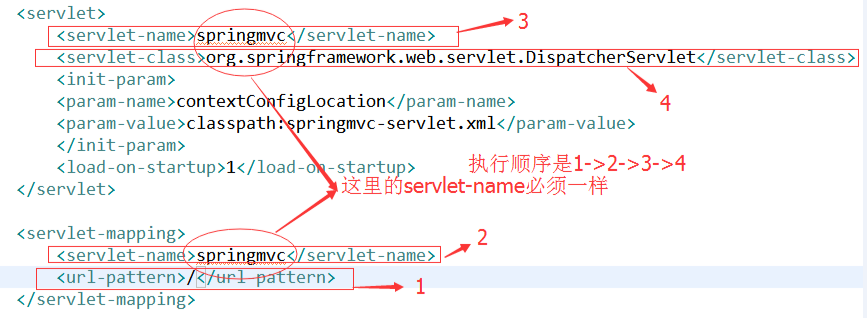
# 6.4、web.xml标签
web-app
<!-- XML声明,指定XML版本和编码 -->
<?xml version="1.0" encoding="UTF-8"?>
<web-app version="2.5"
 	xmlns="http://java.sun.com/xml/ns/javaee"
 	xmlns:xsi="http://www.w3.org/2001/XMLSchema-instance"
 	xsi:schemaLocation="http://java.sun.com/xml/ns/javaee http://java.sun.com/xml/ns/javaee/web-app_2_5.xsd">
</web-app>
2
3
4
5
6
7
- version="2.5":这是web-app元素的version属性,指定了web.xml文件使用的Servlet规范版本。
- xmlns="http://java.sun.com/xml/ns/javaee":这是web-app元素的默认命名空间,它指定了XML文件所使用的命名空间。
- xmlns:xsi="http://www.w3.org/2001/XMLSchema-instance":这是xsi命名空间,它约定了关于XML文件架构的附件信息。
- xsi:schemaLocation="http://java.sun.com/xml/ns/javaee http://java.sun.com/xml/ns/javaee/web-app_2_5.xsd":这个属性指定了XML文件的模式(XSD)的位置。在这个例子中,它指定了web-app元素所使用的是2.5版本的Servlet规范的模式。
display-name
<!-- 标识项目的名称 -->
<display-name>SpringMVC</display-name>
2
context-param
<!-- 定义参数:键、值、描述 -->
<context-param>
    <param-name>名称</para-name>
    <param-value>值</param-value>
    <description>描述</description>
</context-param>

<!-- 定义案例 -->
<context-param>
    <param-name>dbUsername</param-name>
    <param-value>admin</param-value>
    <description>数据库用户名</description>
</context-param>
2
3
4
5
6
7
8
9
10
11
12
13
使用案例
public class MyApp {
    public static void main(String[] args) {
        // 加载Spring配置文件
        ApplicationContext context = new ClassPathXmlApplicationContext("applicationContext.xml");
        // 从应用程序上下文中获取数据库用户名
        String dbUsername = context.getEnvironment().getProperty("dbUsername");
        // 输出数据库用户名
        System.out.println("数据库用户名:" + dbUsername);
    }
}
2
3
4
5
6
7
8
9
10
listener
<!-- 定义监听类 -->
<listener>
    <listerner-class>Listener的类名称全路径</listener-class>
</listener>
<!-- 案例 -->
<listener>
    <listerner-class>com.listener.SessionListener</listener-class>
</listener>
2
3
4
5
6
7
8
使用案例
public class SessionListener implements HttpSessionListener {

    @Override
    public void sessionCreated(HttpSessionEvent se) {
        // This method will be called when a session is created
        System.out.println("Session Created with session id+" + se.getSession().getId());
    }

    @Override
    public void sessionDestroyed(HttpSessionEvent se) {
        // This method will be called when a session is destroyed
        System.out.println("Session Destroyed, Session id:" + se.getSession().getId());
    }

}
2
3
4
5
6
7
8
9
10
11
12
13
14
15
filter和filter-mapping
<!-- 设置字符编码 -->
<filter>
    <filter-name>setCharacterEncoding</filter-name>
    <filter-class>com.myTest.setCharacterEncodingFilter</filter-class>
    <init-param>
        <param-name>encoding</param-name>
        <param-value>UTF-8</param-value>
    </init-param>
</filter>
<filter-mapping>
    <filter-name>setCharacterEncoding</filter-name>
    <url-pattern>/*</url-pattern>
</filter-mapping>
2
3
4
5
6
7
8
9
10
11
12
13
servlet和servlet-mapping
<!-- 基本配置 -->
<servlet>
    <servlet-name>snoop</servlet-name> <!-- servlet名称 -->
    <servlet-class>SnoopServlet</servlet-class> <!-- servlet处理类 -->
</servlet>
<servlet-mapping>
    <servlet-name>snoop</servlet-name> <!-- servlet映射名称 -->
    <url-pattern>/snoop</url-pattern> <!-- 拦截请求 -->
</servlet-mapping>

<!-- 高级配置 -->
<servlet>
    <servlet-name>snoop</servlet-name>
    <servlet-class>SnoopServlet</servlet-class>
    <init-param>
        <param-name>foo</param-name>
        <param-value>bar</param-value>
    </init-param>
    <run-as>
        <description>Security role for anonymous access</description>
        <role-name>tomcat</role-name>
    </run-as>
</servlet>
<servlet-mapping>
    <servlet-name>snoop</servlet-name>
    <url-pattern>/snoop</url-pattern>
</servlet-mapping>
2
3
4
5
6
7
8
9
10
11
12
13
14
15
16
17
18
19
20
21
22
23
24
25
26
27
28
error-page
<!-- 后台程序异常错误跳转页面 -->
<error-page>
  <exception-type>java.lang.Throwable</exception-type>
  <location>WEB-INF/error.jsp</location>
</error-page>

<!-- 500跳转页面-->
<error-page>
  <error-code>500</error-code>
  <location>/WEB-INF/500.jsp</location>
</error-page>

<!-- 404跳转页面 -->
<error-page>
  <error-code>404</error-code>
  <location>/WEB-INF/404.jsp</location>
</error-page>
2
3
4
5
6
7
8
9
10
11
12
13
14
15
16
17
welcome-file-list
<!-- 依次加载第一个成功的首页 -->
<welcome-file-list>
    <welcome-file>index.jsp</welcome-file>
    <welcome-file>index.html</welcome-file>
    <welcome-file>index.htm</welcome-file>
</welcome-file-list>
2
3
4
5
6
# 6.5、web.xml固定配置
<!--web.xml固定代码-->
<servlet>
	<servlet-name>springmvc</servlet-name>
	<servlet-class>org.springframework.web.servlet.DispatcherServlet</servlet-class>
	<!--设置在服务器启动时,马上拆功能键DispatcherServlet对象-->
	<!--load-on-startup:在启动时进行加载,
	数字表示tomcat启动后创建的顺序,数制越小创建的对象时机越早>=0的整数-->
	<init-param>
		<!--指定SpringMVC的配置文件的属性,必须是contextConfigLocation-->
		<param-name>contextConfigLocation</param-name>
		<!--自定义文件的位置classpath:-->
		<param-value>classpath:springmvc.xml</param-value>
	</init-param>
	<load-on-startup>1</load-on-startup>
</servlet>
<!--设置servlet-mapping-->
<servlet-mapping>
	<servlet-name>springmvc</servlet-name>
	<!--可以使用两种值,
	1.使用扩展名的方式,语法*.xxxxxx是自定义的拓展名常用的有*.do*.action*.mvc
		表示以.do结尾的请求,都会被该servlet-mapping处理(没有/)
			http://localhost:8080/myweb/some.do
			http://localhost:8080/myweb/other.do
	2.使用"/"的方式
	-->
	<url-pattern>/</url-pattern>
</servlet-mapping>

<!--注册过滤器,解决post请求中文乱码问题 web.xml文件配置-->
<filter>
	<filter-name>characterEncodingFilter</filter-name>
	<!--CharacterEncodingFilter-->
	<filter-class>org.springframework.web.filter.CharacterEncodingFilter</filter-class>
	<!--设置项目中使用的字符编码-->
	<init-param>
		<param-name>encoding</param-name>
		<param-value>utf-8</param-value>
	</init-param>
	<!--强制请求对象,使用encoding编码的值-->
	<init-param>
		<param-name>forceRequestEncoding</param-name>
		<param-value>true</param-value>
	</init-param>
	<!--强制响应对象,使用encoding编码的值-->
	<init-param>
		<param-name>forceResponseEncoding</param-name>
		<param-value>true</param-value>
	</init-param>
</filter>

<filter-mapping>
	<filter-name>characterEncodingFilter</filter-name>
	<!--表示强制所有的请求先通过过滤器处理-->
	<url-pattern>/*</url-pattern>
</filter-mapping>
2
3
4
5
6
7
8
9
10
11
12
13
14
15
16
17
18
19
20
21
22
23
24
25
26
27
28
29
30
31
32
33
34
35
36
37
38
39
40
41
42
43
44
45
46
47
48
49
50
51
52
53
54
55
# 6.6、springmvc固定配置
<?xml version="1.0" encoding="UTF-8"?>
<beans xmlns="http://www.springframework.org/schema/beans"
       xmlns:xsi="http://www.w3.org/2001/XMLSchema-instance"
       xmlns:context="http://www.springframework.org/schema/context"
       xmlns:mvc="http://www.springframework.org/schema/mvc"
       xmlns:jpa="http://www.springframework.org/schema/data/jpa"
       xmlns:tx="http://www.springframework.org/schema/tx"
       xsi:schemaLocation="http://www.springframework.org/schema/beans http://www.springframework.org/schema/beans/spring-beans.xsd
       http://www.springframework.org/schema/context http://www.springframework.org/schema/context/spring-context.xsd
       http://www.springframework.org/schema/mvc http://www.springframework.org/schema/mvc/spring-mvc.xsd
       http://www.springframework.org/schema/data/jpa http://www.springframework.org/schema/data/jpa/spring-jpa.xsd
       http://www.springframework.org/schema/tx http://www.springframework.org/schema/tx/spring-tx.xsd">

	<!--组件扫描器,用来扫描注解创建对象的-->
	<context:component-scan base-package="com.xygalaxyi"/>

	<!--视图解析器-->
	<bean class="org.springframework.web.servlet.view.InternalResourceViewResolver">
		<!--前缀,视图文件的路径-->
		<property name="prefix" value="/WEB-INF/views/"/>
		<!--后缀,视图文件的拓展名-->
		<property name="suffix" value=".jsp"/>
	</bean>

	<!--springmvc响应AJAX 请求返回一个json数据的对象 添加注解驱动-->
	<mvc:annotation-driven/>
	<!--url-pattern是/时,配置访问静态文件,目录要求:静态文件都在static文件下-->
	<!--同时也需要上面那一句 <mvc:annotation-driven>-->
	<mvc:resources mapping="/static/**" location="/static/"/>

	拦截器
	<!--声明拦截器,在框架中拦截器可以有0或多个-->
	<mvc:interceptors>
		<!--声明第一个-->
		<mvc:interceptor>
			<!--指定拦截的请求uri地址的
				path:就是uri地址,可以使用通配符 **
				**:表示任意的字符,文件,或者多级目录和目录中的文件
				/** : 表示所有的请求都会被拦截
			-->
			<mvc:mapping path="/**"/>
			<!--声明拦截器对象,表示访问上面那个地址的时候都由下面这个拦截器处理-->
			<bean class="com.xygalaxyi.handler.MyInterceptor"/>
		</mvc:interceptor>
	</mvc:interceptors>
</beans>
2
3
4
5
6
7
8
9
10
11
12
13
14
15
16
17
18
19
20
21
22
23
24
25
26
27
28
29
30
31
32
33
34
35
36
37
38
39
40
41
42
43
44
45
46
# 7、@RequestMapping注解
请求映射,作用是把一个请求地址和一个方法绑定在一起
@Controller
@RequestMapping("/mapperTest")
public class RequestMapperController {


    @RequestMapping("/test")
    public String test(){
        return "test";
    }

    @RequestMapping(value = "/test2",method = RequestMethod.GET)
    public String test2(){
        return "test2";
    }

    @RequestMapping(value = "/test3",method = RequestMethod.POST)
    public String test3(){
        return "test3";
    }
}
2
3
4
5
6
7
8
9
10
11
12
13
14
15
16
17
18
19
20
前端访问
<a href="/mapperTest/test">test</a>
<a href="/mapperTest/test2">test2</a>
<!-- test3这样访问会报错,因为需要post请求,默认为get的请求 -->
<a href="/mapperTest/test3">test3</a>
2
3
4
# 8、方法的形参
获取请求中携带的请求参数
# 8.1、SpringMVC自带形参
这些参数springmvc会给自动赋值,直接使用就行
- HttpServletRequest:请求
- HttpServletResponse:响应
- HttpSession:会话
@RequestMapping(value="/login.do",method=RequestMethod.POST)
//直接在这里声明 上请求对象,响应对象,session对象就行
Public ModelAndView test(HttpSession session,
                         HttpServletRequest request,
                         HttpServletResponse response){
    //从请求中得到数据 getParameter()
    String username = request.getParameter("username");
    ModelAndView mv=new ModelAndView();
    //添加到mv对象中,也就是请求作用域对象
    mv.addObject("key",username);
    //请求转发,到login.jsp, 这里配置了视图解析器,本来应该写 /WEB-INF/view/login.jsp的
    mv.setViewName("login");
    returnmv;
}
2
3
4
5
6
7
8
9
10
11
12
13
14
# 8.2、逐个形参
- 处理其方法的形参名,和请求中参数的name必须一致。
- 同名的请求参数会自动赋值给同名的形参
- 框架内部完成了 String username = request.getParameter("username");
- 框架会提供类型转换的功能,能把String转换成int,long,float,double 等类型和他的包装类型。
- 注意:当提交的是空字符串 "",或者是"abc"时,无法进行int类型转换,所以会报错400
@RequestMapping(value="/login.do",method=RequestMethod.POST)
//逐个接收,形参名必须和参数名一致才行
public ModelAndView login(String username,String password){
    ModelAndView mv=new ModelAndView();
    mv.addObject("key",username);
    mv.setViewName("login");
    return mv;
}
2
3
4
5
6
7
8
# 8.3、对象形参
- 类中的属性名和参数名一致,提供get、set方法和无参构造。
- 框架自动调用无参构造创建对象,再调用set方法 设置值。
- 前端发来的参数名称是name,框架自动调用 setName()方法。
- 形参中也可以有多个对象,比如UserPO、Student。
@RequestMapping("/test")
public String test(UserPO userPO){
	return "test";
}

// 如果是POST请求,需要加上@RequestBody
@RequestMapping(value = "/test3",method = RequestMethod.POST)
public String test3(@RequestBody UserPO userPO){
	return "test3";
}
2
3
4
5
6
7
8
9
10
# 8.4、参数和方法形参不一致
通过@RequestParam来映射
@RequestMapping("/login")
public String login(@RequestParam("name") String username
					@RequestParam("pwd") String password){

}
2
3
4
5
请求中的参数
<a href="/login?name=xy&pwd=123">登录</a>
# 9、方法的返回值
# 9.1、返回视图和数据
从前面的Model和ModelAndView中可以知道如何返回数据和视图。
@RequestMapping("/allUser")
public String list(Model model) {
	model.addAttribute("dateTime", LocalDateTime.now());
	model.addAttribute("userList", userService.queryUserList());
	// 会被视图解析器处理
	return "userList"; // views目录下userList.jsp
}

@RequestMapping("/allUser")
public ModelAndView list() {
	ModelAndView modelAndView = new ModelAndView();
	modelAndView.addObject("dateTime", LocalDateTime.now());
	modelAndView.addObject("userList", userService.queryUserList());
	modelAndView.setViewName("userList"); // views目录下userList.jsp
	return modelAndView;
}
2
3
4
5
6
7
8
9
10
11
12
13
14
15
16
# 9.2、返回视图
如果只想跳转页面,而不用数据,那么就可以不用Model和ModelAndView。直接返回字符串即可。
@RequestMapping("/allUser")
public String list() {
	return "userList";
}
2
3
4
# 9.3、返回数据
AJAX请求服务器端返回的就是数据,和视图无关。
- 返回void
- 既不能表示数据,也不能表示视图
- 在处理AJAX时,可以使用void,通过HttpServletResponse来输出数据,响应AJAX请求。
- 也就是返回void,但是需要返回数据,就通过HttpServletResponse来输出数据。
@GetMapping("/rawResponse")
public void handleRawResponse(HttpServletResponse response) {
	// 修改响应字符集
	response.setContentType("text/html,charset=utf-8");
	PrintWriter writer = response.getWriter();
	writer.print("响应AJAX请求");
}
2
3
4
5
6
7
- 返回值Object
返回Object表示返回数据,和视图无关。
加入@ResponseBody,放在处理器方法的上面,通过HttpServletResponse来输出数据,响应AJAX请求。
@ResponseBody
@RequestMapping("/allUser")
public String list() {
	return "userList";
}

// 返回的是字符串:userList,而不是跳转userList.jsp页面
2
3
4
5
6
7
对于所有Object类型都一样,比如UserPo对象。
@ResponseBody
@RequestMapping("/allUser")
public UserPO list() {
	return new UserPO("1","用户",20,"男");
}
2
3
4
5
# 10、静态资源配置
# 10.1、静态资源访问问题
我们在案例中配置了<url-pattern>/</url-pattern>来映射请求给servlet,并将请求给到DispatcherServlet来处理。导致所有的静态资源请求都交给了DispatcherSerlvet处理,默认情况下DispatcherServlet没有处理静态资源的能力。
<servlet>
	<servlet-name>springmvc</servlet-name>
	<servlet-class>org.springframework.web.servlet.DispatcherServlet</servlet-class>
	<init-param>
		<param-name>contextConfigLocation</param-name>
		<param-value>classpath:springmvc.xml</param-value>
	</init-param>
	<load-on-startup>1</load-on-startup>
</servlet>
<servlet-mapping>
	<servlet-name>springmvc</servlet-name>
	<url-pattern>/</url-pattern>
</servlet-mapping>
2
3
4
5
6
7
8
9
10
11
12
13
导致的问题:
DispatcherServlet无法处理静态资源,静态资源访问会失败 404 ,动态资源可以正常访问。
# 10.2、解决方案
- 方式一
<mvc:default-servlet-handler/>
<mvc:annotation-driven/>
2
加入这个标签后,框架会创建一个default对象,他像是一个监察员,对请求中的uri进行筛查,如果是访问静态资源,那么它做处理。注意这里要加入 <mvc:annotation-driven/> 注解驱动,要不动态资源无法访问。
- 方式二
<mvc:resources mapping="/static/**" location="/static/"/>
<mvc:annotation-driven/>
2
框架会创建 ResourceHttpRequestHandler对象,让这个对象去处理静态资源的访问。
# 11、路径问题
# 11.1、路径地址分类
- 绝对地址
带有协议名称,比如:http://localhost:8080/user/list
- 相对地址
- 相对于参考地址而言的地址,访问地址=参考地址+相对地址。比如:
/user/list - 访问时:
http://localhost:8080(参考地址) +/user/list(相对地址) =http://localhost:8080/user/list
# 11.2、获取参考地址方式
- EL表达式方式
使用EL表达式${pageContext.request.contextPath}获取web应用的上下文路径,拼接资源的路径。
<a href="${pageContext.request.contextPath}/user/list">用户列表</a>
- ServletContext方式
使用ServletContext获取资源路径
<%
   <!-- 获取项目路径 -->
   String basePath = request.getScheme() + "://" +
   request.getServerName() + ":" + request.getServerPort() +
   request.getContextPath() + "/";
%>
<title>Title</title>
<base href="<%=basePath%>">
<a href="user/list">用户列表</a>
<!-- 在使用了base之后,就不需要添加/开头了,因为base会将没有以斜杠开头的地址,把参考地址改为base地址 -->
2
3
4
5
6
7
8
9
10
# 12、转发和重定向
- 请求转发(Forward):可以实现页面的跳转和数据共享,是在服务器内部完成的,速度较快。请求转发是指将请求从一个页面转发到另一个页面,转发后用户的浏览器URL地址栏不会发生改变。
- 重定向(Redirect):可以实现页面的跳转和地址更新,是通过客户端发送新的请求来实现的,速度较慢。将请求从一个页面重定向到另一个页面,重定向后用户的浏览器URL地址栏会发生改变,显示重定向后的页面URL。
- 请求转发(Forward)
// 实现原理
request.getRequestDispatcher("xx.jsp").forward();
2
SpringMVC默认是请求转发方式,实现如下:
// ModelAndView方式
@RequestMapping("/allUser")
public ModelAndView list() {
	ModelAndView modelAndView = new ModelAndView();
	modelAndView.setViewName("forward:/userList.jsp");
	// 默认其实就是forward方式
	// modelAndView.setViewName("userList");
	return modelAndView;
}

// Model方式
@RequestMapping("/allUser")
public String list(Model model) {
	return "forward:/userList.jsp";
}
2
3
4
5
6
7
8
9
10
11
12
13
14
15
- 重定向(Redirect)
// 实现原理
response.sendRedirect("xxx".jsp)
2
SpringMVC默认是请求转发方式,实现如下:
// ModelAndView方式
@RequestMapping("/allUser")
public ModelAndView list() {
	ModelAndView modelAndView = new ModelAndView();
	modelAndView.setViewName("redirect:/userList.jsp");
	return modelAndView;
}

// Model方式
@RequestMapping("/allUser")
public String list(Model model) {
	return "redirect:/userList.jsp";
}
2
3
4
5
6
7
8
9
10
11
12
13
# 13、统一全局异常处理
统一全局异常处理:把Controller中所有的异常都集中到一个地方,采用的是aop的思想,把业务逻辑和异常处理分开,解耦合。
先来看个全局异常处理的案例
定义全局处理异常类
@ControllerAdvice
public class GlobalExceptionHandler {

    @ExceptionHandler(Exception.class)
    public ModelAndView handleException(HttpServletRequest request, Exception ex) {
        // 创建一个ModelAndView对象
        ModelAndView mav = new ModelAndView();
        mav.addObject("url", request.getRequestURL());
        mav.addObject("exception", ex);
        mav.setViewName("error"); // 设置视图名为error,可以是一个自定义的错误页面
        return mav;
    }
}
2
3
4
5
6
7
8
9
10
11
12
13
springmvc.xml配置异常类给Spring容器,并配置异常解析器。
<beans xmlns="http://www.springframework.org/schema/beans"
       xmlns:xsi="http://www.w3.org/2001/XMLSchema-instance"
       xsi:schemaLocation="http://www.springframework.org/schema/beans
       http://www.springframework.org/schema/beans/spring-beans.xsd">

	<!-- 异常解析器,当发生java.lang.Exception类型的异常时,会将异常映射到名为error的视图上。 -->
    <bean class="org.springframework.web.servlet.handler.SimpleMappingExceptionResolver">
        <property name="exceptionMappings">
            <props>
                <prop key="java.lang.Exception">error</prop>
            </props>
        </property>
    </bean>

	<!-- 全局异常处理 -->
    <bean class="com.example.GlobalExceptionHandler" />

    <!-- 其他配置 -->
</beans>
2
3
4
5
6
7
8
9
10
11
12
13
14
15
16
17
18
19
error.jsp视图展示错误信息
<%@ page language="java" contentType="text/html; charset=UTF-8" pageEncoding="UTF-8" %>
<!DOCTYPE html>
<html>
<head>
    <meta charset="UTF-8">
    <title>Error</title>
</head>
<body>
    <h1>Error</h1>
    <p>URL: ${url}</p>
    <p>Exception: ${exception}</p>
</body>
</html>
2
3
4
5
6
7
8
9
10
11
12
13
注解说明
- @ControllerAdvice:用于标记一个类,在Spring MVC中作为全局的异常处理器和全局的数据绑定器。它可以用来定义全局的异常处理方法、全局的数据处理逻辑以及全局的模型属性。
- @ExceptionHandler:用于标记一个方法,用于处理特定类型的异常。当在方法上标注了@ExceptionHandler注解,并指定了异常类型,那么当控制器中抛出该异常时,将会调用这个方法来处理异常。该方法必须具有与异常类型匹配的参数。
# 14、拦截器
SpringMVC拦截器图解 
# 14.1、拦截器是什么
拦截器(Interceptor)是一种在请求处理过程中介入的组件,可以在请求到达Controller之前或之后执行一些预处理或后处理操作。拦截器的作用类似于Servlet过滤器,但它更专注于处理请求的处理器(Handler)前后的逻辑。
在Spring MVC中,拦截器通常用于实现以下功能
- 身份验证和权限控制:通过拦截器可以对请求进行身份验证,检查用户是否具有执行指定操作的权限。
- 日志记录:拦截器可以记录请求的详细信息,如请求参数、处理时间等,用于监控和调试。
- 数据预处理:可以在请求到达Controller之前对请求参数进行预处理,如数据类型转换、标准化等。
- 统一处理异常:拦截器可以统一处理某些异常情况,例如转发到特定的错误页面或进行特定的异常处理逻辑。
# 14.2、拦截器 VS 过滤器
拦截器与过滤器类似,只是功能的方向侧重点不同。
- 过滤器是用来过滤请求参数,设置编码字符集等功能。
- 拦截器是拦截用户的请求,对请求做判断处理的。
拦截器与过滤器深度对比
- 过滤器是Servlet中的对象,拦截器是框架中的对象
- 过滤器是实现Filter接口,拦截器是实现HandlerInterceptor。
- 过滤器是用来设置request、response的参数,属性的,侧重对数据的过滤。拦截器是用来验证请求的,能截断请求【返回false】
- 过滤器是在拦截器之前 先执行的
- 过滤器是tomcat服务器创建的对象,拦截器是springmvc创建的对象
- 过滤器是一个执行时间点,拦截器有三个执行时间点
- 过滤器可以处理jsp,js,html等等,拦截器是侧重拦截对controller的请求,如果你的请求不能被中央调度器【DispatcherServlet】接收,那么他不会执行拦截器的内容
# 14.3、拦截器配置使用
- 定义拦截器
实现HandlerInterceptor接口,并重写方法。
public class MyHandlerInterceptor implements HandlerInterceptor {

    @Override
    public boolean preHandle(HttpServletRequest request, HttpServletResponse response, Object handler)
            throws Exception {
        System.out.println("MyHandlerInterceptor->preHandle");
        return true;
    }

    @Override
    public void postHandle(HttpServletRequest request, HttpServletResponse response, Object handler,
                           ModelAndView modelAndView) throws Exception {
        System.out.println("MyHandlerInterceptor->postHandle");
    }

    @Override
    public void afterCompletion(HttpServletRequest request, HttpServletResponse response, Object handler, Exception ex)
            throws Exception {
        System.out.println("MyHandlerInterceptor->afterCompletion");
    }

}
2
3
4
5
6
7
8
9
10
11
12
13
14
15
16
17
18
19
20
21
22
HandlerInterceptor接口方法解析
preHandle(HttpServletRequest request, HttpServletResponse response, Object handler)
- 该方法在请求处理器(Controller)方法执行之前调用,可以进行一些预处理操作。
- request:当前请求的HttpServletRequest对象。
- response:当前响应的HttpServletResponse对象。
- handler:被拦截的处理器(Controller中的方法)。
- 返回值:如果返回true,表示继续执行后续的拦截器和处理器链;如果返回false,表示不继续执行后续的拦截器和处理器,需要手动处理响应。
postHandle(HttpServletRequest request, HttpServletResponse response,
			Object handler, ModelAndView modelAndView)
2
- 该方法在请求处理器(Controller)方法执行之后,返回ModelAndView之前调用,可以对ModelAndView进行操作。
- request:当前请求的HttpServletRequest对象。
- response:当前响应的HttpServletResponse对象。
- handler:被拦截的处理器(Controller中的方法)。
- modelAndView:处理器返回的ModelAndView对象,可以对其进行修改。
- 在该方法中对ModelAndView的修改会影响最终的响应结果。
afterCompletion(HttpServletRequest request, HttpServletResponse response, Object handler, Exception ex)
- 该方法在整个请求处理完成后(包括视图渲染)调用,可以进行一些资源清理操作。
- request:当前请求的HttpServletRequest对象。
- response:当前响应的HttpServletResponse对象。
- handler:被拦截的处理器(Controller中的方法)。
- ex:如果有异常发生,该参数表示异常对象;如果没有异常,则为null。
- 该方法可以用于进行资源清理操作,如关闭数据库连接、释放资源等。
- 配置拦截器
在springmvc.xml配置文件中加入拦截器配置
拦截所有Controller类里的所有处理方法
<!-- 配置拦截器:-->
<mvc:interceptors>
	<!-- 会拦截所有Controller类里的所有处理方法 -->
	<bean class="com.xygalaxy.handler.MyHandlerInterceptor"></bean>
</mvc:interceptors>
2
3
4
5
只拦截某个请求路径的处理方法
<!-- 配置拦截器:-->
<mvc:interceptors>
	<!-- 可以配置多个拦截器  也可以配置bean 拦截器 拦截所有请求 -->
	<mvc:interceptor>
		<!-- 只拦截该路径 -->
		<mvc:mapping path="/**/login"/>
		<!-- 会拦截所有Controller类里的所有处理方法 -->
		<bean class="com.xygalaxy.handler.MyHandlerInterceptor"></bean>
	</mvc:interceptor>
</mvc:interceptors>
2
3
4
5
6
7
8
9
10
# 14.3、多拦截器执行顺序
多个拦截器中DispatcherServlet请求处理流程图 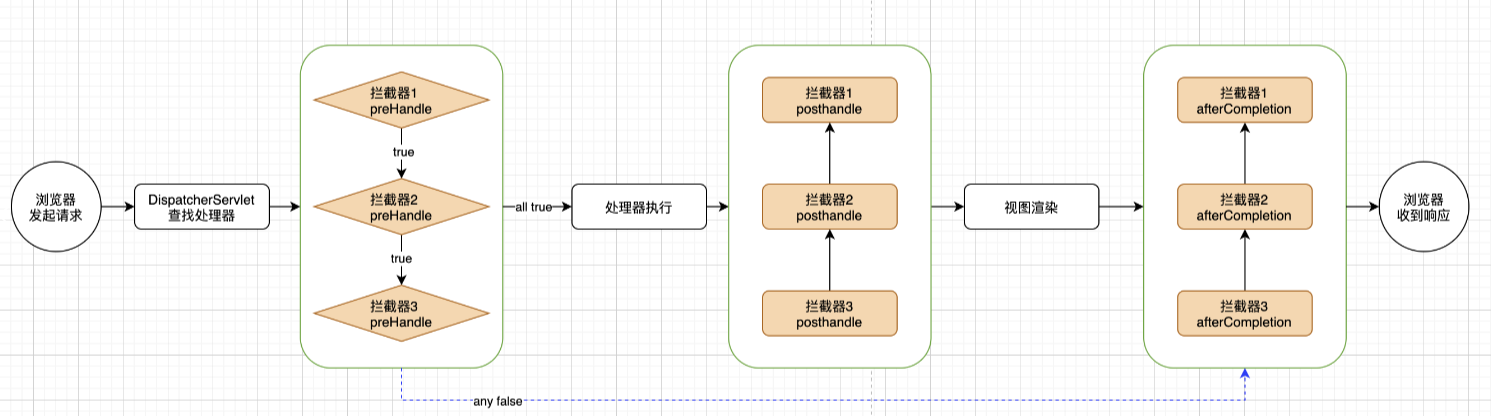
多拦截器执行顺序解析
- preHandle 按照拦截器的顺序先后执行。如果任意一次调用返回 false 则直接跳到拦截器的 afterCompletion 执行。
- postHandle 按照拦截器的逆序先后执行,也就说后面的拦截器先执行 postHandle。
- afterCompletion 也按照拦截器的逆序先后执行,后面的拦截器先执行 afterCompletion。
拦截器的顺序指定
- 对于 xml 配置来说,Spring 将记录 bean 声明的顺序,先声明的拦截器将排在前面。
- 对于注解配置来说,由于通过反射读取方法无法保证顺序,因此需要在方法上添加@Order注解指定 bean 的声明顺序。
- 对应API配置来说,拦截器的顺序并非和添加顺序完全保持一致,为了控制先后顺序,需要自定义的拦截器实现Ordered接口。
注解配置指定
@Configuration
public class MvcConfig {

    @Order(2)
    @Bean
    public MappedInterceptor loginInterceptor() {
        return new MappedInterceptor(new String[]{"/**"}, new String[]{"/login"}, new LoginInterceptor());
    }

    @Order(1)
    @Bean
    public MappedInterceptor logInterceptor() {
        return new MappedInterceptor(null, new LoginInterceptor());
    }

}
2
3
4
5
6
7
8
9
10
11
12
13
14
15
16
实现接口指定
public class LoginInterceptor implements HandlerInterceptor, Ordered {

    @Override
    public boolean preHandle(HttpServletRequest request, HttpServletResponse response, Object handler) throws Exception {
        System.out.println("已登录");
        return true;
    }

    @Override
    public int getOrder() {
        return 2;
    }
}

public class LogInterceptor implements HandlerInterceptor, Ordered {

    @Override
    public boolean preHandle(HttpServletRequest request, HttpServletResponse response, Object handler) throws Exception {
        System.out.println("请求来了");
        return true;
    }

    @Override
    public int getOrder() {
        return 1;
    }
}
2
3
4
5
6
7
8
9
10
11
12
13
14
15
16
17
18
19
20
21
22
23
24
25
26
27