SpringBoot 配置详解
我们上一章知道,SpringBoot默认提供了两个默认的全局配置文件,本章就对SpringBoot的配置进行详细说明使用。
- application.properties:默认Spring initializr默认自动生成的配置文件,也是我们属性的文件格式。
- application.yml:除了properties文件可以做为SpringBoot的配置文件以外,SpringBoot还支持另一种YAML配置文件。
# 1、配置数据读取
# 1.1、@ConfigurationProperties
@ConfigurationProperties:和配置文件绑定,可以从配置文件中的注入数据。
resource下创建application.properties配置文件并声明数据
user.username=张三
user.age=18
user.email=xygalaxy@163.com
user.sex=2
2
3
4
- 创建实体类,并读取配置文件中的数据
注意:实体类需要添加get和set方法或者@data注解,否则获取不到数据
@Data  // 自动生成getter和setter方法
@Component // 声明为Bean
@ConfigurationProperties(prefix = "user") // 读取配置文件中的user数据
class Student {

    private String username;

    private Integer age;

    private String email;

    private String sex;

}
2
3
4
5
6
7
8
9
10
11
12
13
14
- 测试使用
@SpringBootTest
@Slf4j
public class TestController {

    @Autowired
    private Student student;

    @Test
    public void test(){
        log.info("student===>"+ JSON.toJSONString(student));
    }
}

// 输出结果:student===>{"age":18,"email":"xygalaxy@163.com","sex":"2","username":"张三"}
2
3
4
5
6
7
8
9
10
11
12
13
14
注意:读属性文件出现中文出现乱码的解决办法在settings里 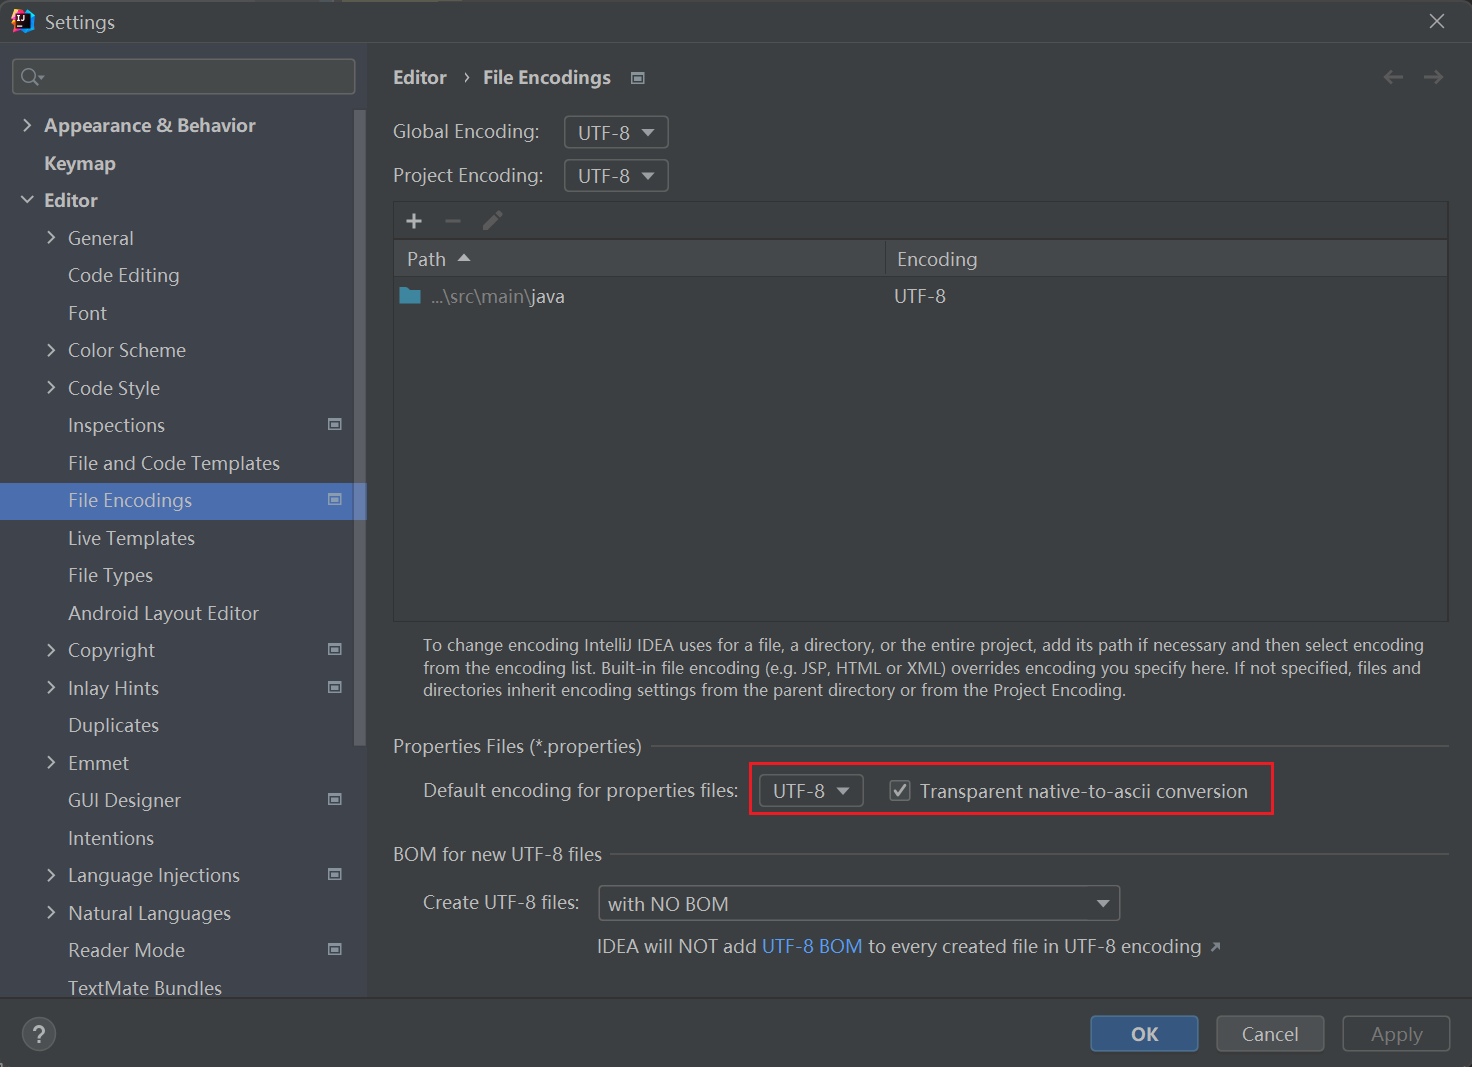
# 1.2、@Value
@Value获取全局配置文件中的某个配置项的数据。
- 创建实体类,并读取配置文件中的数据
@Data
@Component
class Student2 {

    @Value("${user.username}")
    private String username;

    @Value("${user.age}")
    private Integer age;

    @Value("${user.email}")
    private String email;

    @Value("${user.sex}")
    private String sex;

}
2
3
4
5
6
7
8
9
10
11
12
13
14
15
16
17
- 测试使用
@SpringBootTest
@Slf4j
public class TestController {

    @Autowired
    private Student2 student2;

    @Test
    public void test(){
        log.info("student2===>"+ JSON.toJSONString(student2));
    }
}

// 输出结果:student2===>{"age":18,"email":"xygalaxy@163.com","sex":"2","username":"张三"}
2
3
4
5
6
7
8
9
10
11
12
13
14
# 1.3、@ConfigurationProperties 对比 @Value
- @ConfigurationProperties:是和JavaBean的所有属性绑定;@Value:是一个一个属性绑定。
- @ConfigurationProperties:不支持spring表示式的写法;@Value:支持spring的表达式的写法,#{12+13}。
- @ConfigurationProperties:支持JSR303数据校验;@Value:不支持JSR303数据校验。
- @ConfigurationProperties:支持复杂的类型绑定,比如Map,List;@Value:不支持复杂的类型绑定,比如${user.map}是读不出数据的。
properties中定义list和map格式如下
user.list=list1,list2,list3
user.map.k1=${random.int}
2
JSR303数据校验,更多注解可以参考:SpringBoot注解详解-5、validation注解
@Data
@Component
@ConfigurationProperties(prefix = "user")
class Student {

    @NotEmpty(message = "不能为空")
    private String username;

    private Integer age;

    private String email;

    private String sex;

}
2
3
4
5
6
7
8
9
10
11
12
13
14
15
结论建议
- 当我们有JavaBean与全局配置文件里的数据对应的时候,我们就用@ConfigurationProperties注解。
- 当我们只是需要配置文件中某一个值的时候,就用@Value注解。
# 1.4、@PropertiySource
前面我们用的都是SpringBoot默认的application.properties配置文件,但如果把所有配置信息都放全局里面会太过臃肿,随着项目越来越大,配置文件会越来越多,所以我们可以把一些配置信息拆分出来,比如:数据库的信息放到jdbc.properties文件中,日志信息放到logback.properties文件中。
@PropertiySource读取外部属性文件。
接下来我们将application.properties的user信息拆分出来放到user.properties中。
- 创建
user.properties文件,并配置数据
user3.username=李四
user3.age=18
user3.email=xygalaxy@163.com
user3.sex=1
2
3
4
- 创建实体类,并读取
user.properties文件中的数据
@Data
@Component
@PropertySource(value = {"classpath:user.properties"})
@ConfigurationProperties(prefix = "user3")
class Student3 {

    private String username;

    private Integer age;

    private String email;

    private String sex;

}
2
3
4
5
6
7
8
9
10
11
12
13
14
15
- 测试使用
@SpringBootTest
@Slf4j
public class TestController {

    @Autowired
    private Student3 student3;

    @Test
    public void test(){
        log.info("student3===>"+ JSON.toJSONString(student3));
    }

}
// 测试结果:student3===>{"age":18,"email":"xygalaxy@163.com","sex":"1","username":"李四"}
2
3
4
5
6
7
8
9
10
11
12
13
14
# 1.5、随机值和使用变量
配置文件中还可以使用随机值,引用别的变量。
user.username=张三==>${random.int(20)}==>${没定义变量:ccc}==>${user.age:ddd}
user.age=18
user.email=xygalaxy@163.com
user.sex=2

# 测试结果:student===>{"age":18,"email":"xygalaxy@163.com","sex":"2","username":"张三==>10==>ccc==>18"}
2
3
4
5
6

注意:例如int随机值不限制,范围为int最小值到int最大值:【-2^31 ~ 2^31 - 1】也就是【-2147483648 ~ 2147483647】
# 1.6、引入自定义配置文件
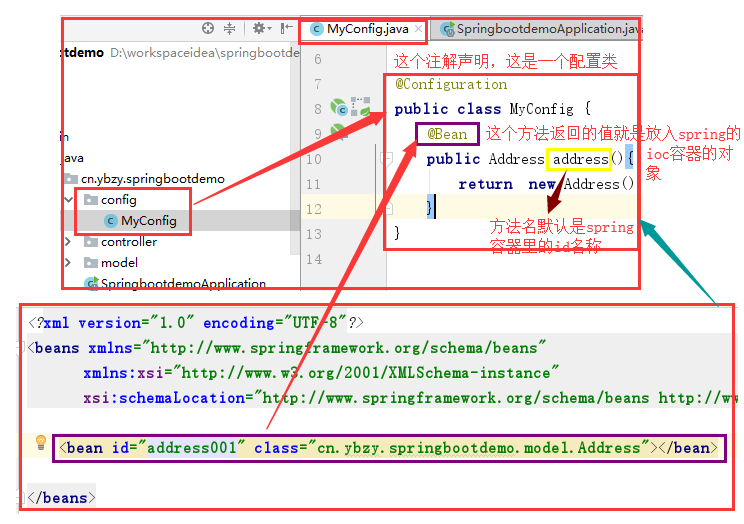
@ImportResource引入自定义spring的配置xml文件,但SpringBoot不推荐使用这种方式,XML配置的话就违背了SpringBoot的初衷。我们更多的使用配置类注解完成。
创建一个新的spring配置文件
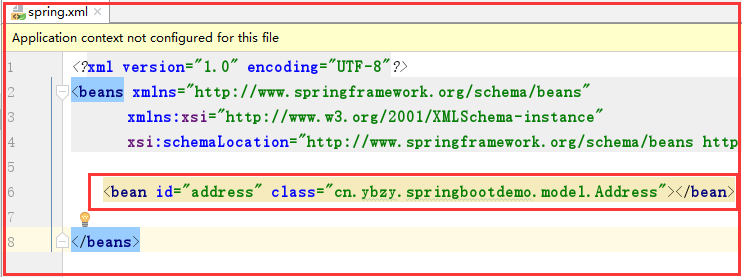
程序口入,主类上加注解

测试

配置类方式
# 2、多环境配置
开发项目的时候,我们可能会有多套环境,比如开发环境、测试环境、生产环境。每个环境的一些配置都是不一样的,如果我们单环境来切换的话,频繁修改配置文件,显得很麻烦,而且容易出错。比如:测试环境和生产环境数据库一般都不同,所以就需要多环境配置。
# 2.1、单文件多环境
application.yml
spring.profiles.active:指定使用哪个环境,激活指定环境。---: 环境分隔符。- 部署启动java应用时,可以通过
--spring.profiles.active=prod进行切换。
完整部署java服务命令
java -jar xxx.jar --spring.profiles.active=prod
# 默认环境
server:
  port: 8080

spring:
  profiles:
    active: dev # 使用dev环境

---  # 环境分隔符
# 测试环境
spring:
  profiles: dev  # 声明该环境为dev环境
  # 数据源配置
  datasource:
    driver-class-name: com.mysql.jdbc.Driver
    url: jdbc:mysql://localhost:3306/xygalaxy?useSSL=false&useUnicode=true&characterEncoding=utf8
    username: root
    password: 123456
server:
  port: 8081


---  # 环境分隔符
# 生产环境
spring:
  profiles: prod # 声明该环境为dev环境
  # 数据源配置
  datasource:
    driver-class-name: com.mysql.jdbc.Driver
    url: jdbc:mysql://localhost:3306/xygalaxy?useSSL=false&useUnicode=true&characterEncoding=utf8
    username: root-prod
    password: 123456-prod
server:
  port: 8082
2
3
4
5
6
7
8
9
10
11
12
13
14
15
16
17
18
19
20
21
22
23
24
25
26
27
28
29
30
31
32
33
34
# 2.2、多文件多环境
单配置文件多环境的话容易混乱,不好维护,所以一般会采用多配置文件的方式。将一些不变并且常用的配置直接放在默认配置环境,将数据库或者其他一些不同的配置放在不同的环境文件中。部署时,只要选择启动的环境即可。
- 除了
application.yml已经有了,再创建其他两个环境文件。
application.yml
application-dev.yml
application-prod.yml
2
3
- application.yml
spring:
  profiles:
    active: application-dev # 启动环境文件名称
2
3
- application-dev.yml
# 测试环境
spring:
  profiles: dev
  # 数据源配置
  datasource:
    driver-class-name: com.mysql.jdbc.Driver
    url: jdbc:mysql://localhost:3306/xygalaxy?useSSL=false&useUnicode=true&characterEncoding=utf8
    username: root
    password: 123456
2
3
4
5
6
7
8
9
- application-prod.yml
# 生产环境
spring:
  profiles: prod
  # 数据源配置
  datasource:
    driver-class-name: com.mysql.jdbc.Driver
    url: jdbc:mysql://localhost:3306/xygalaxy?useSSL=false&useUnicode=true&characterEncoding=utf8
    username: root-prod
    password: 123456-prod
2
3
4
5
6
7
8
9
# 2.3、多配置文件优先级
- 项目的根目录/config/:最高优先级
- 项目的根目录/:第二优先级
- 类路径/config/:第三优先级
- 类路径/:第四优先级
如果这四个位置都有配置文件,那么四个配置文件都会生效,只不过四个配置文件中的相同配置项,生效的是高优先级的配置文件里的配置项!
# 2.4、运行时修改配置
在项目已经打包运行后,我们有时候是需要修改配置的,这时还可以在jar的外面,新建一个配置文件,然后运行jar命令后面跟上 --spring.config.location=x:xxxx/application.properties,那么这个新配置文件会覆盖jar里的配置文件里的相同配置项的配置。外面的这个配置文件优先级最最高!
# 3、banner图配置
启动时默认时SpringBoot的Banner图,我们可以进行修改。
配置信息说明
${AnsiColor.BRIGHT_RED}:设置控制台中输出内容的颜色${application.version}:用来获取MANIFEST.MF文件中的版本号${application.formatted-version}:格式化后的${application.version}版本信息${spring-boot.version}:Spring Boot的版本号${spring-boot.formatted-version}:格式化后的${spring-boot.version}版本信息
配置内容生成网站
- 在resource下新建banner.txt
${AnsiColor.BRIGHT_BLUE}
${spring-boot.version}

                                | |
 __  __  _   _    __ _    __ _  | |   __ _  __  __  _   _
 \ \/ / | | | |  / _` |  / _` | | |  / _` | \ \/ / | | | |
  >  <  | |_| | | (_| | | (_| | | | | (_| |  >  <  | |_| |
 /_/\_\  \__, |  \__, |  \__,_| |_|  \__,_| /_/\_\  \__, |
          __/ |   __/ |                              __/ |
         |___/   |___/                              |___/

//                          _ooOoo_                               //
//                         o8888888o                              //
//                         88" . "88                              //
//                         (| ^_^ |)                              //
//                         O\  =  /O                              //
//                      ____/`---'\____                           //
//                    .'  \\|     |//  `.                         //
//                   /  \\|||  :  |||//  \                        //
//                  /  _||||| -:- |||||-  \                       //
//                  |   | \\\  -  /// |   |                       //
//                  | \_|  ''\---/''  |   |                       //
//                  \  .-\__  `-`  ___/-. /                       //
//                ___`. .'  /--.--\  `. . ___                     //
//              ."" '<  `.___\_<|>_/___.'  >'"".                  //
//            | | :  `- \`.;`\ _ /`;.`/ - ` : | |                 //
//            \  \ `-.   \_ __\ /__ _/   .-` /  /                 //
//      ========`-.____`-.___\_____/___.-`____.-'========         //
//                           `=---='                              //
//      ^^^^^^^^^^^^^^^^^^^^^^^^^^^^^^^^^^^^^^^^^^^^^^^^^^        //
//            佛祖保佑       永不宕机     永无BUG                 //
2
3
4
5
6
7
8
9
10
11
12
13
14
15
16
17
18
19
20
21
22
23
24
25
26
27
28
29
30
31
- application.yml配置 这里会出现中文乱码,改为GBK可以正常显示中文
spring:
  banner:
    charset: GBK

# 其他配置,有兴趣可以去了解下
# spring.banner.location=classpath:banner1.png
# spring.banner.image.margin=2
# spring.banner.image.height=76
# spring.banner.charset=UTF-8
# spring.banner.image.invert=false
# spring.banner.image.location=banner1.png
# spring.main.banner-mode=console
# spring.main.show-banner=true
2
3
4
5
6
7
8
9
10
11
12
13
- 测试效果

# 4、核心配置文件解析
SpringBoot核心配置文件application.properties可以配置很多内容,对于SpringBoot如何读取这些配置信息的细节我们需要了解一下。
# 4.1、application.properties读取细节
- SpringBoot给我们做了很多默认配置,这些配置,具体配置在哪个文件里:
spring-boot-autoconfigure-2.0.5.RELEASE.jar里的META-INF/spring.factories/EnableAutoConfiguration属性里。 EnableAutoConfiguration属性指定了一大推的配置类XxxxAutoConfiguration。SpringBoot是用这些配置类来代替了我们在Spring中使用的xml格式的配置文件。- 在这些配置类中都通过了一个注解
@EnableConfigurationProperties指向了一个XxxxxxProperties的类。 XxxxxxProperties的类又用注解@ConfigurationProperties关联上了我们SpringBoot的全局配置文件。从全局配置文件中读取数据。
XxxxxxProperties的类里的属性案例 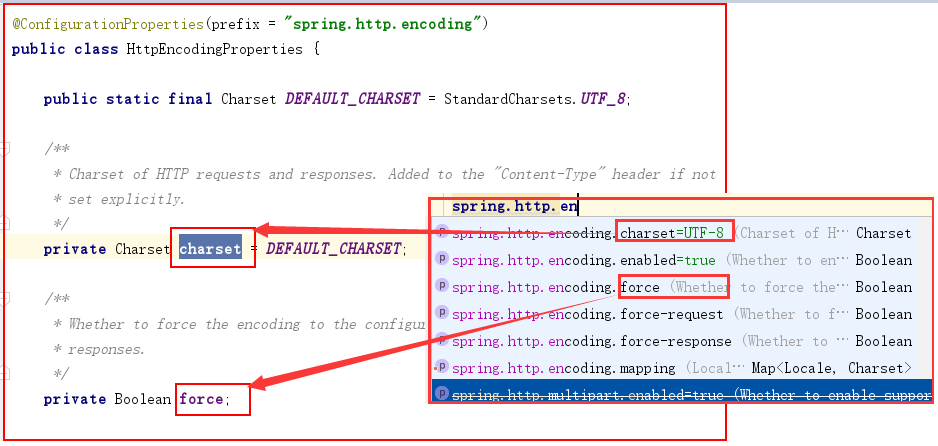
# 4.2、默认配置生效判断
SpringBoot默认写好的这些配置类不是都在初始的状态下已经生效的,SpringBoot里的默认的配置类里的配置项要生效都是有条件的,配置类中通过了一些列@ConditionalXXX注解进行判断,只有这些条件都返回true,这个配置才会起作用!
关于@ConditionalXXX注解,参考:SpringBoot注解详解-conditionalonclass。
默认的配置生效情况查看
- 在全局配置文件中设置debug=true后运行主方法
application.yml配置
debug: true
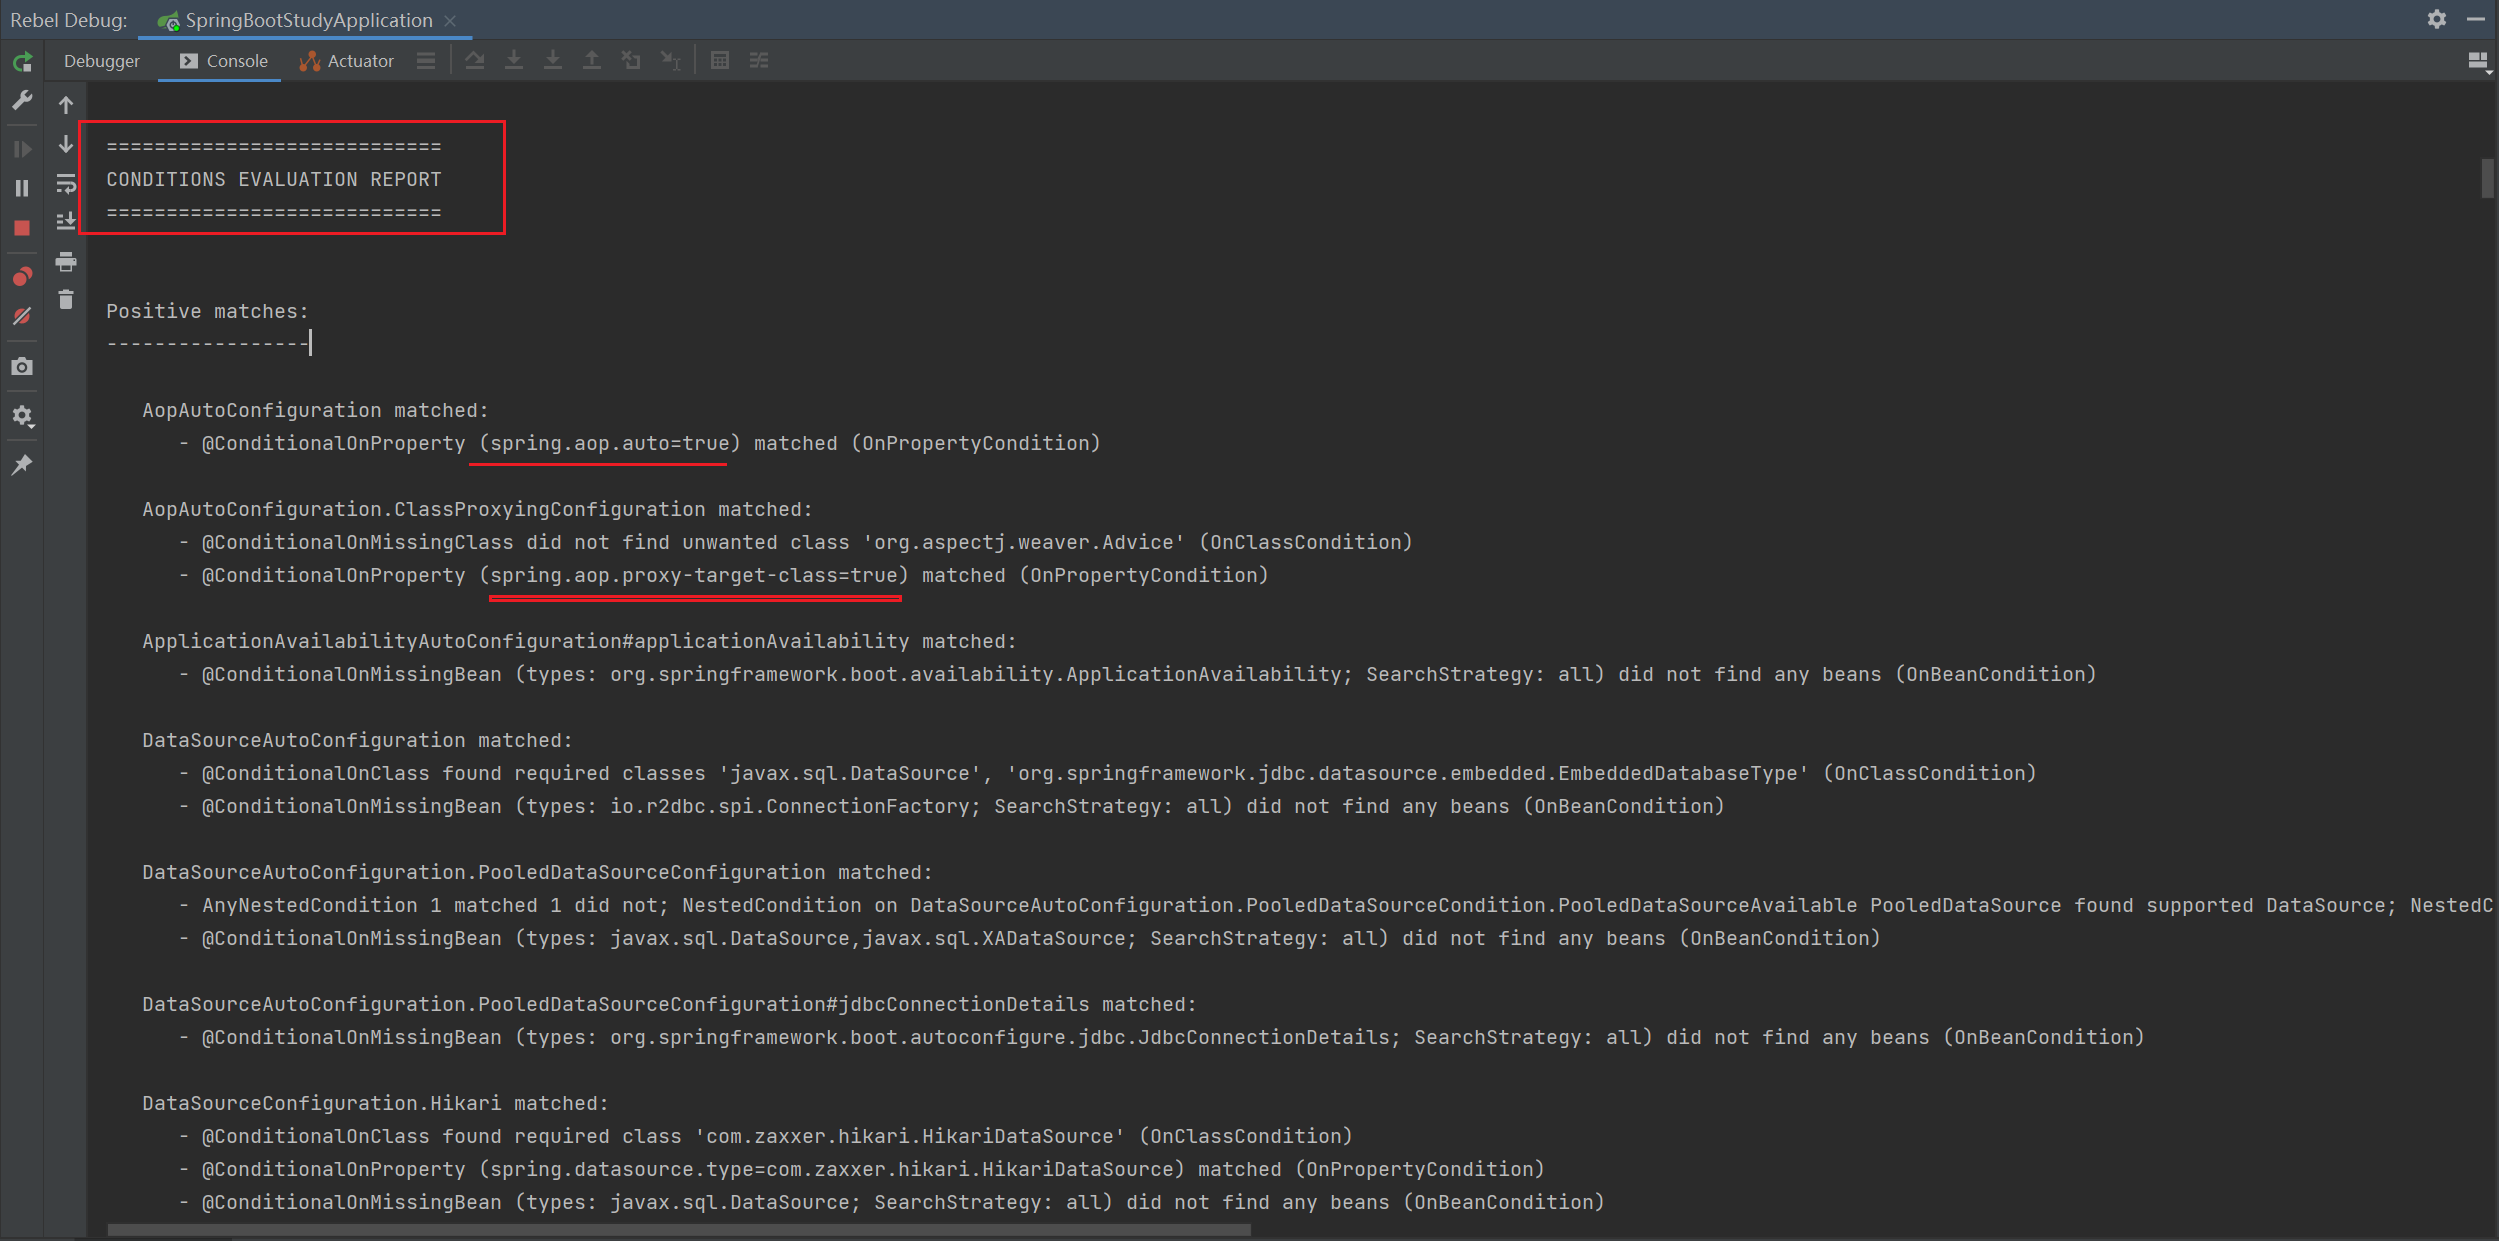
- 运行主方法后,查看控制台打印的日志信息,将会生成一份超长的条件评估报告
