SpringBoot 初识
半塘 2024/1/18 SpringBoot 框架
# 1、SpringBoot 介绍
# 1.1、什么是SpringBoot
- Spring Boot是由Pivotal团队提供的一套开源框架,可以简化spring应用的创建及部署。(J2EE一站式解决方案)
- SpringBoot是伴随Spring4.0的时候发布的一个框架
- SpringBoot来简化Spring应用的开发,约定大于配置,去繁从简。
- 简单的说,spring boot就是整合了很多优秀的框架,不用我们自己手动的去写一堆xml来进行配置。
从本质上来说,Spring Boot就是Spring,它做了那些没有它你也会去做的Spring Bean配置。它使用“约定优于配置”(项目中存在大量的配置,此外还内置了一个习惯性的配置,让你无需手动进行配置)的理念让你的项目快速运行起来。使用Spring Boot很容易创建一个独立运行(运行jar,内嵌Servlet容器)、准生产级别的基于Spring框架的项目,使用Spring Boot你可以不用或者只需要很少的Spring配置。
# 1.2、框架特点
- 创建独立的spring应用。
- 嵌入Tomcat, Jetty, Undertow 而且不需要部署他们。
- 提供的“starters”来简化Maven配置
- 尽可能自动配置spring应用,绝对没有代码生成和XML配置要求。
- 提供生产指标,健壮检查和外部化配置
# 1.3、优缺点
- 优点
- 快速创建独立运行的Spring项目以及主流框架集成【一步完成,十分便捷】
- 使用嵌入式Servlet容器,应用无需打成war包【开发web应用时,无需达成war包,jar包也行】
- starters自动依赖于版本控制【自动管理】
- 大量的自动配置,简化开发,也可修改默认值【不需要写很多的配置文件】
- 无需配置xml,没有代码生成,开箱即用【没有xml,也不是用代码底层生成的xml,就是不需要配置】
- 准生产话环境的运行时应用监控【运维使用】`
- 与云计算的天然集成
- 缺点
- SpringBoot是spring的一个再封装,如果不了解spring,那么学Springboot很费劲。
- 说起来就是:入门易,精通难,它没有增强spring的功能,只是帮助我们做了很多本需要我们自己做的配置整合工作,本质还是我们以前学习的那些框架知识的应用。
# 1.4、微服务
将子系统拆成一个一个的jar包运行就是微服务。Spring Boot算是微服务开发的入门级框架。
微服务架构示例图 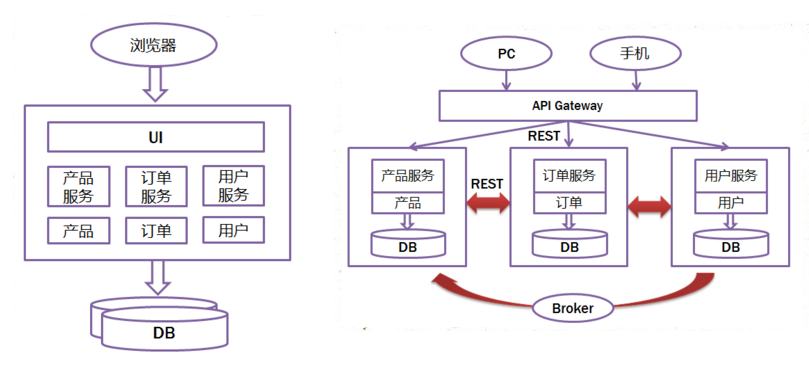
- 单体应用: ALL IN ONE,以前的架构风格,所有的东西都写在一个应用里面。
- 微服务:一个应用应该是一组小型服务。每一个服务通过http的方式进行互通,每个功能元素最终都是一个可独立替换和独立升级的软件单元。
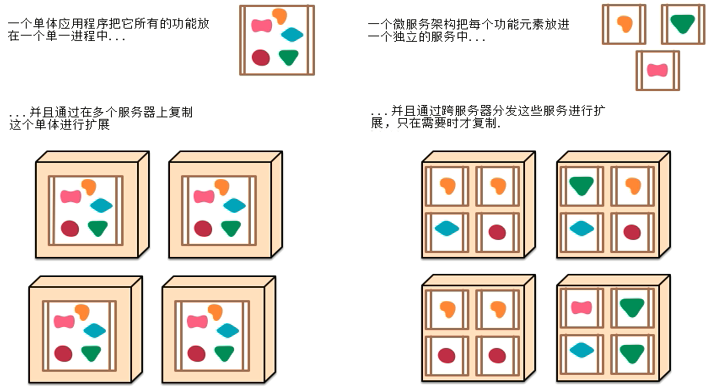
能用单体应用开发的应用,尽量不用微服务。
- 比如个人开发项目单体应用足够了,微服务成本比较大,一般企业级应用用的比较多。
- 微服务就是一种架构风格,掌握还是必要的。
# 2、简单案例
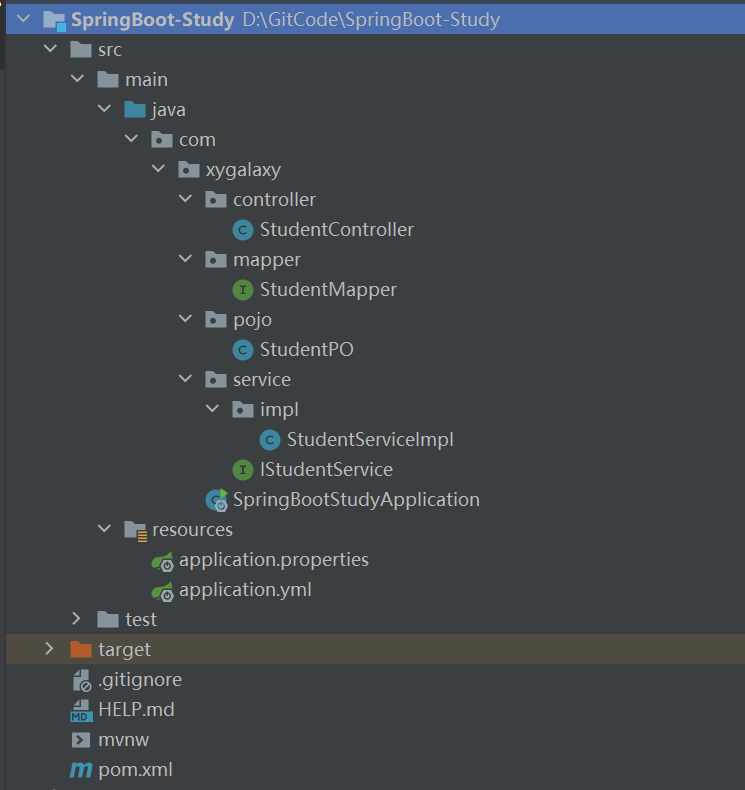
本案例以SpringBoot整合SSM为例,演示SpringBoot的基本用法。
- 项目结构
- 创建数据库表及数据
create table student
(
    id        bigint            not null comment '主键ID' primary key,
    name      varchar(30)       null comment '姓名',
    age       int               null comment '年龄',
    email     varchar(50)       null comment '邮箱',
    version   int               null comment '更新版本',
    sex       int               null comment '性别',
    is_delete tinyint default 0 null comment '是否删除'
);

INSERT INTO xygalaxy.student (id, name, age, email, version, sex, is_delete) VALUES (1, 'Jone', 18, 'test1@xygalaxy.com', 1, 1, 0);
INSERT INTO xygalaxy.student (id, name, age, email, version, sex, is_delete) VALUES (2, 'Jack', 20, 'test2@xygalaxy.com', 1, 2, 0);
INSERT INTO xygalaxy.student (id, name, age, email, version, sex, is_delete) VALUES (3, 'Tom', 28, 'test3@xygalaxy.com', 1, 2, 0);
INSERT INTO xygalaxy.student (id, name, age, email, version, sex, is_delete) VALUES (4, 'Sandy', 21, 'test4@xygalaxy.com', 1, 1, 0);
INSERT INTO xygalaxy.student (id, name, age, email, version, sex, is_delete) VALUES (5, 'Billie', 24, 'test5@xygalaxy.com', 1, 2, 0);
1
2
3
4
5
6
7
8
9
10
11
12
13
14
15
16
2
3
4
5
6
7
8
9
10
11
12
13
14
15
16
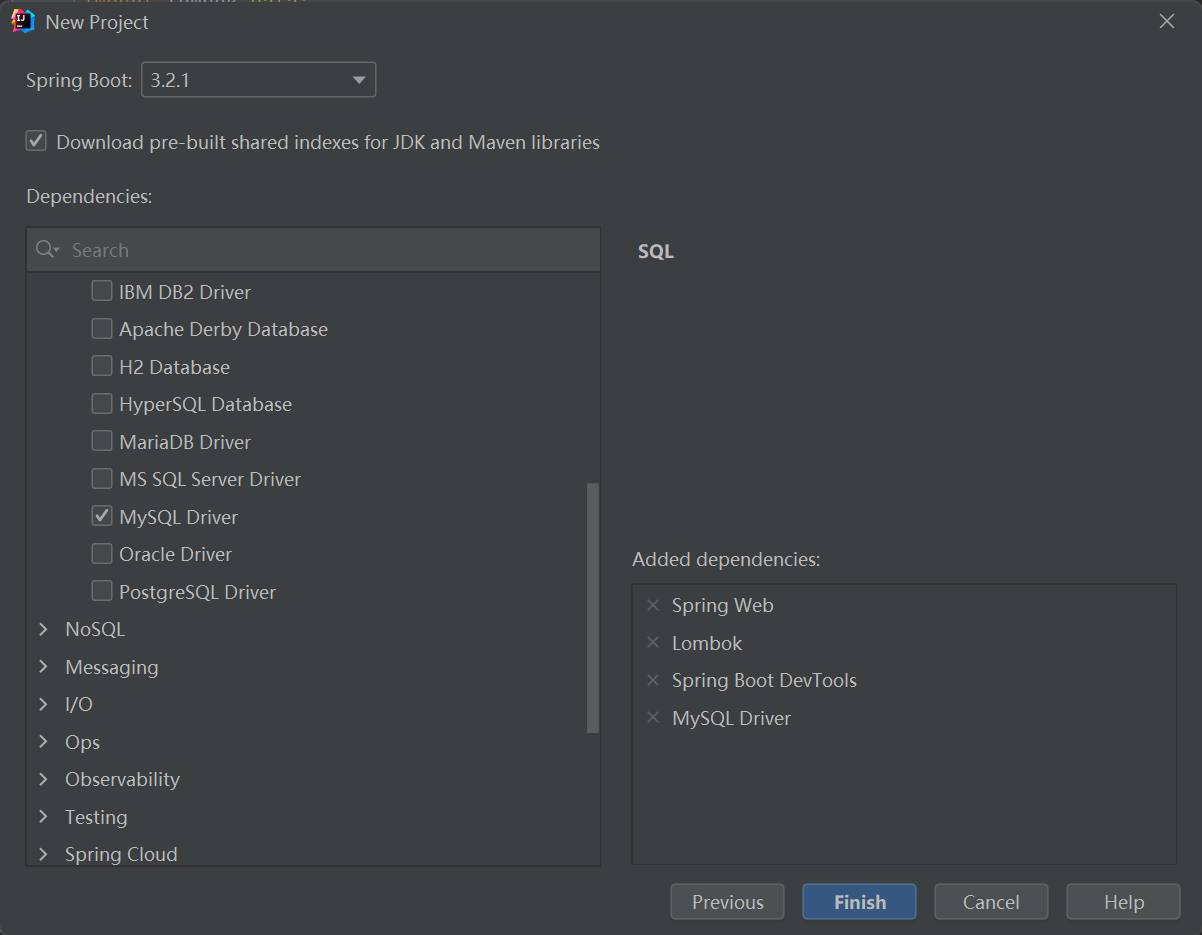
# 2.1、创建SpringBoot项目
创建项目
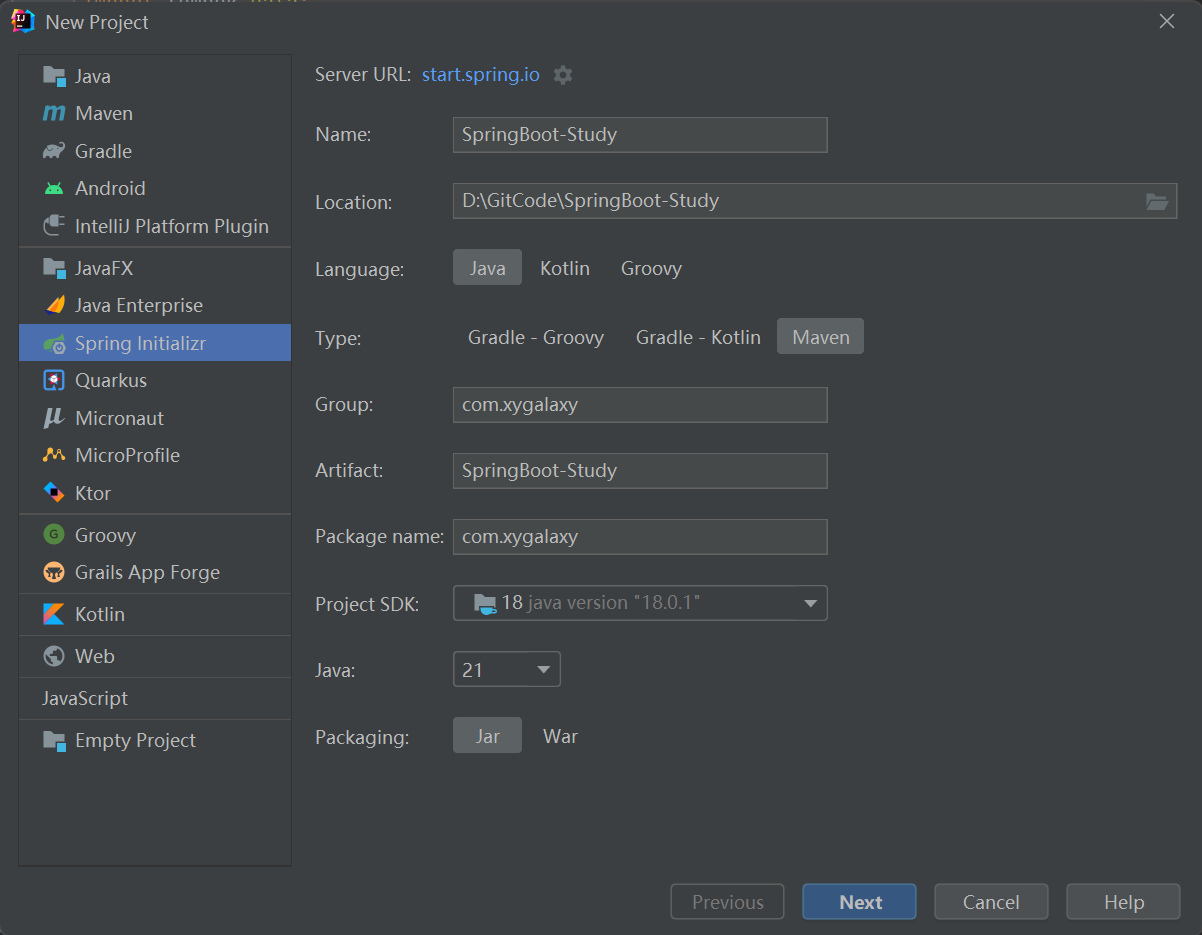
选择需要的依赖:配置依赖有详细说明,因为还要一些其他的依赖,这里不配置也行,直接在pom.xml配置
# 2.2、配置依赖
<?xml version="1.0" encoding="UTF-8"?>
<project xmlns="http://maven.apache.org/POM/4.0.0" xmlns:xsi="http://www.w3.org/2001/XMLSchema-instance"
         xsi:schemaLocation="http://maven.apache.org/POM/4.0.0 https://maven.apache.org/xsd/maven-4.0.0.xsd">
    <modelVersion>4.0.0</modelVersion>
    <parent>
        <groupId>org.springframework.boot</groupId>
        <artifactId>spring-boot-starter-parent</artifactId>
        <version>3.1.7</version>
        <relativePath/> <!-- lookup parent from repository -->
    </parent>
    <groupId>com.xygalaxy</groupId>
    <artifactId>SpringBoot-Study</artifactId>
    <version>0.0.1-SNAPSHOT</version>
    <name>SpringBoot-Study</name>
    <description>SpringBoot-Study</description>
    <properties>
        <java.version>17</java.version>
    </properties>

    <dependencies>
        <!-- Spring Web依赖,主要提供SpringMVC相关 -->
        <dependency>
            <groupId>org.springframework.boot</groupId>
            <artifactId>spring-boot-starter-web</artifactId>
        </dependency>
        <!-- 热部署 -->
        <dependency>
            <groupId>org.springframework.boot</groupId>
            <artifactId>spring-boot-devtools</artifactId>
            <scope>runtime</scope>
            <optional>true</optional>
        </dependency>

        <!-- springboot依赖 -->
        <dependency>
            <groupId>org.springframework.boot</groupId>
            <artifactId>spring-boot-starter</artifactId>
        </dependency>
        <!-- springboot测试依赖 -->
        <dependency>
            <groupId>org.springframework.boot</groupId>
            <artifactId>spring-boot-starter-test</artifactId>
            <version>RELEASE</version>
            <scope>compile</scope>
        </dependency>

        <!-- MybatisPlus依赖 -->
        <dependency>
            <groupId>com.baomidou</groupId>
            <artifactId>mybatis-plus-boot-starter</artifactId>
            <version>3.5.5</version>
        </dependency>
        <!-- 连接数据库依赖 -->
        <dependency>
            <groupId>mysql</groupId>
            <artifactId>mysql-connector-java</artifactId>
            <version>5.1.34</version>
        </dependency>
        <!--  lombok简化实体  -->
        <dependency>
            <groupId>org.projectlombok</groupId>
            <artifactId>lombok</artifactId>
            <version>RELEASE</version>
            <scope>compile</scope>
        </dependency>

    </dependencies>

    <build>
        <plugins>
            <plugin>
                <groupId>org.springframework.boot</groupId>
                <artifactId>spring-boot-maven-plugin</artifactId>
            </plugin>
            <plugin>
                <groupId>org.apache.maven.plugins</groupId>
                <artifactId>maven-compiler-plugin</artifactId>
                <configuration>
                    <source>16</source>
                    <target>16</target>
                </configuration>
            </plugin>
        </plugins>
    </build>

</project>
1
2
3
4
5
6
7
8
9
10
11
12
13
14
15
16
17
18
19
20
21
22
23
24
25
26
27
28
29
30
31
32
33
34
35
36
37
38
39
40
41
42
43
44
45
46
47
48
49
50
51
52
53
54
55
56
57
58
59
60
61
62
63
64
65
66
67
68
69
70
71
72
73
74
75
76
77
78
79
80
81
82
83
84
85
86
2
3
4
5
6
7
8
9
10
11
12
13
14
15
16
17
18
19
20
21
22
23
24
25
26
27
28
29
30
31
32
33
34
35
36
37
38
39
40
41
42
43
44
45
46
47
48
49
50
51
52
53
54
55
56
57
58
59
60
61
62
63
64
65
66
67
68
69
70
71
72
73
74
75
76
77
78
79
80
81
82
83
84
85
86
# 2.3、MVC分层
- 创建实体类
@Data
@TableName("student")
public class StudentPO {

    @TableId(value = "id",type = IdType.ASSIGN_ID)
    private Long id;

    @TableField(value = "name")
    private String name;

    @TableField(value = "age")
    private Integer age;

    @TableField(value = "email")
    private String email;

    @TableField(value = "sex")
    private String sex;

    @TableField(value = "version")
    @Version
    private Integer version;

    @TableField("is_delete")
    @TableLogic(value = "0",delval = "1")
    private Integer isDelete = 0;
}
1
2
3
4
5
6
7
8
9
10
11
12
13
14
15
16
17
18
19
20
21
22
23
24
25
26
27
2
3
4
5
6
7
8
9
10
11
12
13
14
15
16
17
18
19
20
21
22
23
24
25
26
27
- 创建Mapper接口
@Mapper
public interface StudentMapper extends BaseMapper<StudentPO> {

}
1
2
3
4
2
3
4
- 创建Service接口和实现类
接口
public interface IStudentService extends IService<StudentPO> {

}
1
2
3
2
3
实现类
@Service
public class StudentServiceImpl extends ServiceImpl<StudentMapper, StudentPO> implements IStudentService {

}
1
2
3
4
2
3
4
- 创建Controller
@RestController
@RequestMapping("/student")
public class StudentController {

    @Autowired
    private StudentServiceImpl studentService;

    @RequestMapping("/list")
    public List<StudentPO> userList(){
        return studentService.list();
    }

}
1
2
3
4
5
6
7
8
9
10
11
12
13
2
3
4
5
6
7
8
9
10
11
12
13
# 2.4、启动类配置
启动类创建项目就有了,@SpringBootApplication注解为启动类,并配置Mapper接口扫描。
@SpringBootApplication
@MapperScan("com.xygalaxy.mapper")
public class SpringBootStudyApplication {

    public static void main(String[] args) {
        SpringApplication.run(SpringBootStudyApplication.class, args);
    }

}
1
2
3
4
5
6
7
8
9
2
3
4
5
6
7
8
9
# 2.5、application.yml配置
主要配置数据库和开启MyBatis-Plus的日志功能。
# 配置访问端口
server:
  port: 8080

# 数据源配置
spring:
  datasource:
    driver-class-name: com.mysql.jdbc.Driver
    url: jdbc:mysql://localhost:3306/xygalaxy?useSSL=false&useUnicode=true&characterEncoding=utf8
    username: root
    password: 123456

# 开启日志
mybatis-plus:
  configuration:
    log-impl: org.apache.ibatis.logging.stdout.StdOutImpl
  global-config:
    db-config:
      table-prefix: test.
1
2
3
4
5
6
7
8
9
10
11
12
13
14
15
16
17
18
19
2
3
4
5
6
7
8
9
10
11
12
13
14
15
16
17
18
19
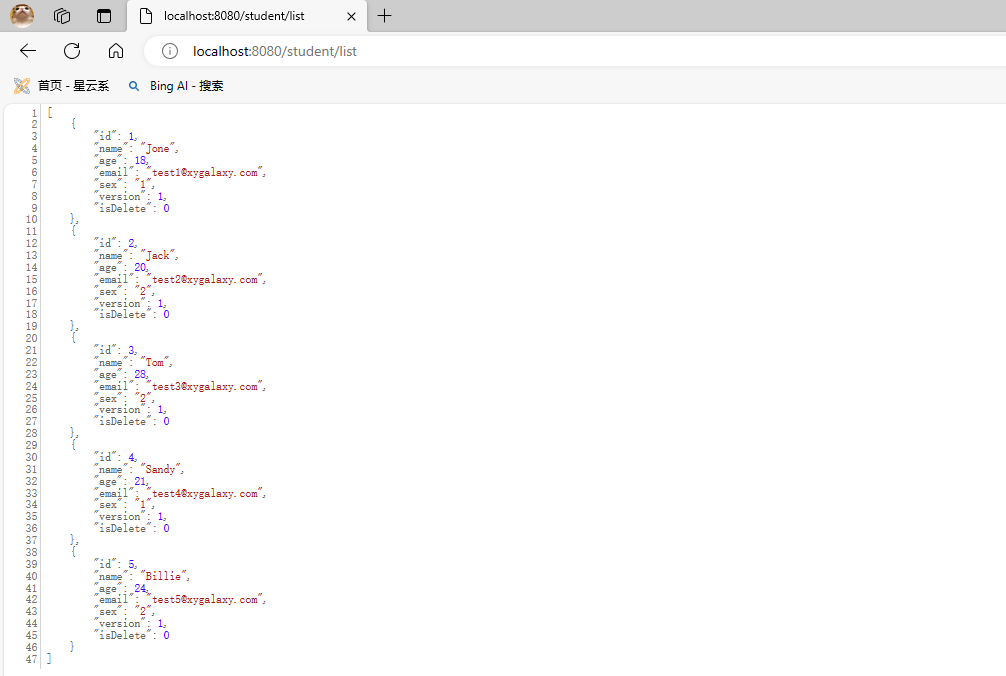
# 2.6、测试
启动类运行

浏览器访问
http://localhost:8080/student/list
// 或者
http://127.0.0.1:8080/student/list
1
2
3
2
3
访问结果
# 3、配置文件
# 3.1、全局配置文件
SpringBoot的有两种格式的全局配置文件,使用任何一个功能都是一样的,配置文件名是固定的 (放在resources目录下)
- application.properties:默认Spring initializr默认自动生成的配置文件,也是我们属性的文件格式。
- application.yml:除了properties文件可以做为SpringBoot的配置文件以外,SpringBoot还支持一种我们以前没接触过的配置文件,这就是YAML配置文件。
# 3.2、配置文件的作用
修改SpringBoot项目配置的默认值。
- SpringBoot在底层都给我们自动配置好了默认值,如果想改就需要使用配置文件修改配置即可。
- 约定大于配置的体现就是SpringBoot已经帮我们配置了所需的配置默认值,只是我们不想用默认值可以通过配置文件修改。
# 3.3、properties配置语法
在Mybatis章节中,我们用到了properties文件来进行保存数据库信息,其实语法是一样的。
jdbc.driver=com.mysql.jdbc.Driver
jdbc.url=jdbc:mysql://localhost:3306/xygalaxy?useSSL=false&useUnicode=true&characterEncoding=utf8
jdbc.username=root
jdbc.password=123456
1
2
3
4
2
3
4
# 4、YAML语法
- YAML(又称为 "Yet Another Markup Language")是一种可读的数据序列化格式。它的设计目标是简洁、易读、易于编写,并可以被各种编程语言解析和生成。
- YAML不是标记语言,它的主要用途是作为配置文件和数据传输的格式。
- YAML 的文件通常使用 ".yaml" 或 ".yml" 的文件扩展名来表示文件的格式。这两种扩展名没有实质性的差别,只是简单的表示文件使用 YAML 格式进行编写。具体哪种扩展名使用取决于个人或团队的偏好。
# 4.1、语法格式
- 基本格式:
key: value表示一对键值对,注意:键值对中的值前面必须有空格,多少个无所谓,但必须有,这是语法。 - 靠键左对齐来区分层级关系,也就是说凡是左对齐的键值对都是一个层次的

- 大小写敏感,严格区分大小写的
#进行注释
# 4.2、值写法
- 字符串默认不用引号引起来,在值里用不会转义特殊字符,\n会换行,会转义特殊字符,\n会输出
- 对象或Map集合的表示方法有两种,一种是用换行+缩进,另一种是利用大括号

- 数组或List集合也有两种表达方式

# 4.3、YAML案例
等价与properties配置文件配置数据库
# 数据源配置
spring:
  datasource:
    driver-class-name: com.mysql.jdbc.Driver
    url: jdbc:mysql://localhost:3306/xygalaxy?useSSL=false&useUnicode=true&characterEncoding=utf8
    username: root
    password: 123456
1
2
3
4
5
6
7
2
3
4
5
6
7